
Table of Contents
Introduction
Laravel eloquent is really a strongest point of Laravel Framework, it provides lot of advantages to code fast and in an efficient way.
Eloquent relationship is one of the major feature and you should know it’s usage in a correct manner so that you can utilise relationships in your projects.
Throughout this Laravel Eloquent Relationship tutorial series I am going to explain each and every available Laravel eloquent relationship type with examples.
What is Relationship?
Here we are actually talking about the the relationship between a database table to another database table so keep that in mind.
So basically relationship means an object connected to another object or properties.
What is One to One Relationship?
One to One relationship are very simple it is basically one item attached to another.
Think about a particular User from your project, a user can have address, phone number, profile etc all of this are basically a one to one relationship examples.
So for example A User has a One Address or A User has a one Profile or User has one Website.
You can think about it depending on your project type and you can understand. just ask question to yourself for example what are the things user might have associated? and if you find the answer ask another question is it one for one user or multiple? if it is one then you can call it one to one relationship.
This is all a theoretical examples, let’s see how we can implement this practically with laravel project.
Go ahead and create new laravel application.
How to use One to One relationship?
Okay so I assume you have already created a Laravel project or you must have an existing laravel project with you. If not you can simply go ahead and create new laravel project on you development environment.
In my case I am using Laravel 5.8 at the time of writing this tutorial, keep in mind this tutorial helps for all developers who are using Laravel 5 or greater than that.
Let’s implement relationship between User and Profile as an example
Setup Model and Database Migration
Create new Model and Migration for User Websites, go ahead and execute following command from your project directory to generate Model and a migration file.
$ php artisan make:model Profile -mModel created successfully.
Created Migration: 2019_04_15_165745_create_profiles_table
Now go ahead and open up xxx_create_profiles_table migration file from database/migrations folder and add new fileds as showing below:
<?php

use Illuminate\Support\Facades\Schema;
use Illuminate\Database\Schema\Blueprint;
use Illuminate\Database\Migrations\Migration;

class CreateProfilesTable extends Migration
{
    /**
     * Run the migrations.
     *
     * @return void
     */
    public function up()
    {
        Schema::create('profiles', function (Blueprint $table) {
            $table->bigIncrements('id');
            $table->unsignedInteger('user_id');
            $table->string('github_url')->nullable();
            $table->string('website_url')->nullable();
            $table->string('twitter_uri')->nullable();
            $table->timestamps();
        });
    }

    /**
     * Reverse the migrations.
     *
     * @return void
     */
    public function down()
    {
        Schema::dropIfExists('profiles');
    }
}
After reading the above migration design you might be thinking that couldn’t be this fields can be added as part of users table and the my reply is may be we can this is actually a important thing to understand I personally feel like organising things is more better way.
Next create new MySQL database and set database connection into your .env file, so that you can migrate the database.
Now we are ready to create profiles table, use following command to migrate the database
$ php artisan migrateAbove command should output similar to this:
Migration table created successfully.
Migrating: 2014_10_12_000000_create_users_table
Migrated: 2014_10_12_000000_create_users_table
Migrating: 2014_10_12_100000_create_password_resets_table
Migrated: 2014_10_12_100000_create_password_resets_table
Migrating: 2019_04_15_165745_create_profiles_table
Migrated: 2019_04_15_165745_create_profiles_table
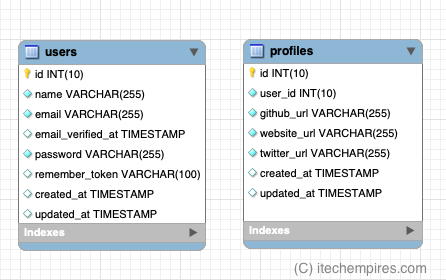
Checkout the database tables and columns:
Implement One to One Relationship
Now that we have Profiles table and eloquent model associated and ready to use we can define relationship in application.
Go ahead and open User.php model and add profile relationship as showing below
public function profile()
{
   return $this->hasOne(Profile::class);
}
Complete User.php Model:
<?php

namespace App;

use Illuminate\Notifications\Notifiable;
use Illuminate\Contracts\Auth\MustVerifyEmail;
use Illuminate\Foundation\Auth\User as Authenticatable;

class User extends Authenticatable
{
    use Notifiable;

    /**
     * The attributes that are mass assignable.
     *
     * @var array
     */
    protected $fillable = [
        'name', 'email', 'password',
    ];

    /**
     * The attributes that should be hidden for arrays.
     *
     * @var array
     */
    protected $hidden = [
        'password', 'remember_token',
    ];

    /**
     * The attributes that should be cast to native types.
     *
     * @var array
     */
    protected $casts = [
        'email_verified_at' => 'datetime',
    ];

    public function profile()
    {
        return $this->hasOne(Profile::class);
    }
}
Execute Example:
Now let’s do quick execution of what we have been implemented so far so go ahead and add dummy user record into the users and profiles table. I said dummy because in my case I have brand new database created for this demo so will have to have a record to test.
If you want you can use following SQL insert command to have records ready for you
INSERT INTO `users` (`id`, `name`, `email`, `email_verified_at`, `password`, `remember_token`, `created_at`, `updated_at`)
VALUES
	(1, 'Yogesh Koli', 'yogesh@itechempires.com', NULL, 'sdfasd fasd sadfas', NULL, '2019-04-16 17:40:49', '2019-04-16 17:40:49');

INSERT INTO `profiles` (`id`, `user_id`, `github_url`, `website_url`, `twitter_uri`, `created_at`, `updated_at`)
VALUES
	(1, 1, 'https://github.com/yogeshkoli', 'http://www.yogeshkoli.com', 'https://twitter.com/iyogeshkoli', '2019-04-16 17:42:01', '2019-04-16 17:42:01');
Alright now open up terminal/command prompt and navigate to the project directory to run tinker if you know tinker is php artisan utility where we can interact with the our application.
User following command to run tinker:
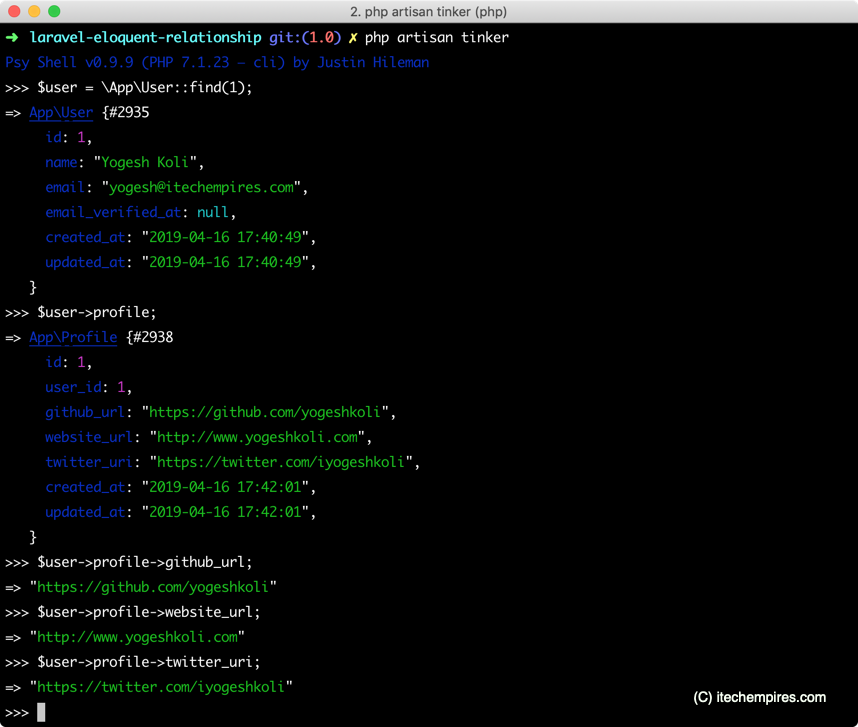
$ php artisan tinkerUser following commands one by one to run the demo:
$ $user = \App\User::find(1);
$ $user->profile;
$ $user->profile->github_url;
See screen shot for your reference.
So far so good right? I hope this tutorial helps your to understand one to one relationship in detail or if you still have any question you can let me know in the comment below.
In next tutorial will learn One-To-many relationship from Laravel.
Next – How to Implement Laravel Eloquent One-to-Many Relationship