Table of Contents
Introduction
In my last tutorial “Laravel 5 VueJS Routing Building Single Page Application” I have shared How you can implement routing in VueJs along with Laravel, in this tutorial we will talk about Google Recapcha and I will provide steps to render it into the project, if you are not sure about Recapcha let me tell you real quick – Recapcha is extra layer of security to prevent accessing API requests by robots, basically Recapcha can detect the active user a human or a robot by simply asking a questions. So if we use it then we can easily get ride of spam and abuse of our application.
As always we will take a very simple example here to demonstrate, we will create a Laravel project along with VueJs configuration and then will create simple form to insert a record into the database and this form will have a google captcha rendered and in the backend while we are going to process the incoming insert request we will validate the google re-captcha response using PHP, sounds good right?
Key Points to Learn:
- Using Google Recapcha asynchronous way to validate XHR requests
- Validate Google Recapcha Input with Laravel Custom Validation Rule
- Building VueJs Template along with Google Recapcha Validation
Be with me and follow the following steps to create example or you can also follow this tutorial if you want to implement google recapcha into your existing project were you’re using VueJs.
Step 1 – Create a Laravel Project:
Make sure you have your development environment ready into your system to run Laravel project if not you can follow Laravel official documentation to get it ready to use. I assume that you have your system ready to rock, now go ahead and open up the terminal and use following command to create new Laravel project.
Using Laravel installer:
$ laravel new vuejs-recapcha-demo
Or using composer:
$ composer create-project --prefer-dist laravel/laravel vuejs-recapcha-demo
I assume that you have Laravel application installed an running on your development server in the next step will have setup a database, you can skip database and migration part if your using your existing project.
Step 2 – Database Settings and Migration:
Create new database into mysql you can name it according to your preference and open your project .env file into the your code editor and update database variables as showing below:
In my case I have setup database as “vuejs-recapcha-demo” and my database username is “root” and password is none.
DB_CONNECTION=mysql
DB_HOST=127.0.0.1
DB_PORT=3306
DB_DATABASE=vuejs-recapcha-demo
DB_USERNAME=root
DB_PASSWORD=
Save and close the file and open your terminal or command prompt if your on windows and run following command from the project root to create new database migration file and eloquent model at the same time.
$ php artisan make:model Post -m
You should see following output after running above command:
Model created successfully.
Created Migration: 2018_05_07_063343_create_posts_table
Now let’s add required fields into the migration and create our table, open newly created migration file into the code editor and update it as showing below:
<?php

use Illuminate\Support\Facades\Schema;
use Illuminate\Database\Schema\Blueprint;
use Illuminate\Database\Migrations\Migration;

class CreatePostsTable extends Migration
{
    /**
     * Run the migrations.
     *
     * @return void
     */
    public function up()
    {
        Schema::create('posts', function (Blueprint $table) {
            $table->increments('id');
            $table->string('title');
            $table->text('body')->nullable();
            $table->timestamps();
        });
    }

    /**
     * Reverse the migrations.
     *
     * @return void
     */
    public function down()
    {
        Schema::dropIfExists('posts');
    }
}
Save update file and open terminal again to run artisan command to migrate the database.
$ php artisan migrate
You will see three different migration running if your following this tutorial on a new Laravel project, this is just because Laravel provides default migration files for user.
Migration table created successfully.
Migrating: 2014_10_12_000000_create_users_table
Migrated:  2014_10_12_000000_create_users_table
Migrating: 2014_10_12_100000_create_password_resets_table
Migrated:  2014_10_12_100000_create_password_resets_table
Migrating: 2018_05_07_063343_create_posts_table
Migrated:  2018_05_07_063343_create_posts_table
If you get any running migrations then double check you database connection settings under .env file and make sure you mysql database is running.
Okay so now if you get the above migrations list then you can open up the database to verify that the given database tables has been created, you should have `posts` table along `user` and `password_resets` tables.
Step 3 – Get Google Recapcha Site Keys:
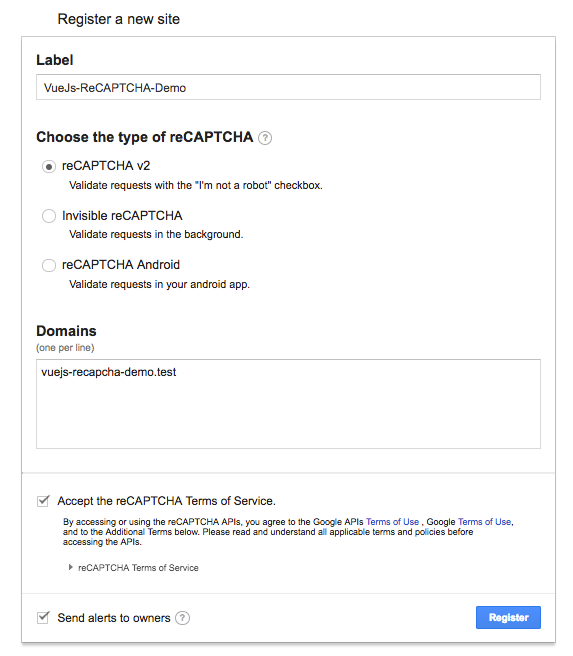
To Add Google Recapcha into the project, we will need recaptcha site keys from google and to generate this keys you need to visit at https://www.google.com/recaptcha and click “My recapcha” to register new site as showing below:


Now that we have our site and secret keys ready to use, let’s save them into the env file so that those will be easy to use into the next steps, go ahead and open up .env file and add following variables at the end of the file:
RECAPTCHA_SITE_KEY=6Le_clgUAAAAAJxTzoUs9MzP5ZzJodxnOj8h1qMq
RECAPTCHA_SECRET=YOUR-RECAPTCHA-SECRET-KEY-GOES-HERE
Again open up “config/services.php” file to store the recapcha credentials, add following line at the last location of the array, make sure to match up variable names from the .env file
'recaptcha' => [
        'key' => env('RECAPTCHA_SITE_KEY'),
        'secret' => env('RECAPTCHA_SECRET')
    ]
Let me tell you the quick difference between site and secret key if its not clear for you, so the Site key is the public key which we are going to use to generate Recapcha on a site and secret key is the server side key which will be usable while interacting with recapcha API to verify user response.
Step 4 – Design Simple UI using Bootstrap 4.0
As we know Laravel 5.6 comes with built in setup of bootstrap 4.0 so we can simply start using it real quick, if you are on bootstrap 3.0 no problem the demo will work for you as well there will be only smaller design differences those does not make any difference for learning.
Use following script it has very basic design for the demo, I have added simple “add post” button which has modal popup associated and also have a very close look on each line of code you will see the head section has all the setup necessary such as CSRF token, application compiled stylesheet and in the body section we have added inline VueJs template “<add-post inline-template>” which we have defined in next steps with VueJS setup.
Open `welcome.blade.php` file and replace it with following script:
<!doctype html>
<html lang="{{ app()->getLocale() }}">
<head>
<meta charset="utf-8">
<meta http-equiv="X-UA-Compatible" content="IE=edge">
<meta name="viewport" content="width=device-width, initial-scale=1">
<!-- CSRF Token -->
<meta name="csrf-token" content="{{ csrf_token() }}">
<title>Google Re-Captcha Demo</title>
<!-- Styles -->
<link href="{{ asset('css/app.css') }}" rel="stylesheet">
<!-- Scripts -->
<script>
window.Laravel = {!! json_encode([
'csrfToken' => csrf_token(),
]) !!};
</script>
</head>
<body>
<div id="app">
<div class="container">
<div class="row">
<div class="col-md">
<div class="jumbotron">
<h1 class="display-4">Google Recapcha with VueJs and Laravel 5.6 Demo</h1>
<p class="lead">This is a simple demonstration to expain implementation of of google Recapcha along with VueJs 2.0</p>
<hr class="my-4">
<p>Click Add Post button to add new post along with google recpacha verfication.</p>
<p class="lead">
<button type="button" class="btn btn-primary btn-lg" data-toggle="modal" data-target="#addPost">
Add Post
</button>
</p>
</div>
</div>
</div>
</div>
<add-post inline-template>
<div class="modal fade" id="addPost" tabindex="-1" role="dialog" aria-labelledby="addPostLabel" aria-hidden="true">
<div class="modal-dialog modal-lg" role="document">
<div class="modal-content">
<div class="modal-header">
<h5 class="modal-title" id="addPostLabel">Add Post</h5>
<button type="button" class="close" data-dismiss="modal" aria-label="Close">
<span aria-hidden="true">×</span>
</button>
</div>
<div class="modal-body">
<form>
<div class="form-group">
<label for="title">Title</label>
<input type="text" id="title" class="form-control" name="title">
</div>
<div class="form-group">
<label for="body">Body</label>
<textarea name="body" id="body" rows="5" class="form-control"></textarea>
</div>
</form>
</div>
<div class="modal-footer">
<button type="button" class="btn btn-secondary" data-dismiss="modal">Cancel</button>
<button type="button" class="btn btn-primary">Submit</button>
</div>
</div>
</div>
</div>
</add-post>
</div>
<script src="{{ asset('js/app.js') }}"></script>
</body>
</html>
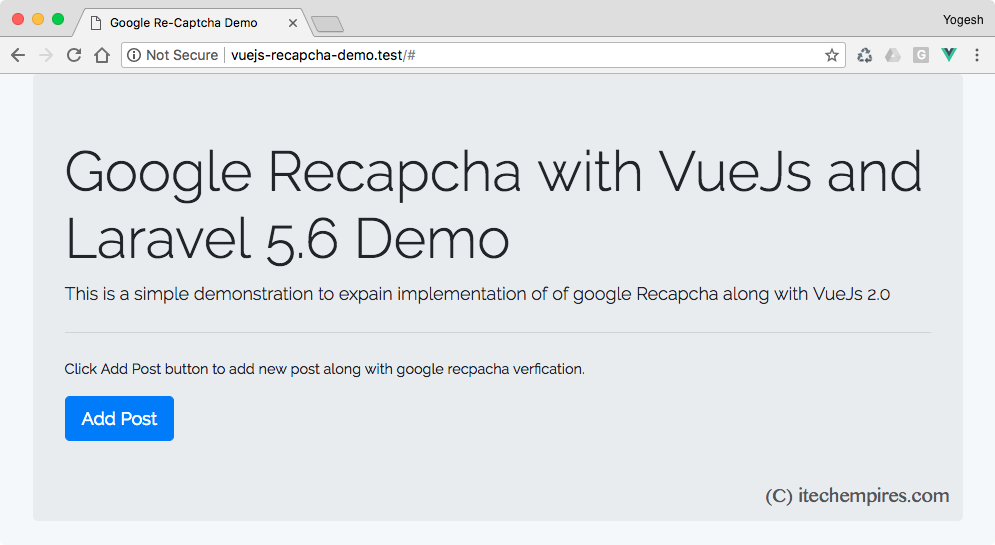
Save this file and try to run project into the browser to see the UI design that we just added, you should see output as showing in below screen shots:

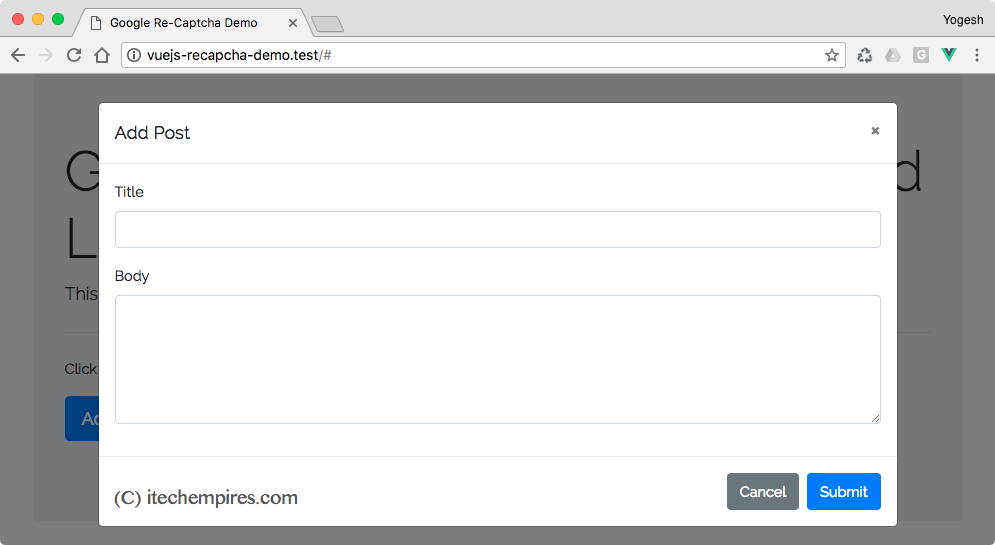
If you see screen exactly the same as above then your following correct way, try to click on Add Post button you will see modal popup as showing below:

Step 5 – Install Required NPM Packages:
Next we will need to install requiredlibraries/libraries using npm, go ahead and open your terminal and use following command to install dependencies from package.json file:
$ npm install
Now we need add additional Vue package which is going to support in google recaptcha installation process, use following command to install vue-recaptcha:
$ npm install vue-recaptcha --save
Step 6 – Create VueJS Template:
I assume that you have installed all required libraries now we are going to create new VueJs template to handle Create Post operation, to do that open “/resources/assets/js/app.js” file and replace example component with following line:
Vue.component('add-post', require('./components/AddPost.vue'));
Your compete file should look like this:
require('./bootstrap');

window.Vue = require('vue');

Vue.component('add-post', require('./components/AddPost.vue'));

const app = new Vue({
    el: '#app'
});
Next create new file under “/resources/assets/js/components/AddPost.vue” which is going to be our template file and add following line of code:
<script>
    import VueRecaptcha from 'vue-recaptcha';

    export default {
        components: { VueRecaptcha },

        data() {
            return {
                post: {
                    title: '',
                    body: '',
                    recaptcha: '',
                },
                errors: []
            }
        },
        methods:{
            onVerify(response) {
               this.post.recaptcha = response;
            },
            addPost()
            {
                 axios
                    .post("/add-post", this.post, {
                    headers:{
                        'Content-Type':'application/json',
                        'Accept':'application/json'
                    }
                })
                .then(({data: {post}}) => {
                    $("#addPost").modal("hide");
                    this.errors = [];
                    this.$refs.recaptcha.reset();
                })
                .catch(error => {
                    if(error)
                    {
                        this.errors = error.response.data.errors;
                    }
                });
            }
        }
    }
</script>
As you can see in the above script we are basically created new module which has two different sections such as data and methods, both the sections are import to learn have closer look on data section where we have declared our empty object of post along with error object and then the method section has few different methods where onVerify method is for vue-recaptcha component which will give the google recaptcha validation response which we will use on server side to validate and then we have addPost method which is handling create request asynchronous way by sending post object with Post method to “/add-post” endpoint.
Step 7 – Create Laravel Custom Rule:
As I said in the beginning of the tutorial to use Laravel custom rule to validate google recaptcha response so we are going to do that now, go ahed and open up your terminal to create new Rule using artisan command:
$ php artisan make:rule Recaptcha
We have given rule name as Recaptcha – keep that in mind.
Go head and open newly generate file from “app/Rules/Recaptcha.php” and update it according to the file given below:
app/Rules/Recaptcha.php:
<?php

namespace App\Rules;

use Illuminate\Contracts\Validation\Rule;
use Zttp\Zttp;

class Recaptcha implements Rule
{
    const URL = 'https://www.google.com/recaptcha/api/siteverify';

    /**
     * Determine if the validation rule passes.
     *
     * @param  string  $attribute
     * @param  mixed  $value
     * @return bool
     */
    public function passes($attribute, $value)
    {
        return Zttp::asFormParams()->post(static::URL, [
            'secret' => config('services.recaptcha.secret'),
            'response' => $value,
            'remoteip' => request()->ip()
        ])->json()['success'];
    }

    /**
     * Get the validation error message.
     *
     * @return string
     */
    public function message()
    {
        return 'The recaptcha verification failed. Try again.';
    }

    /**
     * Determine if Recaptcha's keys are set to test mode.
     *
     * @return bool
     */
    public static function isInTestMode()
    {
        return Zttp::asFormParams()->post(static::URL, [
            'secret' => config('services.recaptcha.secret'),
            'response' => 'test',
            'remoteip' => request()->ip()
        ])->json()['success'];
    }
}
Have a close look on each method we are sending http request to the google api using zttp library (which we will be installing next) along with few different parameters to validate the user response.
Install Zttp library:
As we see we are using this library to call http requests, so we will need to grab this file using compose so open the terminal and fire following command:
$ composer require kitetail/zttp
Step 8 – Handle Create Request:
In this step we are going to use validate user input which will include recapcha as well, will have to create new controller and route to handle “add-post” end point request which is coming from VueJs component, so go ahed and create new controller using following command:
$ php artisan make:controller PostController
Now open up newly generated controller file from `app/Http/Controllers/PostController.php` and replace it with given script:
<?php

namespace App\Http\Controllers;

use Illuminate\Http\Request;
use App\Post;
use App\Rules\Recaptcha;

class PostController extends Controller
{
    public function store(Request $request, Recaptcha $recaptcha)
    {
        $this->validate($request, [
            'title' => 'required',
            'body' => 'required',
            'recaptcha' => ['required', $recaptcha],
        ]);

        $post = Post::create([
        'title' => request('title'),
        'body' => request('body')
        ]);

        return response(['post' => $post], 200);
    }
}
We are doing all the operation inside store method have a close look to understand the validation operations.
Next open `routes/web.php` routes file and add following route at the end of the file:
Route::post('/add-post', 'PostController@store');
Next update Post.php model file as showing below:
<?php

namespace App;

use Illuminate\Database\Eloquent\Model;

class Post extends Model
{
    protected $guarded = [];
}
Step 9 – Update UI to integrate VueJs Template and Google Recaptcha:
Go ahead and open `welcome.blade.php` file and add following line line into the head section which will access google recaptcha api javascript:
<script src='//google.com/recaptcha/api.js'></script>
Next inclose `addPost` model with custom template:
<add-post inline-template>
...model html script goes here
</add-post>
Next add new field and error script into the add post form, make sure to match “config(‘services.recaptcha.key’)” to your project configuration:
                                    <div class="form-group">
                                        <vue-recaptcha
                                        ref="recaptcha"
                                        @verify="onVerify"
                                        sitekey="{{ config('services.recaptcha.key') }}"></vue-recaptcha>
                                    </div>
                                     <ul class="alert alert-danger" v-if="errors.length != 0">
                                         <li v-for="error in errors">
                                            @{{ error[0] }}
                                        </li>
                                    </ul>
Here is complete `welcome.blade.php` file should look:
<!doctype html>
<html lang="{{ app()->getLocale() }}">
<head>
<meta charset="utf-8">
<meta http-equiv="X-UA-Compatible" content="IE=edge">
<meta name="viewport" content="width=device-width, initial-scale=1">
<!-- CSRF Token -->
<meta name="csrf-token" content="{{ csrf_token() }}">
<title>Google Re-Captcha Demo</title>
<!-- Styles -->
<link href="{{ asset('css/app.css') }}" rel="stylesheet">
<!-- Scripts -->
<script>
window.Laravel = {!! json_encode([
'csrfToken' => csrf_token(),
]) !!};
</script>
<script src='//google.com/recaptcha/api.js'></script>
</head>
<body>
<div id="app">
<div class="container">
<div class="row">
<div class="col-md">
<div class="jumbotron">
<h1 class="display-4">Google Recapcha with VueJs and Laravel 5.6 Demo</h1>
<p class="lead">This is a simple demonstration to expain implementation of of google Recapcha along with VueJs 2.0</p>
<hr class="my-4">
<p>Click Add Post button to add new post along with google recpacha verfication.</p>
<p class="lead">
<button type="button" class="btn btn-primary btn-lg" data-toggle="modal" data-target="#addPost">
Add Post
</button>
</p>
</div>
</div>
</div>
</div>
<add-post inline-template>
<div class="modal fade" id="addPost" tabindex="-1" role="dialog" aria-labelledby="addPostLabel" aria-hidden="true">
<div class="modal-dialog modal-lg" role="document">
<div class="modal-content">
<div class="modal-header">
<h5 class="modal-title" id="addPostLabel">Add Post</h5>
<button type="button" class="close" data-dismiss="modal" aria-label="Close">
<span aria-hidden="true">×</span>
</button>
</div>
<form @submit.prevent="addPost">
<div class="modal-body">
<div class="form-group">
<label for="title">Title</label>
<input type="text" id="title" class="form-control" name="title" v-model="post.title">
</div>
<div class="form-group">
<label for="body">Body</label>
<textarea name="body" id="body" rows="5" class="form-control" v-model="post.body"></textarea>
</div>
<div class="form-group">
<vue-recaptcha
ref="recaptcha"
@verify="onVerify"
sitekey="{{ config('services.recaptcha.key') }}"></vue-recaptcha>
</div>
<ul class="alert alert-danger" v-if="errors.length != 0">
<li v-for="error in errors">
@{{ error[0] }}
</li>
</ul>
</div>
<div class="modal-footer">
<button type="button" class="btn btn-secondary" data-dismiss="modal">Cancel</button>
<button type="submit" class="btn btn-primary">Submit</button>
</div>
</form>
</div>
</div>
</div>
</add-post>
</div>
<script src="{{ asset('js/app.js') }}"></script>
</body>
</html>
Next to run the project with this updated code we just need to compile our assets with following command:
$ npm run dev
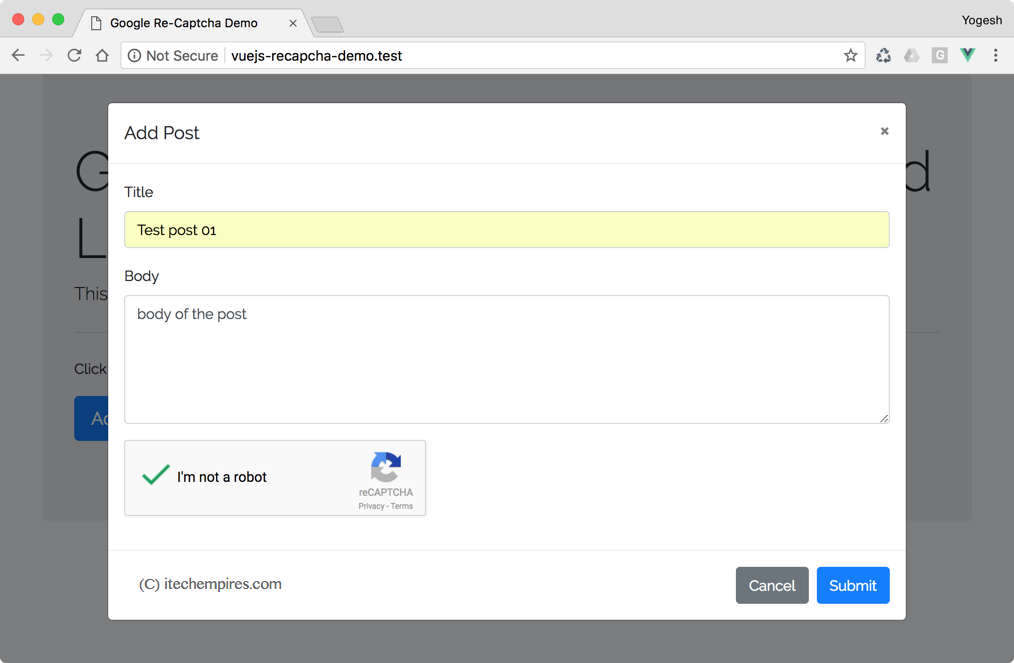
After compiling the assets refresh the page and try to test the application, you should see google recapcha generated as showing below in screen shot:
Conclusion:
A bit long tutorial right, but keep in mind it has lot of points to learn at the initial stage and if you are a beginner vuejs plus Laravel developer it will really help you to boost your development skills. You can also check at key points sections at the top of the tutorial to make sure you got those points as mentioned.
If you really enjoyed learning from this tutorial please keep sharing this tutorial to your friends or If you have any question in mind related to this tutorial you can easily ask using comment box below.


Hey, thanks for the great detailed post!
One question though. Any idea as to why this would work locally (localhost), but not when on our domain (i have checked the site/secret keys and the domain is in google recaptcha panel)
Error: The recaptcha verification failed. Try again.
also, the code is getting past to the api back-end, but not validating with google for some reason
No me dio la ventana modal
No me dio la ventana modal
no se que fallo todo iba bien