Table of Contents
Introduction:
Now a days VueJs being used rapidly to develop big and complex applications along with Laravel 5.5, according to the community size and expert developers feedback VueJS 2.0 is incredibly flexible and convenient to increase web applications performance and features improvements.
Today we are going to learn VueJs routing to build interactive single page application, Do you know what is interactive and single page application? if you are passionate programmer it’s not a big deal to understand for you, it is kind of application where we can navigate between application pages without loading entire DOM.
If you see in simple applications whenever you try to navigate from page to page it’s keep on loading entire DOM for each and every request, and if you use Front end framework like VueJS you don’t have to worry about loading complete page again and again, we can just simply load a particular required part of the application page.
In my last tutorial I have given good amount of details on how you can get started with VueJS by building a CRUD application, if you haven’t check that tutorial click here to read and learn how you can get started with VueJs along with Laravel 5. I would recommend to go through it quickly. as we are going to follow same example from crud tutorial to demonstrate VueJS routing here, keep in mind our goal is to learn how we can implement a routing.
Must Read Before Getting started with this tutorial – Laravel 5.5 VueJs 2.0 CRUD Operations Application
Well, I assume that you read first part of this tutorial and created your CRUD application and ensure that it is running according to the given steps.
Let’s get started to enhance crud application to have an ability to navigate between task page to user profile page.
To build single page application VueJS has recommended to use an officially supported library called vue-router
Step 1: Install vue-router and Configure with Vue:
Open up your terminal and use following command to install vue-router into your project
$ npm install vue-router --save
It will take some time to get installed wait for a while unit your see following message on your terminal:
+ vue-router@3.0.1
added 115 packages in 45.139s
Now let’s import vue router library into our resource setting meaning into app.js file
Open /resources/assets/js/app.js file and update it according to the following line of code:
import './bootstrap';
import Vue from 'vue'; // Importing Vue Library
import VueRouter from 'vue-router'; // importing Vue router library

window.Vue = Vue;
Vue.use(VueRouter);


const app = new Vue({
    el: '#app',
    router
});
If you notice there are several things in there those you need to understand and take care off, first thing we are using ES2015 syntax here to import our files and libraries, second thing we need to install Vue router explicitly with Vue by using Vue.use(); syntax.
Step 2: Create VueJS Component:
As you know in first part of this tutorial we had created a Task component and keep in mind we are going to use that here to for demonstration but again we will need an additional template here so that we can navigation between those of two.
Let’s call it a Profile component, go ahead an create new file called Profile.vue under /resources/assets/js/components/Profile.vue and use following line of code:
<template>
    <div class="container">
        <div class="row">
            <div class="col-md-12">
                <div class="panel panel-default">
                    <div class="panel-heading">
                        My Profile
                    </div>

                    <div class="panel-body">

                    </div>
                </div>
            </div>
        </div>

    </div>
</template>

<script>
    export default {
        data(){
            return {}
        },
        mounted()
        {

        },
        methods: {}
    }
</script>
Step 3: VueJS Routes Configuration:
Now that we have all of stuff configured and ready to use, let’s create our application UI routes using Vue router, we are going to use more structure way to do that by that mean we will store our routes in a separate file and export from there.
Lets create a new file called routes.js under /resources/assets/js/routes.js
Go ahead and add following routes:
import VueRouter from 'vue-router';
import Task from './components/Task.vue';
import Profile from './components/Profile.vue';


let routes = [
    {
        path: '/',
        component: Task
    },
    {
        path: '/profile',
        component: Profile
    }
];


export default new VueRouter({
    routes
});
Take look at above file carefully, you will see we are calling our components here and assigning them to the particular route.
Step 4: Use VueJS Routes:
We have our routes ready to use into our application, let’s make some changes in app.js file to tell the application to use routes.
Open app.js file and replace with the following script:
import './bootstrap';
import Vue from 'vue'; // Importing Vue Library
import VueRouter from 'vue-router'; // importing Vue router library
import router from './routes';

window.Vue = Vue;
Vue.use(VueRouter);


const app = new Vue({
    el: '#app',
    router
});
We did two things here just so you know, first thing is we have extended routes from routes.js file and given routes to the Vue Object so that it will configure and use defined routes.
Open up /resources/views/home.blade.php file and remove <task></task> and replace with following:
<router-view></router-view>
Step 5: Generate VueJS Route Links:
We will needs to links to navigate, vue router provide in-built tags to generate links out of the box, let’s update our header part of the application, add following lines to /resources/views/layouts/app.blade.php file under right navbar before User dropdown navigation:
<router-link tag="li" to="/">
    <a>Tasks</a>
</router-link>
<router-link tag="li" to="/profile">
    <a>Profile</a>
</router-link>
It will generate list item along with the anchor tag and href associated dynamically.
Step 6: Test Application Routing:
We are pretty much done with the development of single page application for this demo, it’s time to test our development.
Before going to run your project go ahead and compile all assets using following command from terminal
$ npm run dev
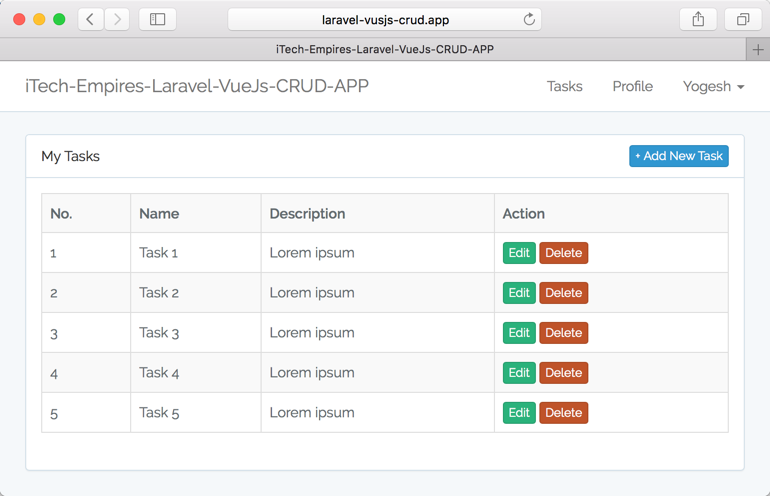
If you run the project in browser you should see following output screen and you navigate between Task and Profile asynchronously.

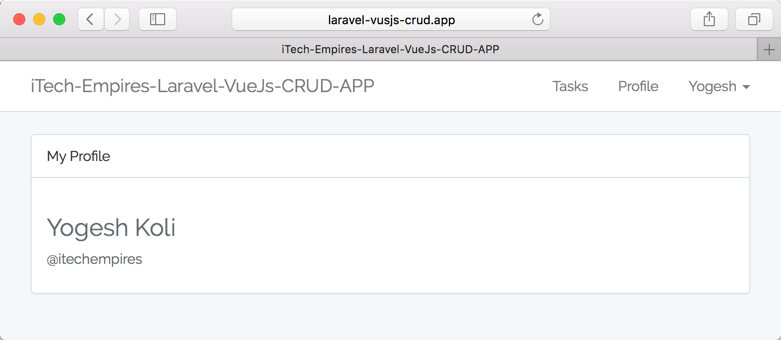
Navigate to Profile view, click on Profile link from the navigation bar you will see the My profile component will be loaded.

You can create as much routes as you want, you just needs to add new item into the routes array in routes.js file and create a template/component associated with it according to your applications requirements.
Don’t forget to update Profile.vue file to show up something there, as I added just a name text there to show up in front up.
Conclusion:
Let’s conclude what you learn from this tutorial, as you know the scope of this tutorial is to learn how to implement routing into your application by building a simple single page application.
So here is a list of points to take a note:
- Learn installation and configuration Vue Router library with VueJs
- Create a routes file, create new object and exporting
- Create new component and configure with routing
- Showing router view
- Generating Dynamic links with router-link
We are done, now it’s all up to you, update Profile component to load information from backend by creating new Laravel API call.
Do let me know if you have any question on this tutorial with comment box below and don’t forget to share and like this tutorial.

Great tutorial, same level as the first one. Thanks and congrats!
Sorry, my question may sound stupid, but in the profile.vue file, I should create some method in the user’s controller to fetch the user information or is there a way to use session authentication information?
how can I disable routes in web.php
this is a great tutorial.
love your website
thanks.