
Laravel 5.5 and VueJS 2.0 is the best combination for the development of any kind of projects in the web development world, no matters if your PHP beginner, intermediate or expert developer as long as your PHP Laravel developer you should be using this combination into your project to make it more flexible and advanced with the help of VueJs 2.0.
VueJs 2.0 is progressive framework for building user interfaces and you know Laravel 5.5 comes with the predefined configuration for VueJS 2.0 to start building the application, you don’t have to worry about configuration part.
I am guessing you have your PHP environment setup and ready to run Laravel 5.5 application if not please make sure you have your development environment ready along with the following server requirements installed or I would suggest to use homestead for your local development.
Development Server Requirements:
- PHP >= 7.0.0
- OpenSSL PHP Extension
- PDO PHP Extension
- Mbstring PHP Extension
- Tokenizer PHP Extension
- XML PHP Extension
- Apache/Nginx
- MySQl
- Composer
- NodeJs with NPM
Table of Contents
Step 1: Create new Laravel Project:
Create new Laravel project by using following commands with your terminal/command line:
Using Laravel installer:
$ laravel new project-name
OR create using Composer
$ composer create-project --prefer-dist laravel/laravel project-name
Step 2: Database Design and Configuration:
Create new database migration file using php artisan:
Open your terminal/command-line application and cd into the root of newly created Laravel project and generate new migration to create task table:
$ cd /path-to-project/project-name
$ php artisan make:migration create_tasks_table --create=tasks
Open migration file for task table, it should be located inside /database/migrations directory and update up() function according to the following script:
    public function up()
    {
        Schema::create('tasks', function (Blueprint $table) {
            $table->increments('id');
            $table->string('name');
            $table->unsignedInteger('user_id');
            $table->text('description');
            $table->timestamps();
        });
    }
Configure Laravel database settings:
We will required a MySQL database at the backend to access and store the crud application data, so you need to create fresh database first. so go ahead and create new database in MySQL and come up with the database name, database username and password.
Open .env file from the root of the application and Update following database settings:
DB_CONNECTION=mysql
DB_HOST=127.0.0.1
DB_PORT=3306
DB_DATABASE=YOUR-DATABASE-NAME
DB_USERNAME=DATABASE-USERNAME
DB_PASSWORD=DATABASE-USER-PASSWORD
Make sure to match above settings with your MySQL database credentials.
Run Laravel Migration:
Use following command to run Laravel migration to create our tasks table by using migration file.
$ php artisan migrate
The above command should generate output like this:
Migrating: 2014_10_12_000000_create_users_table
Migrated:  2014_10_12_000000_create_users_table
Migrating: 2014_10_12_100000_create_password_resets_table
Migrated:  2014_10_12_100000_create_password_resets_table
Migrating: 2017_10_06_080114_create_tasks_table
Migrated:  2017_10_06_080114_create_tasks_table
Laravel will create two extra table for as you know we have build migrations files for users and password resets table.
Step 3: User Authentication:
Let’s use Laravel default user authentication quick-start, it is going to provide us an ability to register a new user, login ability for the user, routes, controllers and predefined views out of the box.
Use following command to generate User Authentication.
$ php artisan make:auth
Authentication scaffolding generated successfully.
If you see above message that means you have generate authentication successfully, now you can check login register pages by navigating your browser to /login and /register.
Login Screen:

Registration Screen:

We have our user authentication part ready to use go ahead and register new user, so that you would be able to see home view of the application, as I did you can see the screen below:

Step 4: Create Task Model and Task Controller
We are going to required a Task Model to handle database operation throughout Laravel Eloquent and a controller to handle user request such as create, read, update and delete the task.
Use following Command from your terminal to generate Model and Resource Controller for Task:
$ php artisan make:model Task -r
The above command should output following messages:
Model created successfully.
Controller created successfully.
You can locate the model at /app/Task.php and controller at /app/Http/Controllers/TaskController.php
Task Model:
<?php

namespace App;

use Illuminate\Database\Eloquent\Model;

class Task extends Model
{
    //
}
Task Controller:
<?php

namespace App\Http\Controllers;

use App\Task;
use Illuminate\Http\Request;

class TaskController extends Controller
{
    /**
     * Display a listing of the resource.
     *
     * @return \Illuminate\Http\Response
     */
    public function index()
    {
        //
    }

    /**
     * Show the form for creating a new resource.
     *
     * @return \Illuminate\Http\Response
     */
    public function create()
    {
        //
    }

    /**
     * Store a newly created resource in storage.
     *
     * @param  \Illuminate\Http\Request  $request
     * @return \Illuminate\Http\Response
     */
    public function store(Request $request)
    {
        //
    }

    /**
     * Display the specified resource.
     *
     * @param  \App\Task  $task
     * @return \Illuminate\Http\Response
     */
    public function show(Task $task)
    {
        //
    }

    /**
     * Show the form for editing the specified resource.
     *
     * @param  \App\Task  $task
     * @return \Illuminate\Http\Response
     */
    public function edit(Task $task)
    {
        //
    }

    /**
     * Update the specified resource in storage.
     *
     * @param  \Illuminate\Http\Request  $request
     * @param  \App\Task  $task
     * @return \Illuminate\Http\Response
     */
    public function update(Request $request, Task $task)
    {
        //
    }

    /**
     * Remove the specified resource from storage.
     *
     * @param  \App\Task  $task
     * @return \Illuminate\Http\Response
     */
    public function destroy(Task $task)
    {
        //
    }
}
We need to update Task model here to have fillable attributes so that we should be able to insert the new task:
<?php

namespace App;

use Illuminate\Database\Eloquent\Model;

class Task extends Model
{
    protected $fillable = [
        'name',
        'user_id',
        'description',
    ];
}
And Update the TaskController to have user middleware attached so that it is only going to be accessible to for the authenticated users, go ahead and add following constructer function into the TaskController.php file:
    public function __construct()
    {
        $this->middleware('auth');
    }
Step 5: Create Required Routes:
As you know we need to deal with the CRUD operations here so it’s better to have resource route added into our routes file that is web.php file.
Go ahed and add following line at the last of your web.php file which is location at /routes/web.php
Route::resource('/task', 'TaskController');
The above single line will provide us bunch of routes to handle crud operations with Task, you can also have a look on those routes by using $ php artisan route:list command.
Step 6: Create New VueJS Component:
It’s time to dive into the VueJs 2.0 as you know we are going to use VueJs for our front end user interface development.
Create new file for Task component inside /resources/assets/js/components/ folder named Task.vue and add following sample line of code:
Task.vue:
<template>
    <div class="container">
        <div class="row">
            <div class="col-md-12">
                <div class="panel panel-default">
                    <div class="panel-heading">My Tasks</div>

                    <div class="panel-body">

                    </div>
                </div>
            </div>
        </div>
    </div>
</template>

<script>
    export default {
        mounted() {

        }
    }
</script>
Keep in mind we will need to update this component later on for now I want to your to test how you should add and register new component in vuejs 2.0.
So our component ready to register, open app.js file from /resources/assets/js/app.js add following line after example component registration line:
app.js:
Vue.component('task', require('./components/Task.vue'));
The complete app.js file should look like this:
require('./bootstrap');

window.Vue = require('vue');

Vue.component('example', require('./components/Example.vue'));
Vue.component('task', require('./components/Task.vue'));

const app = new Vue({
    el: '#app'
});
Step 7: Install npm Package Dependencies:
You know Laravel comes with the Laravel mix to compile SASS, JS etc. to use Laravel mix we have install required dev dependencies to run package scripts.
Use following command to install required dependencies:
$ npm install
It will take some time, depending on your internet connection speed.
added 1334 packages in 132.059s
When you so message like this at the of the your terminal that means our dependencies are installed we are good to go.
Step 8: Compile Assets and Use Task Controller:
Run npm run dev command as showing below to compile our newly added code such as a VueJs Component and Component registration:
$ npm run dev
If you success like “DONE Compiled successfully in 9582ms” this then we are ready to move.
Now open home.blade.php file from /resources/views/home.blade.php and update it accordingly:
@extends('layouts.app')

@section('content')
<task></task>
@endsection
And visit browser to login into the application to see if we got some change, see screen below:

As you see in the above screen we have got our Task component running successfully.
Step 9: Implement Create Task Operation:
It’s time to move on to our real goal to accomplish create, read, update and delete operations in this step let’s see how we should deal with the Create Task Operation.
We will do two things here first is validate the request on server and create task valid requests.
Open Task.vue Component and update according to the following script:
/resources/assets/js/components/Task.vue:
<template>
<div class="container">
<div class="row">
<div class="col-md-12">
<div class="panel panel-default">
<div class="panel-heading">
<button @click="initAddTask()" class="btn btn-primary btn-xs pull-right">
+ Add New Task
</button>
My Tasks
</div>
<div class="panel-body">
</div>
</div>
</div>
</div>
<div class="modal fade" tabindex="-1" role="dialog" id="add_task_model">
<div class="modal-dialog" role="document">
<div class="modal-content">
<div class="modal-header">
<button type="button" class="close" data-dismiss="modal" aria-label="Close"><span
aria-hidden="true">×</span></button>
<h4 class="modal-title">Add New Task</h4>
</div>
<div class="modal-body">
<div class="alert alert-danger" v-if="errors.length > 0">
<ul>
<li v-for="error in errors">{{ error }}</li>
</ul>
</div>
<div class="form-group">
<label for="name">Name:</label>
<input type="text" name="name" id="name" placeholder="Task Name" class="form-control"
v-model="task.name">
</div>
<div class="form-group">
<label for="description">Description:</label>
<textarea name="description" id="description" cols="30" rows="5" class="form-control"
placeholder="Task Description" v-model="task.description"></textarea>
</div>
</div>
<div class="modal-footer">
<button type="button" class="btn btn-default" data-dismiss="modal">Close</button>
<button type="button" @click="createTask" class="btn btn-primary">Submit</button>
</div>
</div><!-- /.modal-content -->
</div><!-- /.modal-dialog -->
</div><!-- /.modal -->
</div>
</template>
<script>
export default {
data(){
return {
task: {
name: '',
description: ''
},
errors: []
}
},
methods: {
initAddTask()
{
this.errors = [];
$("#add_task_model").modal("show");
},
createTask()
{
axios.post('/task', {
name: this.task.name,
description: this.task.description,
})
.then(response => {
this.reset();
$("#add_task_model").modal("hide");
})
.catch(error => {
this.errors = [];
if (error.response.data.errors.name) {
this.errors.push(error.response.data.errors.name[0]);
}
if (error.response.data.errors.description) {
this.errors.push(error.response.data.errors.description[0]);
}
});
},
reset()
{
this.task.name = '';
this.task.description = '';
},
}
}
</script>
If you see in the above script we are using Bootstrap model popup as well and in the script section we are dealing with the VueJs data and methods and by using axios I am handling the ajax request.
Next update the TaskController to handle create operations, update store method as showing below:
/app/Http/Controllers/TaskController.php:
    public function store(Request $request)
    {
        $this->validate($request, [
            'name'        => 'required|max:255',
            'description' => 'required',
        ]);

        $task = Task::create([
            'name'        => request('name'),
            'description' => request('description'),
            'user_id'     => Auth::user()->id
        ]);

        return response()->json([
            'task'    => $task,
            'message' => 'Success'
        ], 200);
    }
Run following command from terminal and to test application:
$ npm run dev
Login to the application from browser you should see following screen with Add new Task button added:

Click Add New Task button, you should see model popup showing below and try to click submit button to see validation errors:

Step 10: Implement Read Records Operations:
Our second feature of the application is Reading the records, let’s implement that, go ahead and open your Task.vue component and replace with the following script:
<template>
<div class="container">
<div class="row">
<div class="col-md-12">
<div class="panel panel-default">
<div class="panel-heading">
<button @click="initAddTask()" class="btn btn-primary btn-xs pull-right">
+ Add New Task
</button>
My Tasks
</div>
<div class="panel-body">
<table class="table table-bordered table-striped table-responsive" v-if="tasks.length > 0">
<tbody>
<tr>
<th>
No.
</th>
<th>
Name
</th>
<th>
Description
</th>
<th>
Action
</th>
</tr>
<tr v-for="(task, index) in tasks">
<td>{{ index + 1 }}</td>
<td>
{{ task.name }}
</td>
<td>
{{ task.description }}
</td>
<td>
<button class="btn btn-success btn-xs">Edit</button>
<button class="btn btn-danger btn-xs">Delete</button>
</td>
</tr>
</tbody>
</table>
</div>
</div>
</div>
</div>
<div class="modal fade" tabindex="-1" role="dialog" id="add_task_model">
<div class="modal-dialog" role="document">
<div class="modal-content">
<div class="modal-header">
<button type="button" class="close" data-dismiss="modal" aria-label="Close"><span
aria-hidden="true">×</span></button>
<h4 class="modal-title">Add New Task</h4>
</div>
<div class="modal-body">
<div class="alert alert-danger" v-if="errors.length > 0">
<ul>
<li v-for="error in errors">{{ error }}</li>
</ul>
</div>
<div class="form-group">
<label for="name">Name:</label>
<input type="text" name="name" id="name" placeholder="Task Name" class="form-control"
v-model="task.name">
</div>
<div class="form-group">
<label for="description">Description:</label>
<textarea name="description" id="description" cols="30" rows="5" class="form-control"
placeholder="Task Description" v-model="task.description"></textarea>
</div>
</div>
<div class="modal-footer">
<button type="button" class="btn btn-default" data-dismiss="modal">Close</button>
<button type="button" @click="createTask" class="btn btn-primary">Submit</button>
</div>
</div><!-- /.modal-content -->
</div><!-- /.modal-dialog -->
</div><!-- /.modal -->
</div>
</template>
<script>
export default {
data(){
return {
task: {
name: '',
description: ''
},
errors: [],
tasks: []
}
},
mounted()
{
this.readTasks();
},
methods: {
initAddTask()
{
$("#add_task_model").modal("show");
},
createTask()
{
axios.post('/task', {
name: this.task.name,
description: this.task.description,
})
.then(response => {
this.reset();
this.tasks.push(response.data.task);
$("#add_task_model").modal("hide");
})
.catch(error => {
this.errors = [];
if (error.response.data.errors.name) {
this.errors.push(error.response.data.errors.name[0]);
}
if (error.response.data.errors.description) {
this.errors.push(error.response.data.errors.description[0]);
}
});
},
reset()
{
this.task.name = '';
this.task.description = '';
},
readTasks()
{
axios.get('/task')
.then(response => {
this.tasks = response.data.tasks;
});
}
}
}
</script>
And open TaskController to update index() function:
    public function index()
    {
        $tasks = Task::where(['user_id' => Auth::user()->id])->get();
        return response()->json([
            'tasks'    => $tasks,
        ], 200);
    }
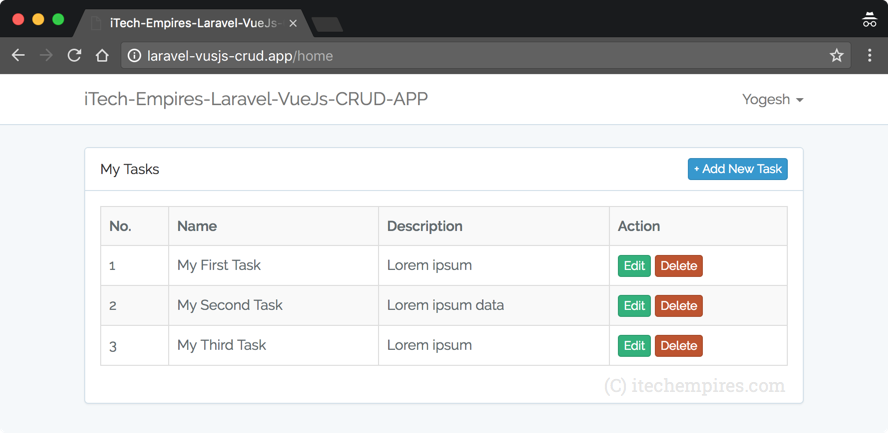
You can run the npm run dev command again from command line to compile assets and open your browser again and refresh the screen to see the you recently crated task listed, you can also checkout in the screen below:
Step 11: Implement Update Task Action:
Same thing we have to deal with the edit button action as well update patch request, I have ready in the below script:
Again open you Task component and replace with the following script:
<template>
<div class="container">
<div class="row">
<div class="col-md-12">
<div class="panel panel-default">
<div class="panel-heading">
<button @click="initAddTask()" class="btn btn-primary btn-xs pull-right">
+ Add New Task
</button>
My Tasks
</div>
<div class="panel-body">
<table class="table table-bordered table-striped table-responsive" v-if="tasks.length > 0">
<tbody>
<tr>
<th>
No.
</th>
<th>
Name
</th>
<th>
Description
</th>
<th>
Action
</th>
</tr>
<tr v-for="(task, index) in tasks">
<td>{{ index + 1 }}</td>
<td>
{{ task.name }}
</td>
<td>
{{ task.description }}
</td>
<td>
<button @click="initUpdate(index)" class="btn btn-success btn-xs">Edit</button>
<button class="btn btn-danger btn-xs">Delete</button>
</td>
</tr>
</tbody>
</table>
</div>
</div>
</div>
</div>
<div class="modal fade" tabindex="-1" role="dialog" id="add_task_model">
<div class="modal-dialog" role="document">
<div class="modal-content">
<div class="modal-header">
<button type="button" class="close" data-dismiss="modal" aria-label="Close"><span
aria-hidden="true">×</span></button>
<h4 class="modal-title">Add New Task</h4>
</div>
<div class="modal-body">
<div class="alert alert-danger" v-if="errors.length > 0">
<ul>
<li v-for="error in errors">{{ error }}</li>
</ul>
</div>
<div class="form-group">
<label for="name">Name:</label>
<input type="text" name="name" id="name" placeholder="Task Name" class="form-control"
v-model="task.name">
</div>
<div class="form-group">
<label for="description">Description:</label>
<textarea name="description" id="description" cols="30" rows="5" class="form-control"
placeholder="Task Description" v-model="task.description"></textarea>
</div>
</div>
<div class="modal-footer">
<button type="button" class="btn btn-default" data-dismiss="modal">Close</button>
<button type="button" @click="createTask" class="btn btn-primary">Submit</button>
</div>
</div><!-- /.modal-content -->
</div><!-- /.modal-dialog -->
</div><!-- /.modal -->
<div class="modal fade" tabindex="-1" role="dialog" id="update_task_model">
<div class="modal-dialog" role="document">
<div class="modal-content">
<div class="modal-header">
<button type="button" class="close" data-dismiss="modal" aria-label="Close"><span
aria-hidden="true">×</span></button>
<h4 class="modal-title">Update Task</h4>
</div>
<div class="modal-body">
<div class="alert alert-danger" v-if="errors.length > 0">
<ul>
<li v-for="error in errors">{{ error }}</li>
</ul>
</div>
<div class="form-group">
<label>Name:</label>
<input type="text" placeholder="Task Name" class="form-control"
v-model="update_task.name">
</div>
<div class="form-group">
<label for="description">Description:</label>
<textarea cols="30" rows="5" class="form-control"
placeholder="Task Description" v-model="update_task.description"></textarea>
</div>
</div>
<div class="modal-footer">
<button type="button" class="btn btn-default" data-dismiss="modal">Close</button>
<button type="button" @click="updateTask" class="btn btn-primary">Submit</button>
</div>
</div><!-- /.modal-content -->
</div><!-- /.modal-dialog -->
</div><!-- /.modal -->
</div>
</template>
<script>
export default {
data(){
return {
task: {
name: '',
description: ''
},
errors: [],
tasks: [],
update_task: {}
}
},
mounted()
{
this.readTasks();
},
methods: {
initAddTask()
{
$("#add_task_model").modal("show");
},
createTask()
{
axios.post('/task', {
name: this.task.name,
description: this.task.description,
})
.then(response => {
this.reset();
this.tasks.push(response.data.task);
$("#add_task_model").modal("hide");
})
.catch(error => {
this.errors = [];
if (error.response.data.errors.name) {
this.errors.push(error.response.data.errors.name[0]);
}
if (error.response.data.errors.description) {
this.errors.push(error.response.data.errors.description[0]);
}
});
},
reset()
{
this.task.name = '';
this.task.description = '';
},
readTasks()
{
axios.get('/task')
.then(response => {
this.tasks = response.data.tasks;
});
},
initUpdate(index)
{
this.errors = [];
$("#update_task_model").modal("show");
this.update_task = this.tasks[index];
},
updateTask()
{
axios.patch('/task/' + this.update_task.id, {
name: this.update_task.name,
description: this.update_task.description,
})
.then(response => {
$("#update_task_model").modal("hide");
})
.catch(error => {
this.errors = [];
if (error.response.data.errors.name) {
this.errors.push(error.response.data.errors.name[0]);
}
if (error.response.data.errors.description) {
this.errors.push(error.response.data.errors.description[0]);
}
});
}
}
}
</script>
And open Task controller to change the update() method as follows:
public function update(Request $request, Task $task)
    {
        $this->validate($request, [
            'name'        => 'required|max:255',
            'description' => 'required',
        ]);

        $task->name = request('name');
        $task->description = request('description');
        $task->save();

        return response()->json([
            'message' => 'Task updated successfully!'
        ], 200);
    }
Save the file open you terminal and execute npm run dev command again and visit to your browser to test update task action as showing below:
Click Edit button from the list to see Update Task Model popup:

Hit Submit button to update the task:

Step 12: Handle Delete Operation:
Final step of the tutorial, to handle delete record/task action, let’s do that:
Open Task.vue component and update following section:
Change delete button script to:
<button @click="deleteTask(index)" class="btn btn-danger btn-xs">Delete</button>
And add following new method under methods section:
            deleteTask(index)
            {
                let conf = confirm("Do you ready want to delete this task?");
                if (conf === true) {

                    axios.delete('/task/' + this.tasks[index].id)
                        .then(response => {

                            this.tasks.splice(index, 1);

                        })
                        .catch(error => {

                        });
                }
            }
Open TaskController and update destroy method:
/app/Http/Controllers/TaskController.php:
    public function destroy(Task $task)
    {
        $task->delete();
        return response()->json([
            'message' => 'Task deleted successfully!'
        ], 200);
    }
Finally execute npm run dev or npm run prod command to compile the code and test your application.
Conclusion:
What your learn from this tutorial?
Many things, such as
- Installing Laravel new application
- Generating new migration
- Execute migration
- Updating Database Settings
- Creating Eloquent Model and updating fillable properties
- Creating Laravel Resource Controller
- Adding Resource Routes
- Using Laravel User Authentication
- Create and register new VueJs 2.0 Component
- Installing required dependencies and Asset compilation
- How to use VueJs 2.0 Component
- Handling Ajax request with help of axios and vuejs
- Laravel Eloquent operations Read, Create, Update and Delete
- Handling CRUD user interface with VueJs 2.0 along with Laravel
- Using Bootstrap Model popup in VueJS 2.0 with example
- Using Bootstrap Table and Panel.
Next Read Recommendation – Laravel 5 VueJS Routing Building Single Page Application
Thanks for being a part of iTech Empires, let me know if you get any issue running above CRUD application by using comment section below:
Take care, I will see you in next tutorial.
Great post!
Suppose, You should to add `this.errors = [];` to `initAddTask()` method
Yes that’s correct!
Gread post !!! … very nice but i have still one question that is …
when i rum this app with php artisan serve then it works fine
when i run in xampp root directory with storage and bootstrap/cache writable permission 777 ..
it does not work .. so please guide me how can i run this application without artisan command ..
Thanks for once again great post …Mr Yogesh !!!
@disqus_2YSxUXUjnH:disqus What did you get from xampp, any error message? and make sure you have enabled required php extensions, I have added detail list at the top of the post under Development Server Requirements section,
Thanks for your reply. i have tested requirement for laravel . will you please send me this crud in my mail id … or share link .. ajayit2020@gmail.com .. please help us..
WOW!!! its work now for me… thanks Mr. Yogesh very nice steps to implement vuejs …. once again thanks..
Is there necessary nodejs install on share hosting cpanal for this crud application?
Hey, thanks for the good tutorial.
I’m following step by step, but have an error when trying to create a task.
Doesn’t matter if I fill the form or not, I always have the same error message :
‘app.js:703 POST http://localhost/task 404 (Not Found)’
I don’t understand, ’cause I have exactly same files as your tutorial..
Look like is missing something. Then, I remove the / on the ‘/task’ named route.
Now, when I submit the form without fill it, I have this error :
app.js:703 POST http://localhost/myfolder/public/task 422 (Unprocessable Entity)
When I fill it and submit it, I have a 500 error :
app.js:703 POST http://localhost/myfolder/public/task 500 (Internal Server Error)
I can’t understand, please help me..
Will you be able to get the server logs and post here or using Laravel bin?
Nothing on php error log file, nothing on laravel.log. I don’t really know how to do ’cause, to be honest, I’m new at Laravel/VueJS and a little bit lost.
I don’t understand because I have exactly the same files as your tutorial..
Did you enabled mode_rewrite php extension and other required php extensions? checkout Development Server Requirements section for more details.
I am guessing you must be having an issue mode_rewrite extension try to enable and try again.
That was what I tought but I have all required extensions and my PHP version is 7.0.10. I’m using Wampserver. I have disabled/enabled the mode_rewrite but nothing happened.
Maybe I’m doing something wrong, but actually don’t know what. Can we download somewhere your files from the tutorial ? Maybe I’ll can check If I made a mistake..
Sir, do you have the source code or github repo for this? Thanks
why I got this statement when I am submitting task Invalid request (Unexpected EOF) into my terminal
Github repo?
this is very helpful for me. i want to ask, the directory structure will the same for very broad application, or we have to make services for that ? like we create in angular
You can use props to share data in between components like we do it using service in AngularJS, and yes directory structure would be same and can be different if you want it’s all depend on your development.
or how we can redirect the new page without refresh the page ?
You will get that in iTech Empires upcoming tutorial?
thanks! it will very helpful
Hey, man! This was great! Thank you so much…I really learned a lot!
very good wait full search data
There much be issue with your resource route, checkout out web.php file and take the reference from Step 5 from this tutorial.
Hi .. Your project is under laravel-vuejs-crud folder .. if you want remove this error then place all file in root folder then it work. sure . this is very nice documented example . thanks Mr. Yogesh Koli. one thing is missing that can be easy is that delete code is missing in controller . but it is easy ….you do it
Hello please i have the same problem i don’t understand your solution. How do i solve it
Hello please did you fix the error?
Just provide the complete url when you request to handle any operation:
For example replace ‘/task/’ from the following call:
axios.delete(‘/task/’
To:
axios.delete(‘/http://localhost/yourappname/task/’
And you should be good go.
Hello Yogesh Koli, Thanks for great tutorial its really big help for beginners. i want to ask you some questions
1) when i m trying to edit name or description and then clicking on close… wihtout submitting it seems like changed already submited on table list even if i click on close.. how to fix it ?
2) second thing what i cant understand how laravel updates or delete it.. when you submiting .. you did not send any id of updated task ?
i got similiar error and fixed it by adding “use Auth” to TaskController on
This is a very nice tutorial. I am studing a lot of tutorials, and I could not find a good explanation about what I want to accomplish. I have just built an api with auth and JWT. This is already working. I would like also to have a frontend with VUEJS.
The point is, how should I implement the frontend(web.php) authentication? Should I use the api? Or build another auth part for the front end?
Thanks a lot!!
Nice tutorial to learn axios inside laravel + vue.. but… ¿¿jQuery inside vue components?? mm
I have done same.. but when i brows public/task it return me a json output on white page. what should i do
wait for Search data and Pagination
Hi, Yogesh – I am not a Facebook user, but I would like to follow your very interesting tutorial – what would you suggest? I do not want to throw away my surfing and my interest privacy just to follow big company – why do you force users to be raped by big brother? It would be nice to put the code on gitlab or github.
Also as an experienced webdev you certainly know very well about the problems for user privacy with disqus – you shoud advertise yourself more as a fighter for the good things in life and not force your users into privacy destroying monopolies! I am sure you can stand purely on your broad knowledge and do not need the “marketing power” of these freedom destroying companies. Also you could link to diaspora instead! Please help to reclaim freedom on the internet, not force users into chains of bigbrotherism! Thanks!
Doesn’t has Delete Method Delete In TaskController
This is fixed by adding the following code to the destroy function in the TasksController.php
$task->id = request(‘id’);
$task->delete();
return response()->json([
‘message’ => ‘Task deleted successfully!’,
], 200);
public function destroy($id)
{
$task = Task::findOrFail($id);
$task->delete();
return response()->json([
‘message’ => ‘Task deleted successfully!’,
], 200);
}
Hey @disqus_Ja59Xd1e9K:disqus – Updated the section, checkout Step #12 you will find delete function there, thanks for pointing out.
did u resolve im having same error 🙁
search and pagination plz
Very useful for beginners like me, who know the basics of Laravel and Vue, but don’t know how to use them together. Thank you so much! Спасибо!
The page doesn’t work properly when I use Xampp instead of “php artisan serve”, how to fix it?
Failed to load resource: the server responded with a status of 500 (Internal Server Error)
same here, I got internal server error and honestly I am new to laravel and vue.
Add – use Auth; in TaskControler
Hi, great tutorial !. I want to use datatables in the index page with Vue. That’s possible?
use IlluminateSupportFacadesAuth;
Agrega esto a TaskController.php
Hi, it’s really a great tutorial! Unfortunately not working to me. It’s shows only My Tasks nothing else.
@ismail What’s the Issue?
I can remove public from url by renaming server.php to index.php and moving .htaccess file to root. then it’s not showing add new task.
So, how can i remove public from url when i want to visit http://localhost/laravelvue/ using xampp
Don’t move .htaccess file to root, you should copy the .htaccess file from /public directory to your Laravel root folder.
Now it works to my after php artisan serve and visit from http://127.0.0.1:8000
thanks, goot tutorial!
hey why i cant read the task, but in localhost:8000/task
the json display
when i run my the program im getting the below error even i added use Auth;
TypeError: error.response.data.errors is undefined
Hi Yogesh, I’m starting with Vue and your tutorial has been of great help for a similar routine I wanted. Only thing I don’t get is why in update the text in the table is being modified at the same time I type in the input text in the modal window.
I have the same problem here. I want to disable that but I don’t know how.
POST http://localhost/task 404 (Not Found)
Uncaught (in promise) TypeError: Cannot read property ‘name’ of undefined
hi Yogesh Koli
tanks a lot and wish you best,
can i implement this tutorial with bootstrap4 and laravel 5.7 ?
Yes you can for sure.
Wao wao wao thanks a lot for sharing this amazing tutorial.
Never mind. Found my way through… btw, great job man.
Can this work with Laravel version 5.8.21. Finding it hard to get my diplays and vue method calls working as it is in the tutorial.
Yes it will.
Glad to hear.
After many days studying today i completed vue crud process following this guide. Many thanks
Good tutorial, thank you! But unfortunately Submit button isn’t working for me when I Add New Task, so I can’t add new tasks (I’ve done second time above mentioned steps).
Check what does it shows inside browsers console under inspect when you click on Submit button. I am sure you will see syntactical error probably.