
Laravel 5.5 is first LTS release of Laravel Framework, Taler Otwell (Founder of Laravel) also said that the purpose of this release is going to be standards long time support and now Laravel 5.5 has a good shape things are well maintained . This is good news for us as a PHP developer we need something that is best and stable. so now if you are thinking to build a big project or you have already having a project and looking for good framework instead of saying good the best framework you can surely switch to Laravel 5.5. Laravel meant for a Big.
Okay so we can Use Laravel 5.5 on Server side or for Back end development, but how about front end?
We have number of choices among them I am picking up AngularJS front framework, yes you have choices but AngularJS fits for multiple reasons it’s incredibly faster and flexible to manage overtakes most of the front frameworks.
You can also go with Laravel 5.5 plus VueJs 2.0 it is also a perfect combination, I have posted a tutorial to learn Laravel 5.5 Crud operation using VueJS 2.0 you can read this from this Laravel 5.5 VueJs 2.0 CRUD Operations Application
Table of Contents
Why AngularJS?
- AngularJS handle data binding incredibly fast
- AngularJS uses DOM directly instead of saving as a copy of HTML code
- MVC pattern for front end developer – it enables flexibility to manage and development of the application.
- Easy to learn and use.
- Improvements Application performance
- Single Page Application development
Tutorial Features & Focus:
- Learn CRUD Implementation
- Learn how to use Laravel Auth
- Understanding of Laravel Routes and Resource routes
- Handling Front end crud operation using AngularJS
- Learn how to handle Ajax requests with AngularJS
Let’s start to build a simple but strong and effective application using Laravel 5 and AngularJs, with create, read, update and delete features.
At the begging of this tutorials you need to be ready to with few different things that is a development server along and code editor.
Laravel 5.5 Server Requirements:
- Apache or Nginx
- MySQL
- PHP >= 7.0
- OpenSSL, PDO, Mbstring, Tokenizer and XML PHP Extensions
- Composer
Step 1: Create new Laravel Project
Create new Laravel project using following command from your terminal or you can continue with your existing Laravel 5.5 project.
Using Laravel installer:
laravel new project-nameOR using composer:
composer create-project --prefer-dist laravel/laravel project-nameAfter creating project you need generate Application Key:
php artisan key:generateAfter setting your application quickly open you project folder into your favourite editor to do further development.
Step 2: Database Configuration and Design:
We need setup a database and required table structure, go ahead and create new database in MySQL.
I am guessing you have created a database and you have a database name, username and a database user password, next we need to configure it with our project.
Also Read: MySQL Database Backup and Restore from Terminal
Database connection settings:
Open .env file and update following settings:
DB_CONNECTION=mysql
DB_HOST=127.0.0.1
DB_PORT=3306
DB_DATABASE=ENTER-YOUR-DATABASE-NAME-HERE
DB_USERNAME=ENTER-DATABASE-USERNAME-HERE
DB_PASSWORD=ENTER-DATABASE-USER-PASSWORD-HERE
Create new table:
We will need users and tasks table, laravel provide users and password resets table migration by default and it’s ready to use out of the box we just needs to create additional migration file to create tasks table:
php artisan make:migration create_tasks_table --create=tasksIt should create migration file and list out following message on command line/terminal:
Created Migration: 2017_10_14_112012_create_tasks_tableOkay our migration file is ready, open up in editor from /database/migrations/ directory and update up() method according to the following script:
public function up()
    {
        Schema::create('tasks', function (Blueprint $table) {
            $table->increments('id');
            $table->unsignedInteger('user_id');
            $table->string('name');
            $table->text('description');
            $table->timestamps();
        });
    }
Run migration to create required tables:
Use following command to run the migrations:
php artisan migrateMigration table created successfully.
Migrating: 2014_10_12_000000_create_users_table
Migrated: 2014_10_12_000000_create_users_table
Migrating: 2014_10_12_100000_create_password_resets_table
Migrated: 2014_10_12_100000_create_password_resets_table
Migrating: 2017_10_14_112012_create_tasks_table
Migrated: 2017_10_14_112012_create_tasks_tableUse can checkout our database for newly created migration tables, here is database EER diagram:
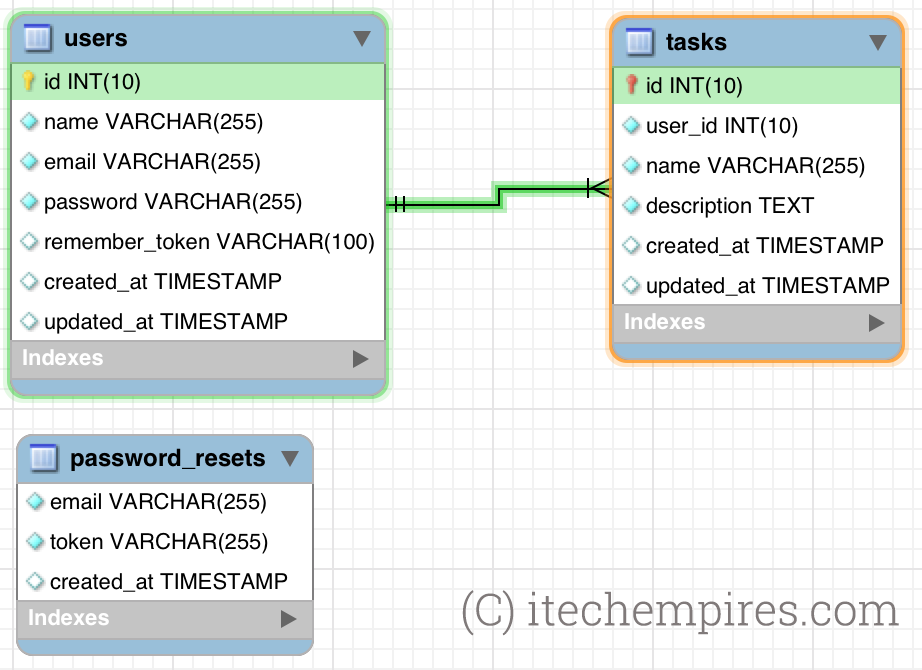
Step 3: Define User Authentication:
As said at the beginning of the tutorials we are going to learn about Laravel Auth, you know Laravel really flexible you can generate user authentication within a second which is going to provide us a ability to register new user, login user and forgot password request handling.
Use following command to generate default AUTH:
php artisan make:authAuthentication scaffolding generated successfully.
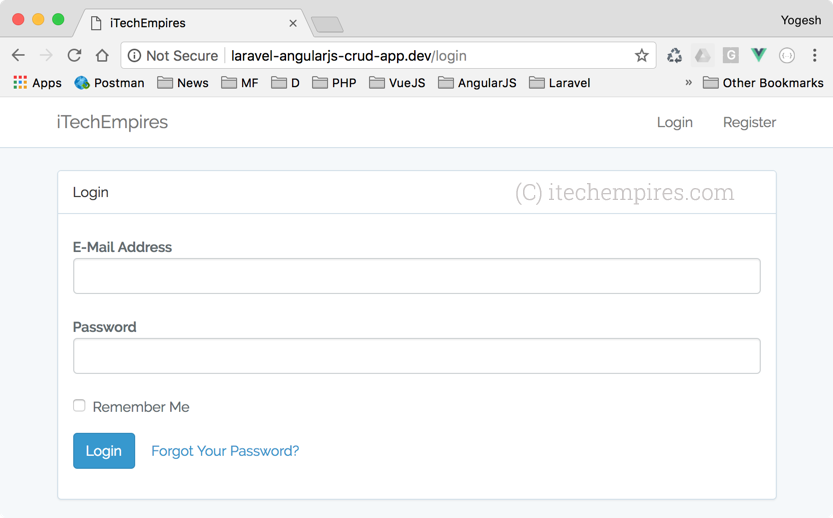
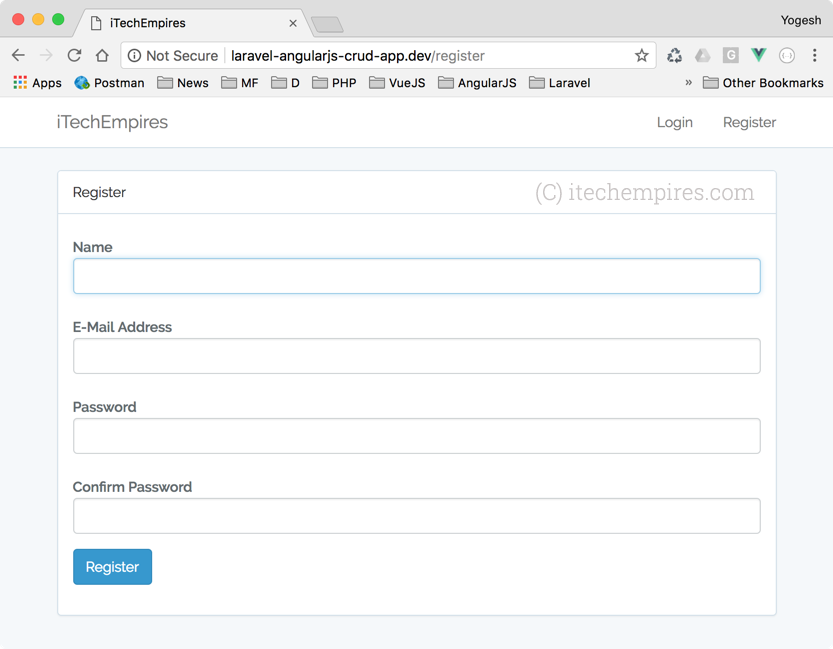
After execution of the above command we can run our project and navigate /login and register urls to checkout the pages as showing below:
Login Screen:
Registration Screen:
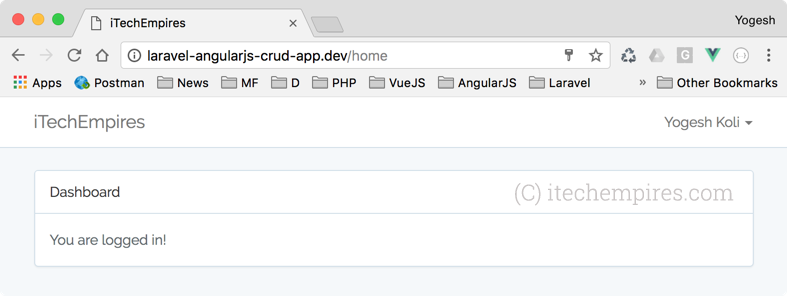
You can register new user as well and make sure user auth is working, you can following screen for the active login user:
Step: 4: Create Model and Controller:
Here we comes into the MVC model, in this step we will see more stuff from Laravel such as Laravel Eloquent model and Laravel Controller it’s incredibly simple to create model and controller in Laravel and usability real consentient.
Open your Terminal or command line and execute following command from root directory of your application:
php artisan make:model Task -rYou should see following message, it indicates that requested Model and controller created successfully.
Model created successfully.
Controller created successfully.
Local Task model at /app/Task.php open into your editor and update it according to following script to add fillable attributes and model biding.
<?php

namespace App;

use Illuminate\Database\Eloquent\Model;

class Task extends Model
{
    protected $fillable = ['user_id', 'name', 'description'];

    public function user()
    {
        return $this->belongsTo(User::class, 'user_id');
    }
}
Open User Model from /app/User.php add new method to define relations between user and tasks:
public function tasks()
{
     return $this->hasMany(Task::class, 'user_id');
}
Step 5: Define application resource routes:
Open /routes/web.php file and add new route at the end of the file as showing below:
<?php

Route::get('/', function () {
    return view('welcome');
});

Auth::routes();

Route::get('/home', 'HomeController@index')->name('home');

Route::resource('/task', 'TaskController');
Quick note: web.php is the file where we define our application routes to handle user request and in the above script just by adding one line we did created seven different routes related to Task table.
Step 6: Configure AngularJS:
This is important step we are going to deal with npm install here, I would prefer to run npm install first to install all required non required dependencies and we will go from there.
Before running following application you need to make sure you installed npm properly:
npm installWait for while to get installed all required decencies, finally it should something like this:
added 1335 packages in 118.496sIt indicates that it did the right job, let’s install AngularJS next:
npm install angular --save-devNow open /resources/assets/js/app.js file and import angular at the top after bootstrap as showing below:
import './bootstrap';
import 'angular';
Next.. we need to add ng-app directive to bootstrap the angularjs application, ng-app always needs to be an root element of the application, so go ahead and open /resources/views/layouts/app.blade.php file and add this directive under <html> element:
<!DOCTYPE html>
<html lang="{{ app()->getLocale() }}" ng-app="LaravelCRUD">
Step 7: Define AngularJS Module and Controller:
Now it’s time to define angularJS module and controller to handle tasks operations, open app.js file from /resources/assets/js/app.js and add following script to declare application module:
var app = angular.module('LaravelCRUD', []
    , ['$httpProvider', function ($httpProvider) {
        $httpProvider.defaults.headers.post['X-CSRF-TOKEN'] = $('meta[name=csrf-token]').attr('content');
    }]);

app.controller('TaskController', ['$scope', '$http', function ($scope, $http) {

}]);
Note: AngularJs Module is an global place for creating, registering and retrieving AngularJS modules for the given application directive.
Also, if you notice carefully we are adding Laravel CSRF tokens to the http request headers and that’s required without having X-CSRF-TOKEN you won’t be able to do anything in the backend, you all requested will be validated using that token.
Step 8: Read Operation:
Read operation basically is basically get’s the records from the server with GET request and list those records on User interface.
Open app.js file from the /resources/assets/js/app.js and add following methods and javascript objects to the TaskController:
    $scope.tasks = [];

    // List tasks
    $scope.loadTasks = function () {
        $http.get('/task')
            .then(function success(e) {
                $scope.tasks = e.data.tasks;
            });
    };
    $scope.loadTasks();
Update Laravel TaskController to handle read request:
/app/Http/Controllers/TaskController.php:
    public function index()
    {

        $tasks = request()->user()->tasks;

        return response()->json([
            'tasks' => $tasks,
        ], 200);
    }
Also make sure to add a constructer to have auth middleware to make it only accessible to the active users.
    public function __construct()
    {
        $this->middleware('auth');
    }
Now will have to update the User View to be able to list out those records, open resources/views/home.blade.php file and update according to the following script:
@extends('layouts.app')

@section('content')
    <div class="container" ng-controller="TaskController">
        <div class="row">
            <div class="col-md-12">
                <div class="panel panel-default">
                    <div class="panel-heading">
                        <button class="btn btn-primary btn-xs pull-right" ng-click="initTask()">Add Task</button>
                        Task
                    </div>

                    <div class="panel-body">
                        @if (session('status'))
                            <div class="alert alert-success">
                                {{ session('status') }}
                            </div>
                        @endif


                        <table class="table table-bordered table-striped" ng-if="tasks.length > 0">
                            <tr>
                                <th>No.</th>
                                <th>Name</th>
                                <th>Description</th>
                                <th>Action</th>
                            </tr>
                            <tr ng-repeat="(index, task) in tasks">
                                <td>
                                    @{{ index + 1 }}
                                </td>
                                <td>@{{ task.name }}</td>
                                <td>@{{ task.description }}</td>
                                <td>
                                    <button class="btn btn-success btn-xs" ng-click="initEdit(index)">Edit</button>
                                    <button class="btn btn-danger btn-xs" ng-click="deleteTask(index)" >Delete</button>
                                </td>
                            </tr>
                        </table>
                    </div>
                </div>
            </div>
        </div>

    </div>
@endsection
Step 9: Create Operation:
Keep in mind for each operation we needs to do three updates, that is to add a angularjs controller function, update TaskController methods according to the operations and Update the User view:
Add AngularJS Controller Function:
$scope.errors = [];

    $scope.task = {
        name: '',
        description: ''
    };
    $scope.initTask = function () {
        $scope.resetForm();
        $("#add_new_task").modal('show');
    };

    // Add new Task
    $scope.addTask = function () {
        $http.post('/task', {
            name: $scope.task.name,
            description: $scope.task.description
        }).then(function success(e) {
            $scope.resetForm();
            $scope.tasks.push(e.data.task);
            $("#add_new_task").modal('hide');

        }, function error(error) {
            $scope.recordErrors(error);
        });
    };

    $scope.recordErrors = function (error) {
        $scope.errors = [];
        if (error.data.errors.name) {
            $scope.errors.push(error.data.errors.name[0]);
        }

        if (error.data.errors.description) {
            $scope.errors.push(error.data.errors.description[0]);
        }
    };

    $scope.resetForm = function () {
        $scope.task.name = '';
        $scope.task.description = '';
        $scope.errors = [];
    };
Update TaskController.php:
    public function store(Request $request)
    {
        $this->validate($request, [
            'name'        => 'required|max:255',
            'description' => 'required',
        ]);

        $task = Task::create([
            'name'        => request('name'),
            'description' => request('description'),
            'user_id'     => Auth::user()->id
        ]);

        return response()->json([
            'task'    => $task,
            'message' => 'Success'
        ], 200);
    }
If you get Auth not found execution then make sure to add Auth Class to your controller:
use Illuminate\Support\Facades\Auth;
Update User View:
Add following model popup in home.blade.php file within container class:
<div class="modal fade" tabindex="-1" role="dialog" id="add_new_task">
<div class="modal-dialog" role="document">
<div class="modal-content">
<div class="modal-header">
<button type="button" class="close" data-dismiss="modal" aria-label="Close"><span
aria-hidden="true">×</span></button>
<h4 class="modal-title">Add Task</h4>
</div>
<div class="modal-body">
<div class="alert alert-danger" ng-if="errors.length > 0">
<ul>
<li ng-repeat="error in errors">@{{ error }}</li>
</ul>
</div>
<div class="form-group">
<label for="name">Name</label>
<input type="text" name="name" class="form-control" ng-model="task.name">
</div>
<div class="form-group">
<label for="description">Description</label>
<textarea name="description" rows="5" class="form-control"
ng-model="task.description"></textarea>
</div>
</div>
<div class="modal-footer">
<button type="button" class="btn btn-default" data-dismiss="modal">Close</button>
<button type="button" class="btn btn-primary" ng-click="addTask()">Submit</button>
</div>
</div><!-- /.modal-content -->
</div><!-- /.modal-dialog -->
</div><!-- /.modal -->
Execute Create Operation:
Go ahead and execute following command to compile the script and test our create operation:
$ npm run dev
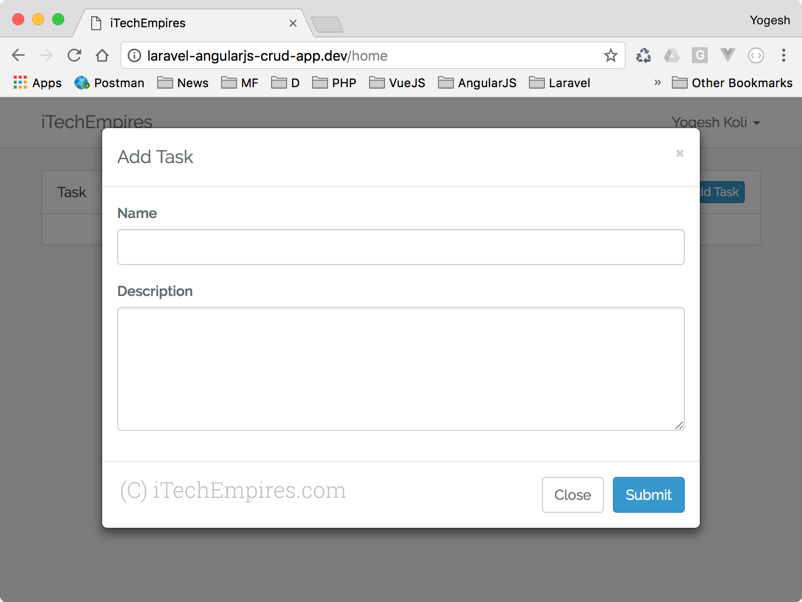
Click Add Task button, will get you to the Create New Task model window:
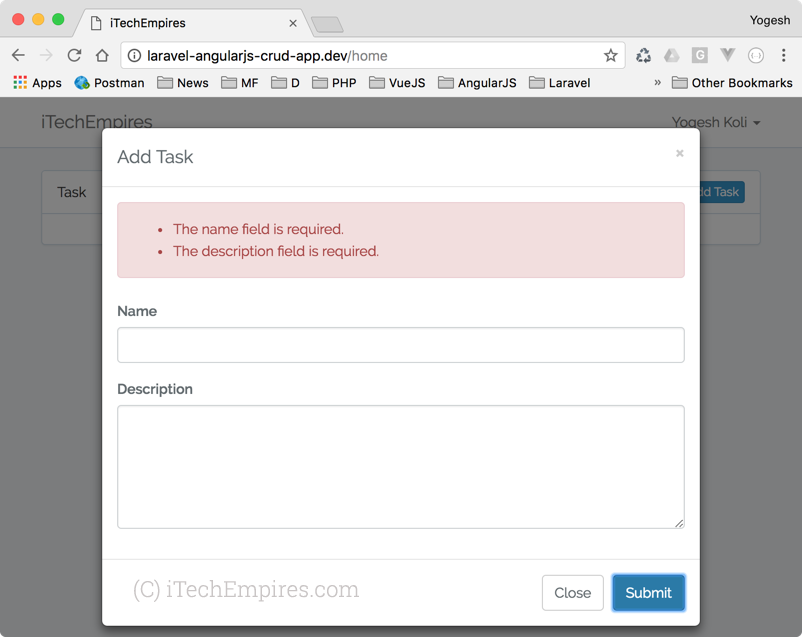
Click Submit button without filling input fields to test validations:
Fill Input field and click submit to create new task:
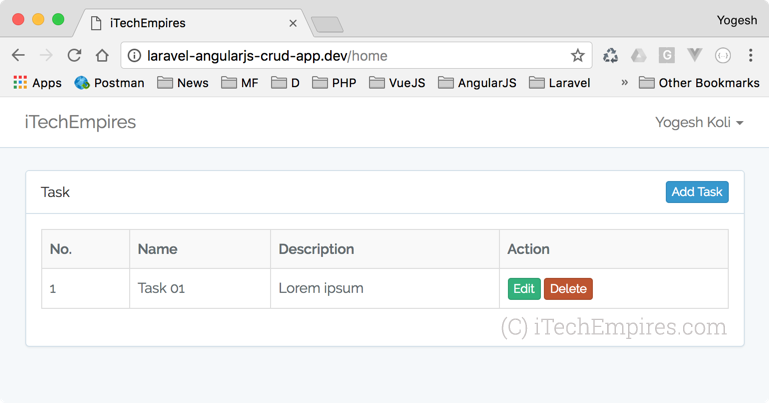
Step 10: Update Given Task:
Add new angularjs controller functions:
$scope.edit_task = {};
    // initialize update action
    $scope.initEdit = function (index) {
        $scope.errors = [];
        $scope.edit_task = $scope.tasks[index];
        $("#edit_task").modal('show');
    };

    // update the given task
    $scope.updateTask = function () {
        $http.patch('/task/' + $scope.edit_task.id, {
            name: $scope.edit_task.name,
            description: $scope.edit_task.description
        }).then(function success(e) {
            $scope.errors = [];
            $("#edit_task").modal('hide');
        }, function error(error) {
            $scope.recordErrors(error);
        });
    };
Update User View:
<div class="modal fade" tabindex="-1" role="dialog" id="edit_task">
<div class="modal-dialog" role="document">
<div class="modal-content">
<div class="modal-header">
<button type="button" class="close" data-dismiss="modal" aria-label="Close"><span
aria-hidden="true">×</span></button>
<h4 class="modal-title">Update Task</h4>
</div>
<div class="modal-body">
<div class="alert alert-danger" ng-if="errors.length > 0">
<ul>
<li ng-repeat="error in errors">@{{ error }}</li>
</ul>
</div>
<div class="form-group">
<label for="name">Name</label>
<input type="text" name="name" class="form-control" ng-model="edit_task.name">
</div>
<div class="form-group">
<label for="description">Description</label>
<textarea name="description" rows="5" class="form-control"
ng-model="edit_task.description"></textarea>
</div>
</div>
<div class="modal-footer">
<button type="button" class="btn btn-default" data-dismiss="modal">Close</button>
<button type="button" class="btn btn-primary" ng-click="updateTask()">Submit</button>
</div>
</div><!-- /.modal-content -->
</div><!-- /.modal-dialog -->
</div><!-- /.modal -->
Update TaskController.php:
public function update(Request $request, Task $task)
    {
        $this->validate($request, [
            'name'        => 'required|max:255',
            'description' => 'required',
        ]);

        $task->name = request('name');
        $task->description = request('description');
        $task->save();

        return response()->json([
            'message' => 'Task updated successfully!'
        ], 200);
    }
Test Update feature:
Go ahead and run the $ npm run dev command again from you terminal to compile resent changes and test your application:
Click Edit button from the task list to open Edit model window:
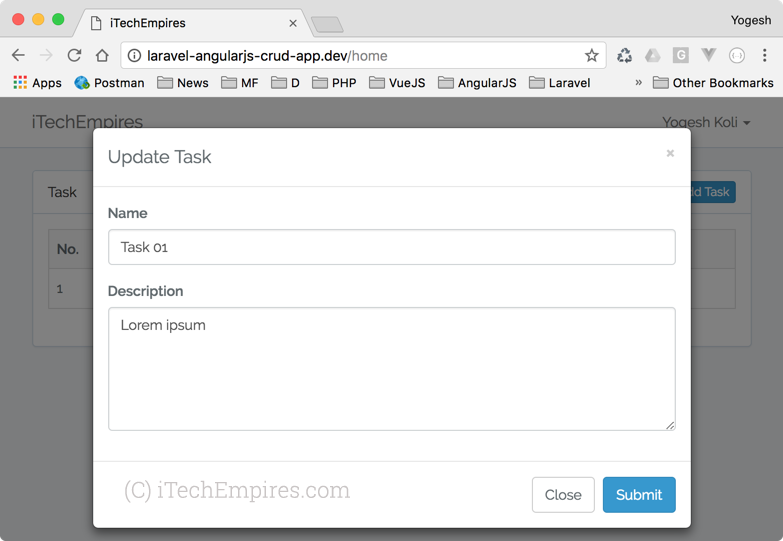
Make change to task and click submit:
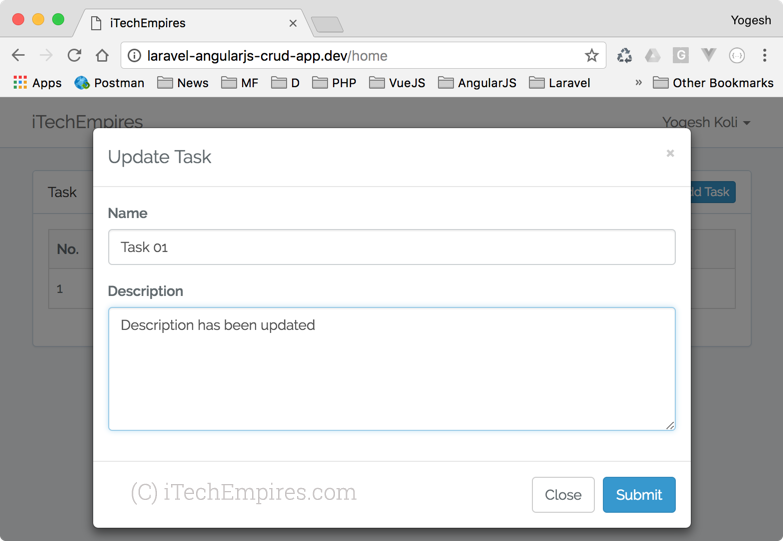
Quickly list recently updated task:
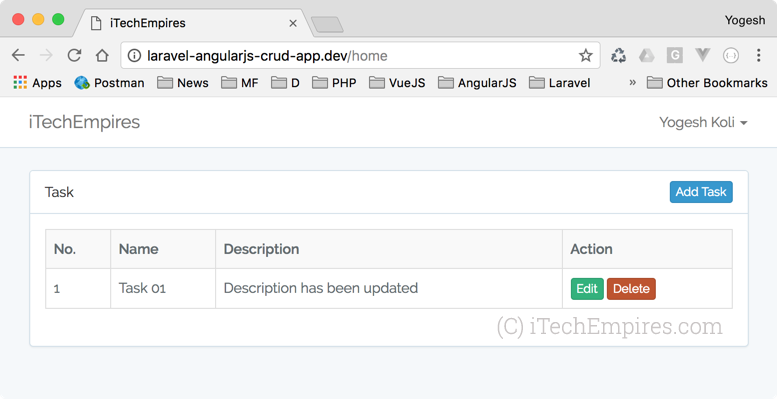
We have done with the important operations now it’s time to deal with delete action.
Step 11: Delete given Task:
Update AngularJS Controller:
// delete the given task
    $scope.deleteTask = function (index) {

        var conf = confirm("Do you really want to delete this task?");

        if (conf === true) {
            $http.delete('/task/' + $scope.tasks[index].id)
                .then(function success(e) {
                    $scope.tasks.splice(index, 1);
                });
        }
    };
Change TaskController method definition:
    public function destroy(Task $task)
    {
        $task->delete();

        return response()->json([
            'message' => 'Task deleted successfully!'
        ], 200);
    }
Now you can again compile your script and test the delete action, it should work however if you get any issues while learning this tutorials let me know using comments box below.
Conclusion:
Let’s conclude what you have learned from this tutorial:
- How to install new Laravel application and database configuration
- Creating Database migrations file and running the migrations to create new database tables
- How to deal with Laravel Eloquent model data binding and handling Model CRUD operations from Controller
- How to install and configure AngularJS using npm with Laravel 5.5
- AngularJS module settings, creating controller and handling front operations with secure Ajax requests.
- Using bootstrap models popup inside AngularJS controllers
- Validating the requests and list-out the errors
Thanks for being a part of iTech Empires, please don’t forgot to subscribe for our news letter to get reset updates directly into your inbox and also make sure to share this tutorial on social media to support.
Thank you, happy coding!

hello when i run the code… http://localhost/laravel-angular/public/home it vahish after 1 second and on console i get “Uncaught Error: [$injector:modulerr] Failed to instantiate module LaravelCRUD due to:
Error: [$injector:nomod] Module ‘LaravelCRUD’ is not available! You either misspelled the module name or forgot to load it. If registering a module ensure that you specify the dependencies as the second argument.”
pleasee help me
Create a Module with the name LaravelCRUD
angular.module(‘LaravelCRUD’, []).controller(“TaskController”, function ($scope,$http) {
//rest of the code in the app.js goes here
});
I am getting issue while adding task task not submitted even required error not working
You might be running this demo on localhost, so make few changes into the app.js file where we call $http request, for example change
$http.post('/task'to$http.post('http://localhost/project/task'Then you should be good to go.
it helps me thank you Sir Manste
Its Work File, Thanks
Hi,
I am unable to open the block content..Please help
the blocked content is not visible even after clicking on like button…
what is the issue??
Hi, i am using laravel 5.6 and i’m trying to follow your tuto, but only recieve “ReferenceError: index is not defined at mn.eval (eval at Ea (app.js:1), :3:572)” at console.
Somebody can help me?
awesome bro ………… 🙂
could you please give me more link to learn more about angular and laravel
Hello Sir,
List of data in angular js is not working because in controller file , view is missing in the function of view .
So please tell me ,
how to be show data table using angular js in laravel 5.5 ?
What is the exact issue? whether you are not able to list out the records or you can’t fetch the records? mean while follow the tutorial carefully you will get the clear idea on you have can deal with CRUD operations.
Doesnt show any data for me, i’ve restarted 3 times
same issue im facing.
in my project i couldnt find /resources/assets/js/app.js this. i.e inside resourses no assets folder
Don’t worry about it, this is because you are using Laravel 5.7 and laravel 5.7 has removed assets folder from the framework folder structure.
quand je fais ceci, le mien n’envoi que le fichier json!!! pourquoi???
Pouvez-vous nous dire exactement quels sont les problèmes que vous rencontrez? Je ne sais pas où vous vous retrouvez.
Hi,
Same way to design a project not working. please option to download.
What are the issues?
thanks bro its working perfect…
Great.
ng-click not working in Modal, when i click submit button to add new task.
$scope.addTask = function () {
console.log(‘addTasks called’);
};
Make sure you are calling the current function and checkout the console if there is any JS errors.
Hi Koli,
Please let know where/in which file, to add Add AngularJS Controller Function: (in Step 9)
$scope.errors = [];
$scope.task = {
name: ”,
description: ”
};
$scope.initTask = function () {
$scope.resetForm();
$(“#add_new_task”).modal(‘show’);
};
……..
You can add this inside app.js file the location is – resources/assets/js/app.js
However the best practice of adding controller is to create a separate file for the controller and import it to app.js and call from there, but here in this tutorial I am using the simple approach to avoid complications for the beginners.
npm run dev throwing an error with laravel 5.8
Hey any one can give me the app.js file?
Step 7 portion is restriced. How am i able to complete my setup
@Usama it is you just need to share this post on twitter or use the other option to subscribe it helps us to reach more people.