
Table of Contents
Introduction:
This tutorial is for beginners, who started working on PHP Project, and wants to add asynchronous file upload feature, so you’re at right place.
What is PHP Asynchronous File Upload?
So, you might think what is file upload? And how it works?
The answer is here, to upload your file from your local machine to the server (website) is called file upload, it works exactly same as the definition, when we select our file from the browser and click submit, the browser takes file from our local machine and submits it to the server and server do his job to save the file to the defined path.
Here I am going to explain step by step process to create the file upload feature along with the source code of this tutorial so that you can easily download and test on your local machine.
The things you should know before following this tutorial:
- PHP
- HTML
- jQuery
- CSS
- Bootstrap
So let’s start some coding:
Create PHP Asynchronous File Upload Demo:
Go ahead and create project folder and add new index.html file and use following script:
index.html
Form and Input Field: The basic need to upload file is to have `<form>` with `enctype=”multipart/form-data”`, if you notice the above file, I have added form with enctype, next is the `input` field of `file type`, we have this field with the ID “file_to_upload“.
Submit Button: After `</form>` we have Submit button included with `onClick` event along with function call `uploadFile()`, we are going to write this function under script.js file, which is going to handle file upload operation.
Create script.js file:
Let’s create script.js file and add following source code in to it:
script.js:
So, we have our script.js file ready, here we have uploadFile() function is defined, this function is basically to check validation and get the selected file from input field and submit it to the uploadFile.php page asynchronously using ajax.
So now we need to create uploadFile.php, so go ahead and crated this file to the root, and use following source code:
uploadFile.php
Just a 10 lines code 🙂 yes, this line is to have our file uploaded to the `files` folder on server, we are using `move_uploaded_file()` function here. if you remember we had sent selected file from “file_to_upload” input field.
We are done with the code, find out following tutorial folder structure and complete source code below:
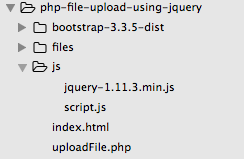
Demo Screen:

if your done with all above steps then go ahead and run the code on your server if not you can download the code from the below link as well.
great tutorial. Which web framework u use sir.
You’re asking for specific tutorial or regarding website development ?
Although I use laravel framework for development, there lot more tutorials coming related to laravel.
sir, sorry, but can you kindly please explain to me about getting path string of the uploaded images, and inserting it into the database, i’ve been working on your tutorial about CRUD operation using Jquery, and i want to implement image for user, but i am stuck, no image uploaded to my server folder and no path record in database. this is what i’ve tried for the php file:
if(isset($_POST[‘username’]) && isset($_POST[’email’])
&& (isset($_FILES[“file”][“type”])){
$tmp = $_FILES[‘file’][‘tmp_name’];
$Path = “uploads/”.$_FILES[‘file’][‘name’];
if(move_uploaded_file($tmp,$Path))
{
$query = “INSERT INTO users(username, email, image) VALUES(‘$username’, ‘$email’, ‘$Path’, ”)”;
if (!$result = mysql_query($query)) {
echo”No data Inserted!”;
exit(mysql_error());
}
echo “1 Data Added!”;
}
}
am i missing something here or perhaps something inside js file, sir?
Thank you for this tutorial its works really great. Thank you…