
In last tutorial I have given details on following points:
- Database Setup and Database Table Script
- PayPal Sandbox user setup
- PayPal Sandbox REST Application setup
If you have not check first part of this tutorial click to visit: PayPal JavaScript Express checkout Integration in PHP MySQL – Part 1
In this tutorial we are going to see the actual scripting part of the PayPal Express checkout integration:
Tutorial Features:
- Login screen for the demo (we will have a predefined user ready to login and test the demo)
- Product Listing with Add to Shopping Cart Button
- Add Product to Shopping Cart
- Remove Product From Shopping Cart
- Shopping Cart page with good design
- PayPal Express Checkout Button (this button will help us to get paid)
- My Orders Page with order listing details such as Order Total and Ordered items.
- Logout the user from the demo
You can checkout the live demo and Tutorial Overview Video:
Live DemoTutorial Overview Video
Table of Contents
Step 4: Setup PHP Application:
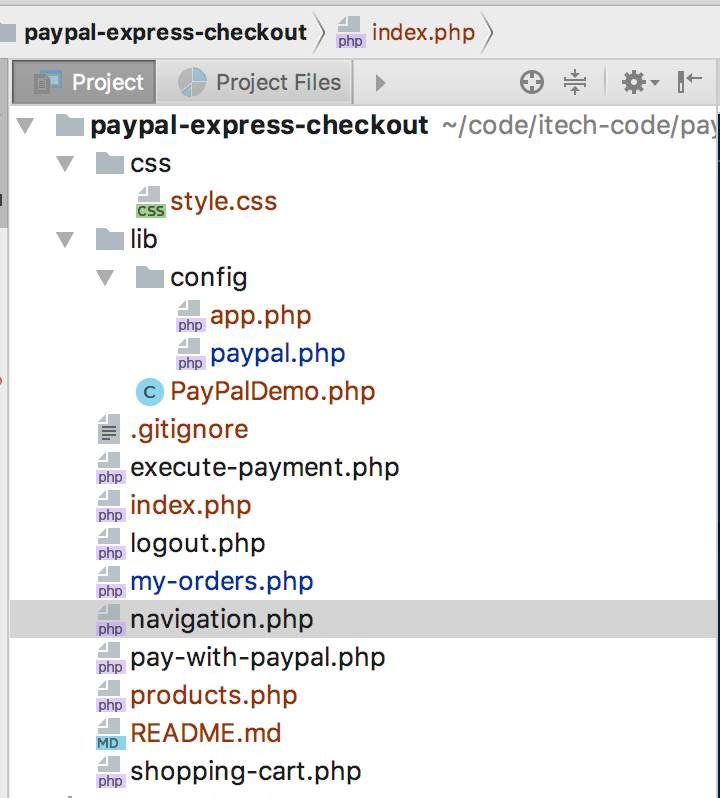
Let’s to create brand new PHP application into your PHP development environment and use following screen to design folder structure for the application:
Step 5: Database Connection Settings:
If you are done with the project structure, go a head and open app.php file from lib/config/app.php location, and add following script
<?php

session_start();
define('HOST', 'localhost'); // Database host name ex. localhost
define('USER', 'ENTER-USERNAME-HERE'); // Database user. ex. root ( if your on local server)
define('PASSWORD', 'ENTER-PASSWORD-HERE'); // Database user password  (if password is not set for user then keep it empty )
define('DATABASE', 'ENTER-DATABASE-NAME-HERE'); // Database name

function DB()
{
    $con = new mysqli(HOST, USER, PASSWORD, DATABASE);

    if ($con->connect_error) {
        die("Connection failed: " . $con->connect_error);
    }

    return $con;
}

?>
Don’t forget to update database connection settings variables from the above file, the above file is going to help application to connect MySQL database using MySQLi.
Step 6: PayPal Application Configuration Settings:
Open lib/config/paypal.php file and add following script and update global variables to match with your PayPal application settings and don’t forget to update APP_URL to your application URL, it may be from your development environment or production environment but make sure it need to match with your own application url.
<?php

/**
 *  If you make this application for live payments then update following variable values:
 *  Change MODE from sandbox to live
 *  Update PayPal Client ID and Secret to match with your live paypal app details
 *  Change Base URL to https://api.paypal.com/v1/
 *  finally make sure that APP URL matcher to your application url
 */

define('MODE', 'sandbox');
define('CURRENCY', 'USD');
define('APP_URL', 'http://demos.itechempires.com/paypal-javascript-express-checkout-live-demo/');

define("PayPal_CLIENT_ID", "ENTER-YOUR-PAYPAL-CLIENT-ID-HERE");
define("PayPal_SECRET", "ENTER-YOUR-PAYPAL-APP-SECRET-HERE");
define("PayPal_BASE_URL", "https://api.sandbox.paypal.com/v1/");

?>
Quick note If you want to make this application live in feature make sure to change the above setting to live, meaning update application mode from sandbox to live and update client id, client secret and PayPal base url according to your live applications details.
Step 7: Application Library Class:
We have lib/PayPalDemo.php, file added into the project folder structure I am going to call it application library class the reason behind this is, this file is going to handle all backend operation such as user login, get user details, register new user, add product to shopping cart, remove product from shopping cart, checkout the PayPal Payment status, execute the payment and so on.
So in this step we are just going to make ready for upcoming function, go ahead and open PayPalDemo.php file and add following script:
<?php

require __DIR__ . '/config/app.php';
require __DIR__ . '/config/paypal.php';

class PayPalDemo
{
    protected $db;

    function __construct()
    {
        $this->db = DB();
    }
}

?>
We have just created an empty class we will add functions later on as we needed.
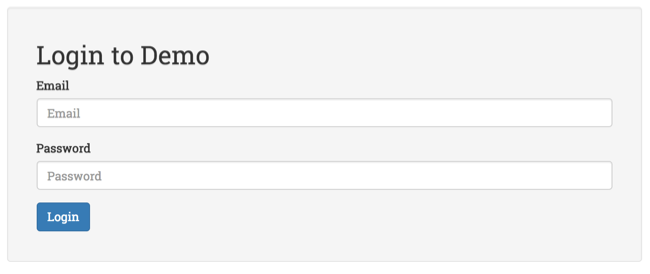
Step 8: Login Page Design, Handling Login Request:
We will design login page on index.php page, open index.php file and following login page design.
<!doctype html>
<html lang="en">
<head>
    <meta charset="UTF-8">
    <meta name="viewport"
          content="width=device-width, user-scalable=no, initial-scale=1.0, maximum-scale=1.0, minimum-scale=1.0">
    <meta http-equiv="X-UA-Compatible" content="ie=edge">
    <title>PHP MySQL PayPal JavaScript Express Checkout Demo</title>

    <link rel="stylesheet" href="https://maxcdn.bootstrapcdn.com/bootstrap/3.3.7/css/bootstrap.min.css">
    <link href="https://fonts.googleapis.com/css?family=Roboto+Slab" rel="stylesheet">
    <link rel="stylesheet" href="css/style.css">
</head>
<body>

    <div class="container">
        <div class="row">
            <div class="col-md-12">
                <h1>PHP MySQL PayPal JavaScript Express Checkout Demo</h1>
            </div>
        </div>

        <div class="row well">
            <div class="col-md-7">
                <h2>
                    Login to Demo
                </h2>
                <?php
                if (isset($login_error_message) && $login_error_message != "") {
                    echo '<div class="alert alert-danger"><strong>Error: </strong> ' . $login_error_message . '</div>';
                }
                ?>
                <form action="index.php" method="post">
                    <div class="form-group">
                        <label for="email">Email</label>
                        <input class="form-control" type="email" name="email" id="email" placeholder="Email" >
                    </div>
                    <div class="form-group">
                        <label for="password">Password</label>
                        <input class="form-control" type="password" name="password" id="password" placeholder="Password" >
                    </div>
                    <div class="form-group">
                        <input name="btnLogin" type="submit" class="btn btn-primary" value="Login" >
                    </div>
                </form>
            </div>
            <div class="col-md-5">

            </div>
        </div>
    </div>


</body>
</html>
Handle Login action:
Open PayPalDemo.php file from lib folder and add following functions:
    public function isEmail($email)
    {
        $email = mysqli_real_escape_string($this->db, $email);
        $query = "SELECT `email` FROM `users` WHERE `email` = '$email'";
        if (!$result = mysqli_query($this->db, $query)) {
            exit(mysqli_error($this->db));
        }
        if (mysqli_num_rows($result) > 0) {
            return TRUE;
        } else {
            return FALSE;
        }
    }

    public function isValidPassword($email, $password)
    {
        $email = mysqli_real_escape_string($this->db, $email);
        $password = mysqli_real_escape_string($this->db, $password);

        if ($this->isEmail($email)) {
            $enc_password = $this->findPasswordByEmail($email);
            if (password_verify($password, $enc_password)) {
                return TRUE;
            } else {
                return FALSE;
            }
        } else {
            return FALSE;
        }

    }

    function findPasswordByEmail($email)
    {
        $query = "SELECT password FROM `users` WHERE `email`='$email'";
        if (!$result = mysqli_query($this->db, $query)) {
            exit(mysqli_error($this->db));
        }
        $data = '';
        if (mysqli_num_rows($result) > 0) {
            while ($r = mysqli_fetch_assoc($result)) {
                $data = $r['password'];
            }
        }

        return $data;
    }

    public function getUserIDByEmail($email)
    {
        $email = mysqli_real_escape_string($this->db, $email);
        $query = "SELECT id FROM `users` WHERE `email` = '$email'";
        if (!$result = mysqli_query($this->db, $query)) {
            exit(mysqli_error($this->db));
        }
        $data = '';
        if (mysqli_num_rows($result) > 0) {
            while ($row = mysqli_fetch_assoc($result)) {
                $data = $row['id'];
            }
        }

        return $data;
    }
Functions overview:
- isEmail() – check given email is exists.
- isValidPassword() – check if the given password is valid
- findPasswordByEmail() – get the password for given email address
- getUserIDByEmail() – find out the user id for given email address
Let’s user this function on index.php page to handle login request, add following script at the top of the index.php page.
Index.php:
<?php

require __DIR__ . '/lib/PayPalDemo.php';


if(!empty($_SESSION['user_id'])){
    header('Location: products.php');
    exit;
}

$app = new PayPalDemo();

$login_error_message = '';

// handle login request
if (!empty($_POST['btnLogin'])) {


    $email = trim($_POST['email']);
    $password = trim($_POST['password']);

    if ($email == "") {
        $login_error_message = 'Email field is required!';
    } else if ($password == "") {
        $login_error_message = 'Password field is required!';
    } else if (!filter_var($email, FILTER_VALIDATE_EMAIL)) {
        $login_error_message = 'Invalid email address!';
    } else {

        // check email is valid
        if ($app->isEmail($email)) {

            // check password is valid
            if ($app->isValidPassword($email, $password)) {

                // set session and redirect to the profile page
                $_SESSION['user_id'] = $app->getUserIDByEmail($email); // Set Session
                header("Location: products.php"); // Redirect user to the products.php page

            } else {
                $login_error_message = 'Invalid login password!';
            }

        } else {
            $login_error_message = 'Account is not exist with this email, please create new account to login!';
        }
    }
}

?>
Our login page is ready to use, let’s move on to the next step to design our products page.
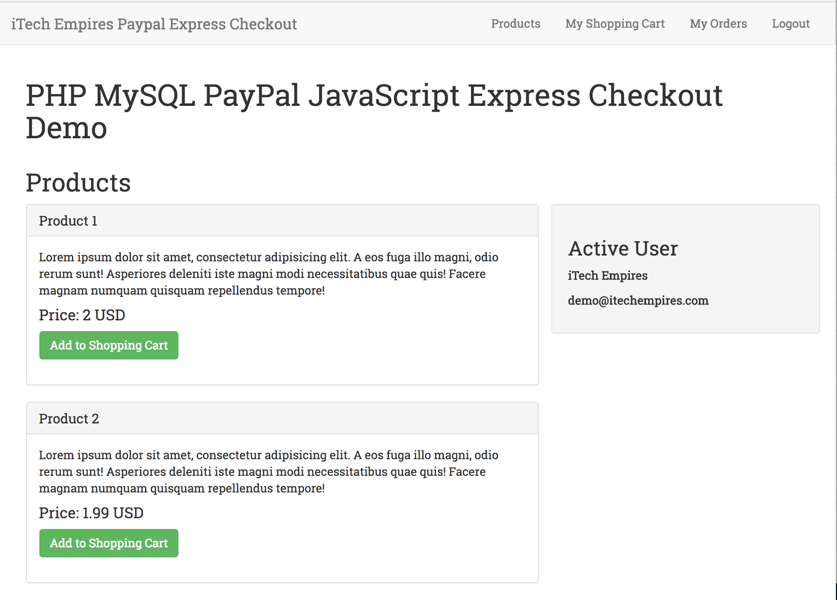
Step 9: Product Page:
Products page needs to have products listing along with the add to shopping cart button and little bit information about user.
Add Required functions for the product page into the PayPalDemo Class as showing below:
getAllProducts() – used to get all the products from the system:
    public function getAllProducts()
    {
        $data = [];
        $query = "SELECT * FROM products";
        if (!$result = mysqli_query($this->db, $query)) {
            exit(mysqli_error($this->db));
        }
        if (mysqli_num_rows($result) > 0) {
            while ($row = mysqli_fetch_assoc($result)) {
                $data[] = $row;
            }
        }

        return $data;
    }
getUserDetails() – used to get user details for the given user id.
public function getUserDetails($id)
{
    $data = [];
    $query = "SELECT * FROM `users` WHERE `id` = '$id'";
    if (!$result = mysqli_query($this->db, $query)) {
        exit(mysqli_error($this->db));
    }
    if (mysqli_num_rows($result) > 0) {
        while ($row = mysqli_fetch_assoc($result)) {
            $data = $row;
        }
    }

    return $data;
}
Open products.php page and add this php script at the top of the page:
<?php

require __DIR__ . '/lib/PayPalDemo.php';

if (empty($_SESSION['user_id'])) {
    header('Location: index.php');
    exit;
}

$app = new PayPalDemo();
// fetch all products
$products = $app->getAllProducts();
$user = $app->getUserDetails($_SESSION['user_id']);
?>
here we are handling session as well as Products request, lets move on to the design part.
<!doctype html>
<html lang="en">
<head>
    <meta charset="UTF-8">
    <meta name="viewport"
          content="width=device-width, user-scalable=no, initial-scale=1.0, maximum-scale=1.0, minimum-scale=1.0">
    <meta http-equiv="X-UA-Compatible" content="ie=edge">
    <title>PHP MySQL PayPal JavaScript Express Checkout Demo</title>

    <link rel="stylesheet" href="https://maxcdn.bootstrapcdn.com/bootstrap/3.3.7/css/bootstrap.min.css">
    <link href="https://fonts.googleapis.com/css?family=Roboto+Slab" rel="stylesheet">
    <link rel="stylesheet" href="css/style.css">
</head>
<body>

<?php require 'navigation.php'; ?>

<div class="container">
    <div class="row">
        <div class="col-md-12">
            <h1>PHP MySQL PayPal JavaScript Express Checkout Demo</h1>
        </div>
    </div>

    <div class="row">
        <div class="col-md-12">
            <h2>
                Products
            </h2>
        </div>
    </div>

    <div class="row">
        <div class="col-md-8">
            <?php foreach ($products as $product) { ?>
                <div class="panel panel-default">
                    <div class="panel-heading">
                        <h3 class="panel-title">
                            <?php echo $product['name'] ?>
                        </h3>
                    </div>
                    <div class="panel-body">
                        <p>
                            <?php echo $product['description'] ?>
                        </p>

                        <h4>Price: <?php echo $product['price'] . ' ' . $product['currency'] ?></h4>


                        <div class="form-group">
                            <form action="shopping-cart.php" method="post">
                                <input type="hidden" name="product_id" value="<?php echo $product['id'] ?>">
                                <input name="btnAddProduct" type="submit" class="btn btn-success" value="Add to Shopping Cart">
                            </form>
                        </div>
                    </div>
                </div>
            <?php } ?>

        </div>
        <div class="col-md-4 well">
            <h3>Active User</h3>
            <p>
                <b><?php echo $user['first_name'] . ' ' . $user['last_name'] ?></b>
            </p>
            <p>
                <b><?php echo $user['email']; ?></b>
            </p>
        </div>
    </div>
</div>

</body>
</html>
navigation.php:
<nav class="navbar navbar-default">
    <div class="container-fluid">
        <!-- Brand and toggle get grouped for better mobile display -->
        <div class="navbar-header">
            <button type="button" class="navbar-toggle collapsed" data-toggle="collapse" data-target="#bs-example-navbar-collapse-1" aria-expanded="false">
                <span class="sr-only">Toggle navigation</span>
                <span class="icon-bar"></span>
                <span class="icon-bar"></span>
                <span class="icon-bar"></span>
            </button>
            <a class="navbar-brand" href="index.php">iTech Empires Paypal Express Checkout</a>
        </div>

        <!-- Collect the nav links, forms, and other content for toggling -->
        <div class="collapse navbar-collapse" id="bs-example-navbar-collapse-1">

            <ul class="nav navbar-nav navbar-right">
                <li>
                    <a href="products.php">Products</a>
                </li>
                <li>
                    <a href="shopping-cart.php">My Shopping Cart</a>
                </li>
                <li>
                    <a href="my-orders.php">My Orders</a>
                </li>
                <li><a href="logout.php?action=true">Logout</a></li>
            </ul>
        </div><!-- /.navbar-collapse -->
    </div><!-- /.container-fluid -->
</nav>
Step 10: Design and Development of Shopping Cart:
This is core feature of the application, which is required for every e-commerce application, it helps user to select and buy a particular product.
First thing let’s add required functions into PayPalDemo class:
get_product_details() – use to get the product details for given product id.
public function get_product_details($id)
{
    $data = [];
    $query = "SELECT * FROM `products` WHERE `id` = '$id'";
    if (!$result = mysqli_query($this->db, $query)) {
        exit(mysqli_error($this->db));
    }
    if (mysqli_num_rows($result) > 0) {
        while ($row = mysqli_fetch_assoc($result)) {
            $data = $row;
        }
    }

    return $data;
}
add_new_product() – use to add given product into shopping cart.
public function add_new_product($product)
{
    if (!isset($_SESSION['cart'])) {
        $_SESSION['cart'] = [0 => [
            'product_id' => $product['id'],
            'name'       => $product['name'],
            'price'      => $product['price'],
            'currency'   => $product['currency'],
            'quantity'   => 1,
        ]];
    } else {
        $cart = $_SESSION['cart'];
        $found = FALSE;
        foreach ($cart as $item) {
            if ($item['product_id'] === $product['id']) {
                $found = TRUE;
            }
        }

        if ($found === FALSE) {

            $count = count($cart);

            $cart[$count] = [
                'product_id' => $product['id'],
                'name'       => $product['name'],
                'price'      => $product['price'],
                'currency'   => $product['currency'],
                'quantity'   => 1,
            ];

            $_SESSION['cart'] = $cart;
        }
    }
}
remove_product() – remove particular item from the shopping with the given index
public function remove_product($index)
{
    if ($index >= 0) {
        $cart = $_SESSION['cart'];
        unset($cart[$index]);
        $_SESSION['cart'] = $cart;
    }
}
_get_sum() – Calculate the total price of the selected items from the shopping cart.
public function _get_sum()
{
    $price = 0;
    if (count($_SESSION['cart']) > 0) {
        foreach ($_SESSION['cart'] as $product) {
            $price += (float)$product['price'];
        }
    }

    return round($price, 2);
}
Our required functions are ready to use, go ahead and open shopping-cart.php page and add following script:
<?php

require __DIR__ . '/lib/PayPalDemo.php';


if (empty($_SESSION['user_id'])) {
    header('Location: index.php');
    exit;
}

$app = new PayPalDemo();

if (!empty($_POST['btnAddProduct'])) {

    $product_id = $_POST['product_id'];

    $product = $app->get_product_details($product_id);

    $app->add_new_product($product);

}

if (!empty($_POST['btnRemoveProduct'])) {
    $app->remove_product($_POST['index']);
}

if (isset($_GET['status']) && $_GET['status'] == FALSE) {
    $message = 'Your payment transaction failed!';
}

$user = $app->getUserDetails($_SESSION['user_id']);

$cart = (!empty($_SESSION['cart']) ? $_SESSION['cart'] : []);

$total = (!empty($_SESSION['cart']) ? $app->_get_sum() : 0);
?>

<!doctype html>
<html lang="en">
<head>
    <meta charset="UTF-8">
    <meta name="viewport"
          content="width=device-width, user-scalable=no, initial-scale=1.0, maximum-scale=1.0, minimum-scale=1.0">
    <meta http-equiv="X-UA-Compatible" content="ie=edge">
    <title>PHP MySQL PayPal JavaScript Express Checkout Demo</title>

    <link rel="stylesheet" href="https://maxcdn.bootstrapcdn.com/bootstrap/3.3.7/css/bootstrap.min.css">
    <link href="https://fonts.googleapis.com/css?family=Roboto+Slab" rel="stylesheet">
    <link rel="stylesheet" href="css/style.css">
</head>
<body>

<?php require 'navigation.php'; ?>

<div class="container">
    <div class="row">
        <div class="col-md-12">
            <h1>PHP MySQL PayPal JavaScript Express Checkout Demo</h1>
        </div>
    </div>

    <div class="row">
        <div class="col-md-12">
            <h2>
                Shopping Cart
            </h2>
        </div>
    </div>

    <div class="row">
        <div class="col-md-8">

            <?php
            if (isset($message) && $message != "") {
                echo '<div class="alert alert-danger"><strong>Error: </strong> ' . $message . '</div>';
            }
            ?>

            <div class="panel panel-success">
                <div class="panel-heading">
                    <h3 class="panel-title">
                        My Cart
                    </h3>
                </div>
                <div class="panel-body">
                    <?php if (count($cart) > 0) { ?>
                        <table class="table table-striped table-bordered table-responsive">
                            <tr>
                                <th>Name.</th>
                                <th>Quantity</th>
                                <th>Price</th>
                                <th>Action</th>
                            </tr>
                            <?php
                            $i = 0;
                            foreach ($cart as $product) { ?>
                                <tr>
                                    <td><?php echo $product['name'] ?></td>
                                    <td><?php echo $product['quantity'] ?></td>
                                    <td><?php echo $product['price'] . ' ' . $product['currency'] ?></td>
                                    <td>
                                        <form method="post" action="shopping-cart.php">
                                            <input type="hidden" name="index" value="<?php echo $i; ?>">
                                            <input type="submit" name="btnRemoveProduct" class="btn btn-default btn-xs"
                                                   value="Remove">
                                        </form>
                                    </td>
                                </tr>
                                <?php $i++;
                            } ?>
                            <tr>
                                <td align="right"><b>Total</b></td>
                                <td colspan="4" align="right">
                                    <span class="price"><?php echo $total ?> USD</span>
                                </td>
                            </tr>
                        </table>
                    <?php } else { ?>
                        <div class="form-group">
                            <p>Your shopping cart is empty you don't have selected any of the product to purchase <a
                                        href="products.php">click here</a> to add products. </p>
                        </div>
                    <?php } ?>

                    <a class="btn btn-success" href="products.php"> Continue Shopping</a>

                    <div class="pull-right"><?php (count($cart) > 0 ? require 'pay-with-paypal.php' : '') ?></div>

                </div>
            </div>
            <?php if(count($cart) > 0){ ?>
            <h3>
               Use following PayPal Buyer Account login Details for the demo:
            </h3>
            <p>
                Email: <b>buy@itechempires.com</b>
            </p>
            <p>
                Password: <b>itechempires</b>
            </p>
            <?php } ?>
        </div>
        <div class="col-md-4 well">
            <h3>Active User</h3>
            <p>
                <b><?php echo $user['first_name'] . ' ' . $user['last_name'] ?></b>
            </p>
            <p>
                <b><?php echo $user['email']; ?></b>
            </p>
        </div>
    </div>
</div>

</body>
</html>
The above script will handle add new product request from product page as well as remove product request from the same page and it will show shopping cart.
Step 11: Handling PayPal Express Checkout Action:
This is almost an important step, in this step we are going to write a script for PayPal Checkout button and script to execute PayPal payment.
If you notice in shopping-cart.php page we have included pay-with-paypal.php page, this is the page where we are going to have our PayPal checkout generated, let’s open pay-with-paypal.php page and add following script:
pay-with-paypal.php:
<div id="paypal-button"></div>

<script src="https://www.paypalobjects.com/api/checkout.js"></script>
<script>
    paypal.Button.render({
        <?php if(MODE == 'live') { ?>
        env: 'production',
        <?php } else {?>
        env: 'sandbox',
        <?php } ?>

        commit: true,

        client: {
            sandbox: '<?php echo PayPal_CLIENT_ID; ?>',
            production: '<?php echo PayPal_CLIENT_ID; ?>'
        },

        payment: function (data, actions) {

            return actions.payment.create({
                payment: {
                    transactions: [
                        {
                            amount: {
                                total: '<?php echo $total ?>',
                                currency: '<?php echo CURRENCY; ?>'
                            }
                        }
                    ]
                }
            });
        },

        onAuthorize: function (data, actions) {

            return actions.payment.execute().then(function () {
                window.location = "<?php echo APP_URL ?>" +  "execute-payment.php?payment_id=" + data.paymentID + "&payer_id=" + data.payerID + "&token=" + data.paymentToken;
            });
        }
    }, '#paypal-button');
</script>
in above script we are doing few different things by using PayPal JavaScript Library, first thing is we are using PayPal object to render the required button and the secondly we are providing required settings, such as application environment or the buyer, PayPal application credentials, order total and currency and finally after authorising the merchant we are executing the payment and redirecting back to the execute-payment.php page along with the few different parameters.
So let’s update our execute-payment.php page according to the following script:
<?php

require __DIR__ . '/lib/PayPalDemo.php';


if (empty($_SESSION['user_id'])) {
    header('Location: index.php');
    exit;
}

if (!empty($_GET['payment_id']) && !empty($_GET['payer_id']) && !empty($_GET['token'])) {

    $app = new PayPalDemo();

    $user = $app->getUserDetails($_SESSION['user_id']);

    $payment_id = $_GET['payment_id'];
    $payer_id = $_GET['payer_id'];
    $token = $_GET['token'];

    if ($app->paypal_check_payment($payment_id, $payer_id, $token, $user['id'])) {
        header("Location: my-orders.php?status=true");
        exit;
    } else {
        header('Location: shopping-cart.php?status=false');
        exit;
    }

} else {
    header('Location: products.php');
    exit;
}

?>
We are going to required two functions here, let’s add them next into the PayPalDemo.php file:
getUserDetails() – use to get user details for the given user id.
    public function getUserDetails($id)
    {
        $data = [];
        $query = "SELECT * FROM `users` WHERE `id` = '$id'";
        if (!$result = mysqli_query($this->db, $query)) {
            exit(mysqli_error($this->db));
        }
        if (mysqli_num_rows($result) > 0) {
            while ($row = mysqli_fetch_assoc($result)) {
                $data = $row;
            }
        }

        return $data;
    }
paypal_check_payment() – use to checkout the payment status:
public function paypal_check_payment($payment_id, $payer_id, $token, $user_id)
    {

        // request http using curl
        $ch = curl_init();
        curl_setopt($ch, CURLOPT_URL, PayPal_BASE_URL . 'oauth2/token');
        curl_setopt($ch, CURLOPT_HEADER, FALSE);
        curl_setopt($ch, CURLOPT_SSL_VERIFYPEER, FALSE);
        curl_setopt($ch, CURLOPT_POST, TRUE);
        curl_setopt($ch, CURLOPT_RETURNTRANSFER, TRUE);
        curl_setopt($ch, CURLOPT_USERPWD, PayPal_CLIENT_ID . ":" . PayPal_SECRET);
        curl_setopt($ch, CURLOPT_POSTFIELDS, "grant_type=client_credentials");
        $result = curl_exec($ch);
        $accessToken = NULL;


        if (empty($result)) {
            return FALSE;
        } else {

            // get Order details along with the status and update order
            $json = json_decode($result);
            $accessToken = $json->access_token;
            $curl = curl_init(PayPal_BASE_URL . 'payments/payment/' . $payment_id);
            curl_setopt($curl, CURLOPT_POST, FALSE);
            curl_setopt($curl, CURLOPT_SSL_VERIFYPEER, FALSE);
            curl_setopt($curl, CURLOPT_HEADER, FALSE);
            curl_setopt($curl, CURLOPT_RETURNTRANSFER, TRUE);
            curl_setopt($curl, CURLOPT_HTTPHEADER, array(
                'Authorization: Bearer ' . $accessToken,
                'Accept: application/json',
                'Content-Type: application/xml'
            ));
            $response = curl_exec($curl);
            $result = json_decode($response);
            $state = $result->state;
            $total = $result->transactions[0]->amount->total;
            curl_close($ch);
            curl_close($curl);

            if ($state == 'approved') {
                $this->add_new_order($user_id, $payment_id, $payer_id, $total);

                return TRUE;

            } else {

                return FALSE;
            }

        }

    }
Again the above script will required few internal function to add success order details, order items and make shopping cart empty for approved orders:
    public function add_new_order($user_id, $payment_id, $payer_id, $total)
    {
        $query = "INSERT INTO orders(user_id, payment_id, payer_id, payment_total, created_at) VALUES ('$user_id', '$payment_id', '$payer_id', '$total', CURRENT_TIMESTAMP )";
        if (!$result = mysqli_query($this->db, $query)) {
            exit(mysqli_error($this->db));
        }
        $order_id = mysqli_insert_id($this->db);
        $this->_add_order_items($order_id);
    }
    public function _add_order_items($order_id)
    {
        $cart = $_SESSION['cart'];

        if (count($cart) > 0) {
            foreach ($cart as $product) {
                $query = "INSERT INTO order_items(product_id, order_id) VALUES ('{$product['product_id']}', '$order_id')";
                if (!$result = mysqli_query($this->db, $query)) {
                    exit(mysqli_error($this->db));
                }
            }
        }

        $_SESSION['cart'] = [];
    }
Step 12: Design My Orders Page:
Add required functions into PayPalDemo class:
getOrders() – get all the order for given user.
public function getOrders($user_id)
{
    $data = [];

    $query = "SELECT * FROM orders WHERE user_id = '$user_id' ORDER BY id DESC";
    if (!$result = mysqli_query($this->db, $query)) {
        exit(mysqli_error($this->db));
    }
    if (mysqli_num_rows($result) > 0) {
        while ($row = mysqli_fetch_assoc($result)) {
            $data[] = $row;
        }
    }

    return $data;
}
getOrderItems() – get all the items for the given order
public function getOrderItems($order_id)
{
    $data = [];
    $query = "SELECT P.id, P.name, P.price, P.currency FROM order_items OI
  LEFT JOIN products P
  ON P.id = OI.product_id
    WHERE OI.order_id = '$order_id'";
    if (!$result = mysqli_query($this->db, $query)) {
        exit(mysqli_error($this->db));
    }
    if (mysqli_num_rows($result) > 0) {
        while ($row = mysqli_fetch_assoc($result)) {
            $data[] = $row;
        }
    }

    return $data;
}
after adding the above function add following script into my-orders.php page to display all order for the given active user.
<?php

require __DIR__ . '/lib/PayPalDemo.php';


if (empty($_SESSION['user_id'])) {
    header('Location: index.php');
    exit;
}

$app = new PayPalDemo();

if (isset($_GET['status']) && $_GET['status'] == TRUE) {
    $message = 'Your payment transaction has been successfully completed.';
}

$user = $app->getUserDetails($_SESSION['user_id']);
$orders = $app->getOrders($user['id']);

?>

<!doctype html>
<html lang="en">
<head>
    <meta charset="UTF-8">
    <meta name="viewport"
          content="width=device-width, user-scalable=no, initial-scale=1.0, maximum-scale=1.0, minimum-scale=1.0">
    <meta http-equiv="X-UA-Compatible" content="ie=edge">
    <title>PHP MySQL PayPal JavaScript Express Checkout Demo</title>

    <link rel="stylesheet" href="https://maxcdn.bootstrapcdn.com/bootstrap/3.3.7/css/bootstrap.min.css">
    <link href="https://fonts.googleapis.com/css?family=Roboto+Slab" rel="stylesheet">
    <link rel="stylesheet" href="css/style.css">

</head>
<body>
<?php require 'navigation.php'; ?>

<div class="container">
    <div class="row">
        <div class="col-md-12">
            <h1>PHP MySQL PayPal JavaScript Express Checkout Demo</h1>
        </div>
    </div>

    <div class="row">
        <div class="col-md-12">
            <h2>
                My Orders
            </h2>
        </div>
    </div>

    <div class="row">
        <div class="col-md-8">

            <?php
            if (isset($message) && $message != "") {
                echo '<div class="alert alert-success"><strong>Success: </strong> ' . $message . '</div>';
            }
            ?>

            <?php if (count($orders) > 0) {
                foreach ($orders as $order){
                ?>
                <div class="panel panel-info">
                    <div class="panel-heading">
                        <h3 class="panel-title">
                            Order @ <?php echo $order['created_at'] ?>
                        </h3>
                    </div>
                    <div class="panel-body">
                        <table class="table table-bordered table-striped">
                            <tr>
                                <th>Product Name</th>
                                <th>Price</th>
                                <th>Currency</th>
                            </tr>
                        <?php foreach ($app->getOrderItems($order['id']) as $item){?>
                                <tr>
                                    <td>
                                        <?php echo $item['name']; ?>
                                    </td>
                                    <td>
                                        <?php echo $item['price']; ?>
                                    </td>
                                    <td>
                                        <?php echo $item['currency']; ?>
                                    </td>
                                </tr>
                        <?php } ?>
                        </table>
                        <h4>
                            Total: <?php echo $order['payment_total']; ?> USD
                        </h4>
                    </div>
                </div>

            <?php }
            }else{ ?>
                <p>
                    You don't have any orders yet, visit <a href="products.php">Products</a> to order.
                </p>
            <?php }?>

        </div>
        <div class="col-md-4 well">
            <h3>Active User</h3>
            <p>
                <b><?php echo $user['first_name'] . ' ' . $user['last_name'] ?></b>
            </p>
            <p>
                <b><?php echo $user['email']; ?></b>
            </p>
        </div>
    </div>
</div>

</body>
</html>
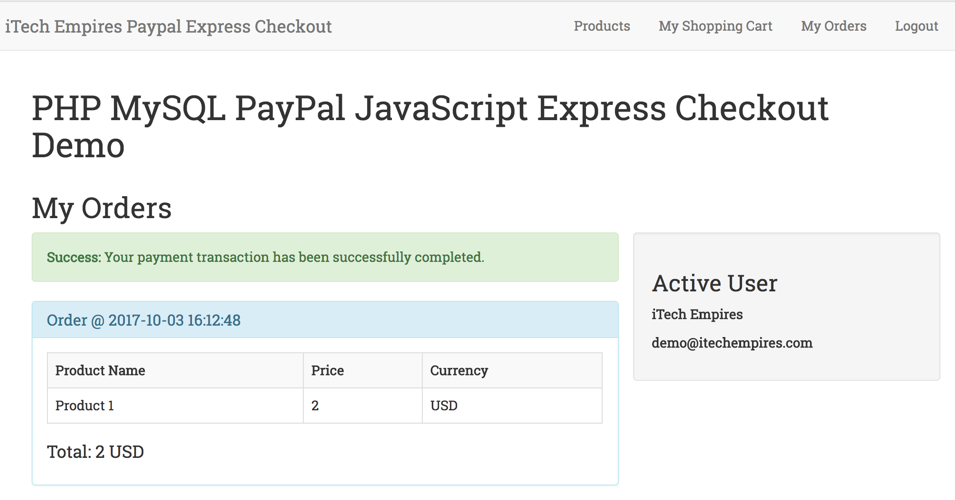
We will have following details design after everything goes successfully:
Step 13: Logout Page:
Finally here we goes to the last step for this tutorial that is logout user from the system:
<?php

if (isset($_GET['action']) && $_GET['action'] == TRUE) {
    session_start();
    $_SESSION['user_id'] = '';
    $_SESSION['cart'] = [];
    session_destroy();
    header("Location: index.php");
}

?>
We are done!
I know the tutorial is bit long you may have questions or get some errors let me know in the comments box below, I have tried my best to get you understandings of entire process for PayPal integrations into your application.
The advantage of using this JavaScript PayPal checkout is it’s secure and your don’t have to add code for managing or validating Payment information, its PayPal that does that job, and your customer/buyer will be aware about it and it makes simple way to Pay on websites.
You can checkout the live demo of this tutorial for your help and understanding click following button to visit live demo:
PayPal Express Checkout Live DemoLet me know your thoughts and comments. Happy coding!
I will see you in the next tutorial.
Thank you for sharing your new information…
I did not change anything of your curl part but it seems that I get an empty response from paypal. Any idea ?
Make sure you set correct PayPal base url, as well double check payment secret key and token.
I resolved the issue by adding several arguments to curl (CURLOPT_SSL_VERIFYPEER=> false,
CURLOPT_SSL_VERIFYHOST => false,
CURLOPT_SSLVERSION => 6)
Thanks a lot for this !
With this bit of code, how best would you suggest to implement a coupon code? Thanks
can i get the source code file!
Hello, I would like to add a user to do my test, but when I add it via the database, I put an email and a password, I am told that the password is wrong
Hi, I would like to add a user to do my test, but when I add it via the database, I put an email and a password, I am told that the password is wrong
I have an error: Undefined property: stdClass::$state in C:wamp64wwwshoplibPayPalDemo.php
Parse error: syntax error, unexpected ‘public’ (T_PUBLIC) in /cphome/nxt33317/public_html/webshop/lib/PayPalDemo.php on line 17