Table of Contents
How to Use CKEditor in AngularJS and PHP?
In my last tutorial I have given details on how you can work with AngularJs using crud application, In this tutorial I am going to provide solution on how to use CKEditor while using AngularJS into your application, here I will provide a sample demo using PHP to demonstrate use of CKEditor in angularJS.
Tutorial Features:
We will create a quick sample demo of creating Blog Post, which is going to have few basic operations listing below:
- Create New Blog Post (Use CKEditor for description field of the blog post)
- Delete Blog Post
- List Existing Blog Post
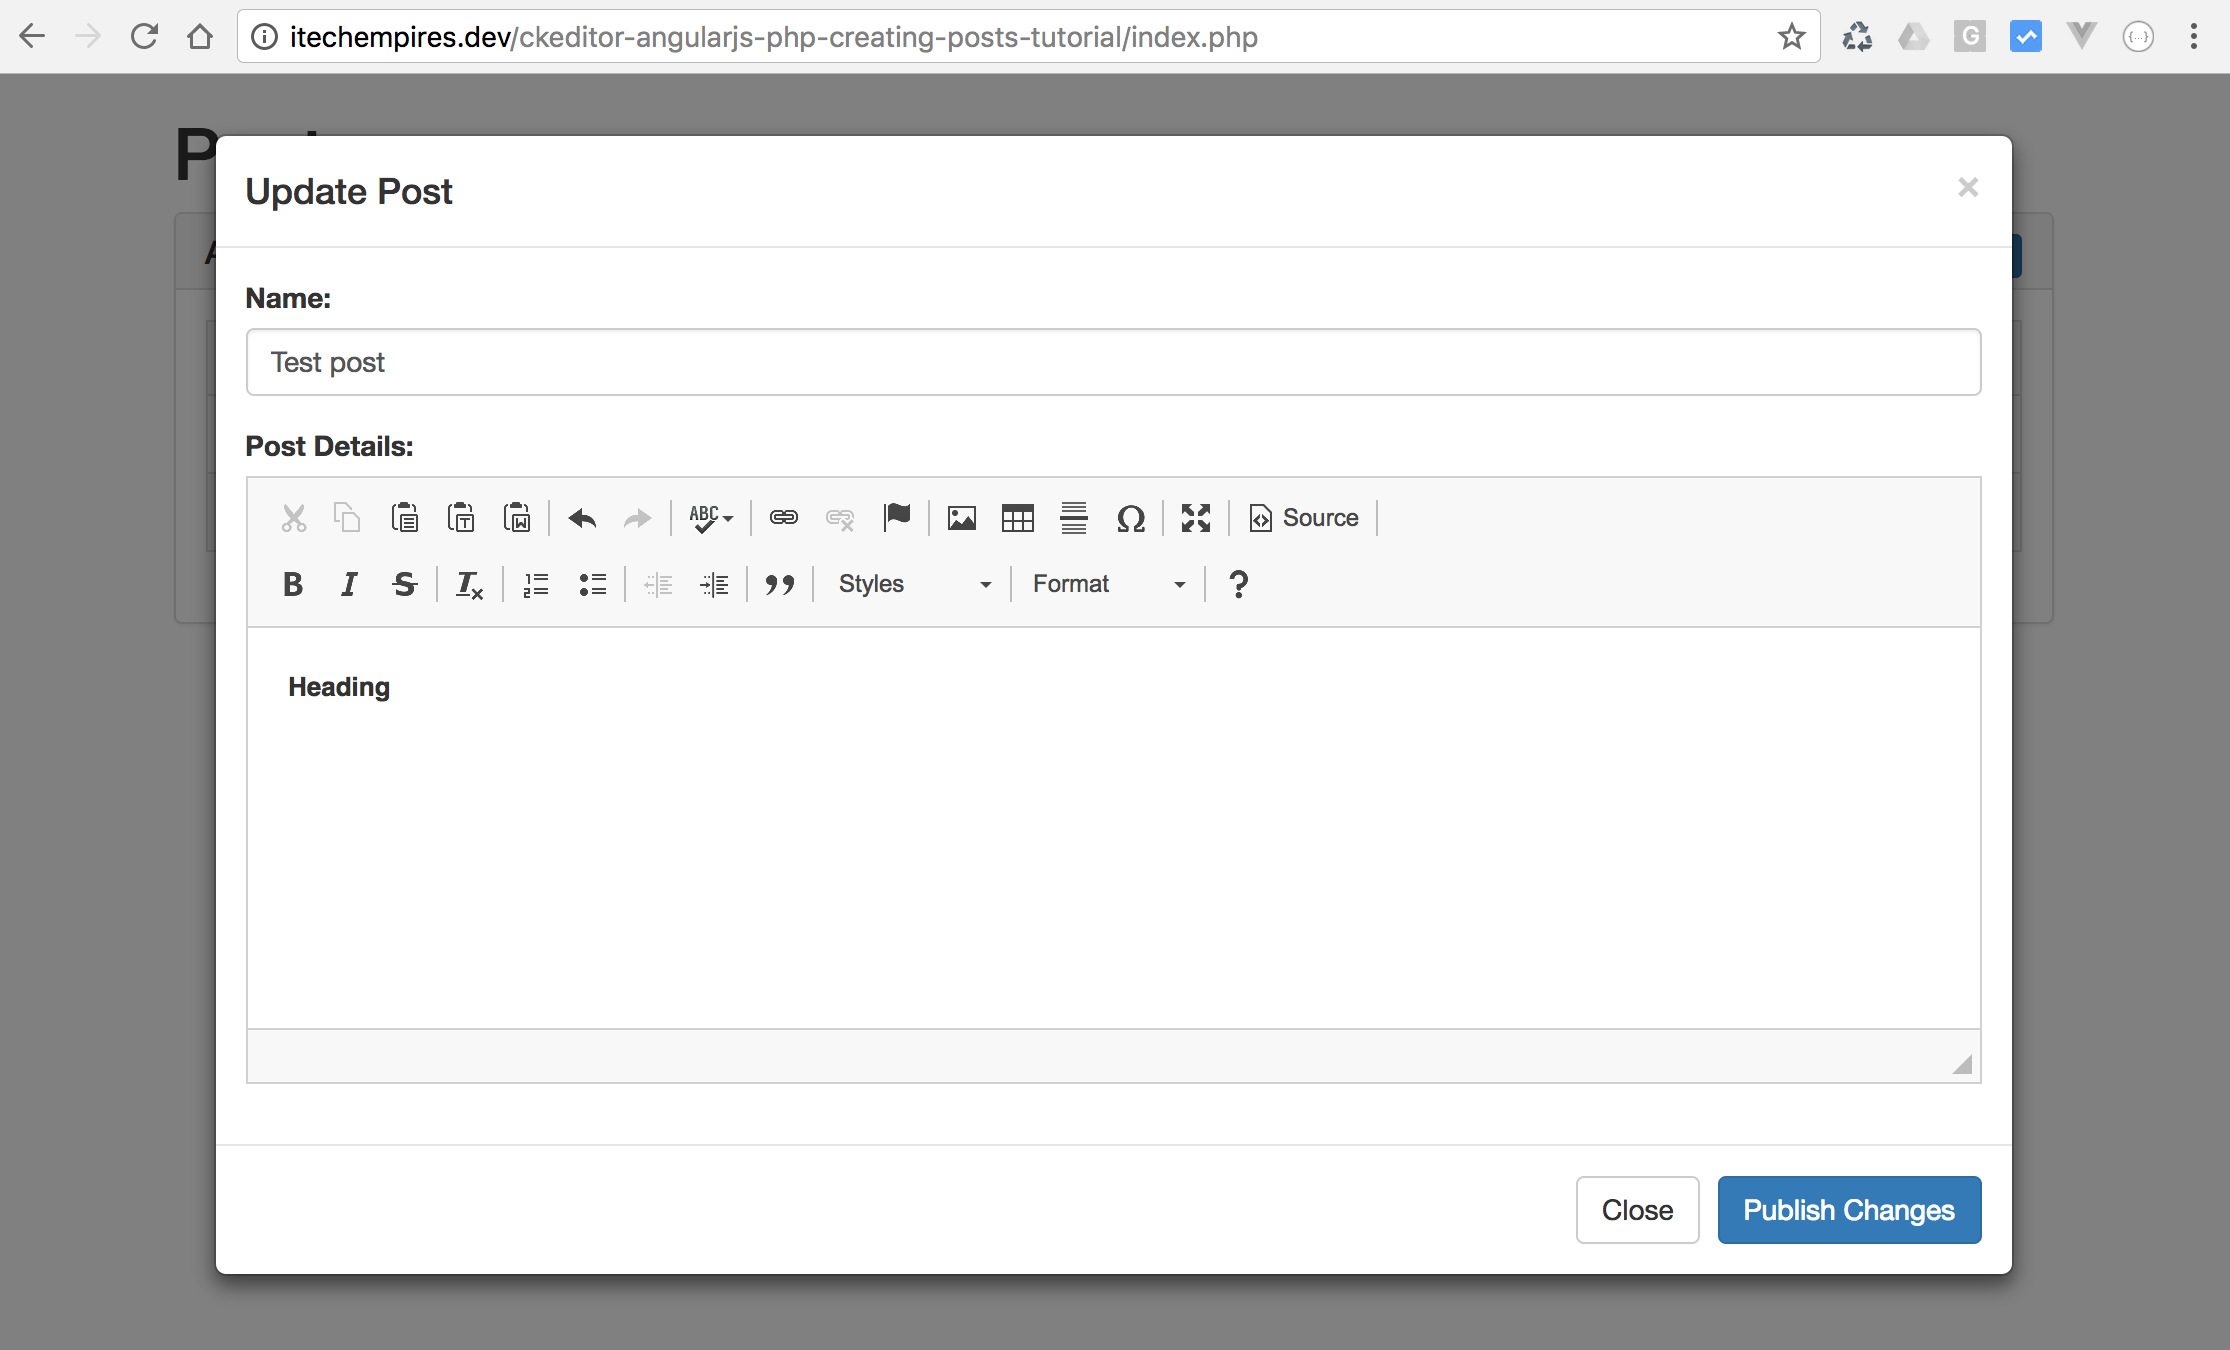
- Update Blog Post (Again Use CKEditor while updating the description field of the blog post and it should be pre populated)
Live Demo:
Things used:
- PHP
- AngularJS
- CKEditor
- Bootstrap V3
- jQuery
Let’s get started:
Step 1 – Setup Database Table:
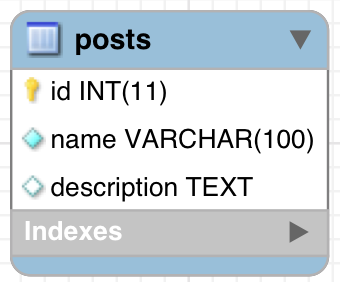
Create new Database and add new table called `posts` or you can simply use following script to create new table.
CREATE TABLE `posts` (
  `id` int(11) unsigned NOT NULL AUTO_INCREMENT,
  `name` varchar(100) NOT NULL DEFAULT '',
  `description` text,
  PRIMARY KEY (`id`)
) ENGINE=InnoDB DEFAULT CHARSET=latin1;

Let’s start by creating the folder for the application to store sample application files, so go ahead and create new folder to in your php environment setup it can be lamp, xampp, mamp or homestead totally depend on your system php environment.
I am assuming you have your application folder ready to go along with the database that you have created the in the first step.
Step 2 – Design User interface:
Create new file called index.php inside the application folder and setup basic html page according to the given script.
`/index.php`
<!doctype html>
<html lang="en">
<head>
    <meta charset="UTF-8">
    <title>CKEditor with AngularJS and PHP</title>

    <!-- Latest compiled and minified CSS -->
    <link rel="stylesheet" href="https://maxcdn.bootstrapcdn.com/bootstrap/3.3.7/css/bootstrap.min.css">
</head>
<body>


<script src="https://cdnjs.cloudflare.com/ajax/libs/jquery/3.2.1/jquery.min.js"></script>
<script src="//cdn.ckeditor.com/4.7.1/standard/ckeditor.js"></script>
<script src="https://maxcdn.bootstrapcdn.com/bootstrap/3.3.7/js/bootstrap.min.js"></script>
<script src="https://ajax.googleapis.com/ajax/libs/angularjs/1.6.5/angular.min.js"></script>
</body>
</html>
In the above script we have added bootstrap, AngularJS and CKEditor, jQuery Library to use and to reference this libraries I am using there CDN version, if you want you visit there website to download source and reference them into the page, it’s all depend on your requirements. it doesn’t matter either on will work.
Let’s design our page using bootstrap, update index.php page according to the following script:
`/index.php`
<!doctype html>
<html lang="en">
<head>
<meta charset="UTF-8">
<title>CKEditor with AngularJS and PHP</title>
<!-- Latest compiled and minified CSS -->
<link rel="stylesheet" href="https://maxcdn.bootstrapcdn.com/bootstrap/3.3.7/css/bootstrap.min.css">
</head>
<body>
<div ng-app="App">
<div ng-controller="postController">
<div class="container">
<h1>Posts</h1>
<div class="panel panel-default">
<div class="panel-heading">
<button class="btn btn-primary btn-xs pull-right" ng-click="initAddPost()">Add Post</button>
<h3 class="panel-title">All Post</h3>
</div>
<div class="panel-body">
</div>
</div>
</div>
<div class="modal fade" tabindex="-1" role="dialog" id="new_post">
<div class="modal-dialog modal-lg" role="document">
<div class="modal-content">
<div class="modal-header">
<button type="button" class="close" data-dismiss="modal" aria-label="Close"><span
aria-hidden="true">×</span></button>
<h4 class="modal-title">Create New Post</h4>
</div>
<div class="modal-body">
<div class="form-group">
<label>Name:</label>
<input type="text" ng-model="post.name" class="form-control">
</div>
<div class="form-group">
<label>Post Details:</label>
<textarea ck-editor ng-model="post.description"></textarea>
</div>
</div>
<div class="modal-footer">
<button type="button" class="btn btn-default" data-dismiss="modal">Close</button>
<button type="button" ng-click="publishPost()" class="btn btn-primary">Publish</button>
</div>
</div>
<!-- /.modal-content -->
</div>
<!-- /.modal-dialog -->
</div>
<!-- /.modal -->
</div>
</div>
<script src="https://cdnjs.cloudflare.com/ajax/libs/jquery/3.2.1/jquery.min.js"></script>
<script src="//cdn.ckeditor.com/4.7.1/standard/ckeditor.js"></script>
<script src="https://maxcdn.bootstrapcdn.com/bootstrap/3.3.7/js/bootstrap.min.js"></script>
<script src="https://ajax.googleapis.com/ajax/libs/angularjs/1.6.5/angular.min.js"></script>
<script src="js/ng-script.js"></script>
</body>
</html>
If you review above file line by line you will see at the start of the body section I have added ng-app directive to define angularJS module and next I have added ng-controller directive, keep in mind we are going to use those while writing our angularJS script.
Next I have added basic design with bootstrap panel and a button to open up the modal popup along with the ng-click event and then I have added the modal popup to be able to perform the add new post functionality.
If you notice under model popup we have `<textarea ck-editor ng-model=”post.description”></textarea>` element here we have added custom directive for CkEditor, just keep in mind about this directive you have to notice we are going to create that in the angularJS script and this would be the directive which is going to be the responsible to replacing this textarea element to CKEditor.
Step 3- Write Required AngularJS Script:
In this step we are going to write basic require angularJs script to start, so go ahead and add new folder called `js` and a file under the same folder called `ng-script.js` if you notice clearly we have already added reference to this file in the above step.
Go ahead and open this file into your editor and add following script:
`/js/ng-script.js:`
var app = angular.module('App', []);

app.controller('postController', ['$scope', '$http', function ($scope, $http) {

    $scope.post = {
        name: '',
        description: ''
    };

    $scope.initAddPost = function () {
        var element = angular.element('#new_post');
        element.modal("show");
    };

}]);
In the above script at the very beginning we have declared angular module which is going to reference to the `ng-app` directive which we added inside index.php page and next we have a declaration of `postController` again same we have added inside index.php along with the `ng-controller`directive.
PostController:
This is the place where we are going to have our script to handle post basic operations, right now we have added a post object and method to handle add post click event to open up the model popup.
Step 4 – Create CKEditor AngularJS Directive:
In this step we will needs to create a directive which is responsible for replacing the html element to CKEditor, go ahead and open up the our script file and add following directive right after the postController.
`/js/ng-script.js:`
app.directive('ckEditor', function () {
    return {
        require: '?ngModel',
        link: function (scope, elm, attr, ngModel) {
            var ck = CKEDITOR.replace(elm[0]);

            if (!ngModel) return;

            ck.on('pasteState', function () {
                scope.$apply(function () {
                    ngModel.$setViewValue(ck.getData());
                });
            });

            ngModel.$render = function (value) {
                ck.setData(ngModel.$viewValue);
            };
        }
    };
});
With this above directive we all set to go and play with the our demo to added basic add, edit, list and delete feature.
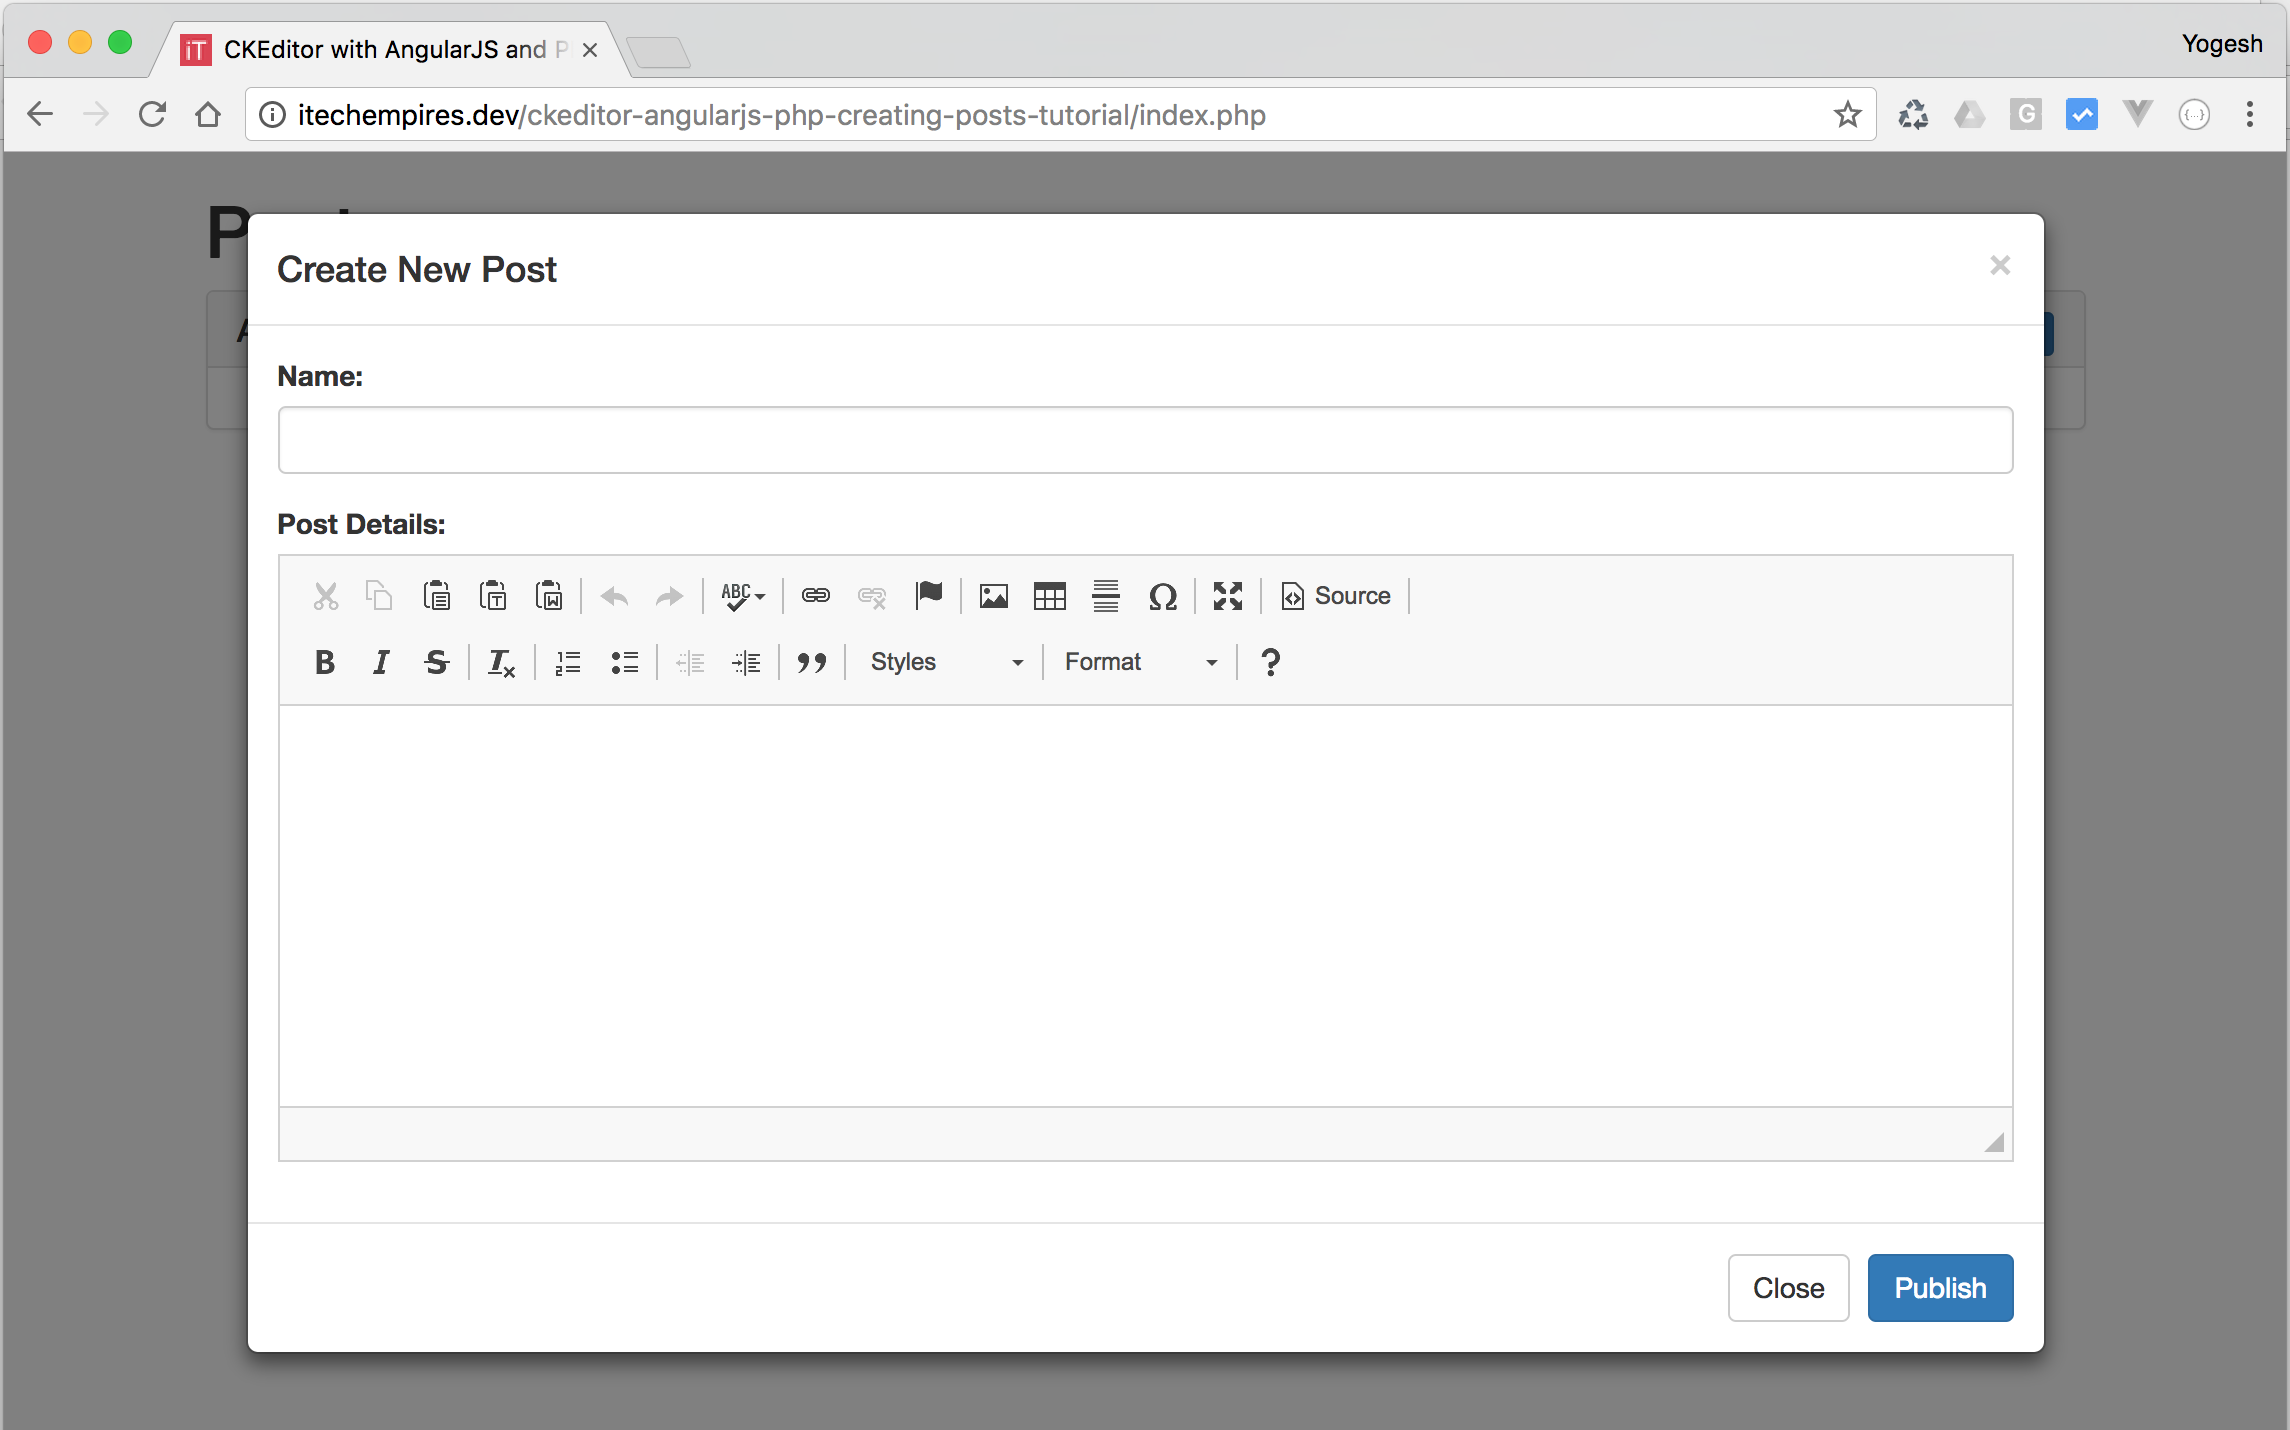
If you go ahead and run the application with the current state and click on add post button you see the following output, which is exactly what we want a CKEditor element where we can add our post detail content.

Step 5 – Create PHP CRUD API:
In this step we will create a very basic api using PHP and PDO connection to handle create, read, update and delete post operations:
Go ahed and create folder called script inside the application directory and add following files:
- /script/database_connection.php
- /script/library.php
- /script/create.php
- /script/list.php
- /script/update.php
- /script/delete.php
Open Database Connection file into your editor and add following script and make sure you update the database connection setting variables according to the your php environment settings.
`/script/database_connection.php:`
<?php
/*
 * DATABASE connection script
 * */

// ...

// database Connection variables
define('HOST', 'localhost'); // Database Host name ex. localhost
define('USER', 'root'); // Database User ex. root
define('PASSWORD', 'secret'); // Database User Password  (if password is not set for user then keep it empty )
define('DATABASE', 'test_db'); // Database Name

function DB()
{
    static $instance;
    if ($instance === null) {
        $opt = array(
            PDO::ATTR_ERRMODE => PDO::ERRMODE_EXCEPTION,
            PDO::ATTR_DEFAULT_FETCH_MODE => PDO::FETCH_ASSOC,
            PDO::ATTR_EMULATE_PREPARES => FALSE,
        );
        $dsn = 'mysql:host=' . HOST . ';dbname=' . DATABASE;
        $instance = new PDO($dsn, USER, PASSWORD, $opt);
    }
    return $instance;
}

?>
Open up the library.php file and use following script:
`/script/library.php:`
<?php

require __DIR__ . '/database_connection.php';

/**
 * Class Post
 */
class Posts
{

    /**
     * @var mysqli|PDO|string
     */
    protected $db;

    /**
     * Post constructor.
     */
    public function __construct()
    {
        $this->db = DB();
    }

    /**
     * Add new Post
     *
     * @param $name
     * @param $description
     *
     * @return string
     */
    public function Create($name, $description)
    {
        $query = $this->db->prepare("INSERT INTO posts(name, description) VALUES (:name,:description)");
        $query->bindParam("name", $name, PDO::PARAM_STR);
        $query->bindParam("description", $description, PDO::PARAM_STR);
        $query->execute();

        return json_encode(['post' => [
            'id'          => $this->db->lastInsertId(),
            'name'        => $name,
            'description' => $description
        ]]);
    }

    /**
     * List Posts
     *
     * @return string
     */
    public function Read()
    {
        $query = $this->db->prepare("SELECT * FROM posts");
        $query->execute();
        $data = array();
        while ($row = $query->fetch(PDO::FETCH_ASSOC)) {
            $data[] = $row;
        }

        return json_encode(['posts' => $data]);
    }


    /**
     * Update Post
     *
     * @param $name
     * @param $description
     * @param $id
     */
    public function Update($name, $description, $id)
    {
        $query = $this->db->prepare("UPDATE posts SET name = :name, description = :description WHERE id = :id");
        $query->bindParam("name", $name, PDO::PARAM_STR);
        $query->bindParam("description", $description, PDO::PARAM_STR);
        $query->bindParam("id", $id, PDO::PARAM_STR);
        $query->execute();
    }

    /**
     * Delete Post
     *
     * @param $id
     */
    public function Delete($id)
    {
        $query = $this->db->prepare("DELETE FROM posts WHERE id = :id");
        $query->bindParam("id", $id, PDO::PARAM_STR);
        $query->execute();
    }
}
Open up the create.php file into your editor to add following script:
`/script/create.php:`
<?php

$data = json_decode(file_get_contents('php://input'), TRUE);

if (isset($data['post'])) {

    require __DIR__ . '/library.php';

    $name = (isset($data['post']['name']) ? $data['post']['name'] : NULL);
    $description = (isset($data['post']['description']) ? $data['post']['description'] : NULL);

    // validated the request
    if ($name == NULL) {
        http_response_code(400);
        echo json_encode(['errors' => ["Name Field is required"]]);

    } else {

        $post = new Posts();

        echo $post->Create($name, $description);
    }
}
?>
`/script/list.php:`
<?php
require __DIR__ . '/library.php';

$post = new Posts();

echo $post->Read();
?>
`/script/update.php:`
<?php

$data = json_decode(file_get_contents('php://input'), TRUE);

if (isset($data['post'])) {

    require __DIR__ . '/library.php';

    $name = (isset($data['post']['name']) ? $data['post']['name'] : NULL);
    $description = (isset($data['post']['description']) ? $data['post']['description'] : NULL);
    $id = (isset($data['post']['id']) ? $data['post']['id'] : NULL);

    // validations
    if ($name == NULL) {
        http_response_code(400);
        echo json_encode(['errors' => ["Name Field is required"]]);

    } else {

        $post = new Posts();

        $post->Update($name, $description, $id);
    }
}

?>
`/script/delete.php:`
<?php

$data = json_decode(file_get_contents('php://input'), TRUE);

if (isset($data['post'])) {

    require __DIR__ . '/library.php';

    $id = (isset($data['post']['id']) ? $data['post']['id'] : NULL);

    $post = new Posts();

    $post->Delete($id);
}

?>
So our PHP api is all set to handle backend operations, now we just need to call this api from angular js and to work on the posts.
okay let’s get back on to the AngularJs Script:
Step 6 – Add new Post:
Go ahead and open up the ng-script.js file into your editor and update PostController it according to the following script:
app.controller('postController', ['$scope', '$http', function ($scope, $http) {

    $scope.post = {
        name: '',
        description: ''
    };

    $scope.posts = [];
    $scope.errors = [];

    // init add post model
    $scope.initAddPost = function () {
        var element = angular.element('#new_post');
        element.modal("show");
    };

    // publish the the post
    $scope.publishPost = function () {

        $http.post('script/create.php', {
            post: $scope.post
        })
            .then(function success(e) {

                $scope.errors = [];

                $scope.posts.push(e.data.post);

                var modal_element = angular.element('#new_post');
                modal_element.modal('hide');

            }, function error(e) {
                $scope.errors = e.data.errors;
            });

    };


}]);
Now if you run the application and try to add new post it should work, but you won’t see the list right after adding new post, following next step to list all the post.
Step 7 – List all post:
Add following method inside postController after publish post method:
 // list all post
    $scope.listPost = function () {
        $http.get('script/list.php', {})
            .then(function success(e) {
                $scope.posts = e.data.posts;
            }, function error(e) {

            });
    };
    $scope.listPost();
Next open up the index.php page and update the all post panel section according to the following:
  <div class="panel panel-default">
                <div class="panel-heading">
                    <button class="btn btn-primary btn-xs pull-right" ng-click="initAddPost()">Add Post</button>
                    <h3 class="panel-title">All Post</h3>
                </div>
                <div class="panel-body">
                    <table ng-if="posts.length > 0" class="table table-bordered table-responsive table-striped">
                        <tr>
                            <th>No</th>
                            <th>Name</th>
                            <th>Description</th>
                            <th>Action</th>
                        </tr>
                        <tr ng-repeat="post in posts">
                            <td>{{ $index + 1 }}</td>
                            <td>{{ post.name }}</td>
                            <td>{{ post.description }}</td>
                            <td>
                                <button ng-click="edit($index)"  class="btn btn-primary btn-xs">Edit</button>
                                <button ng-click="delete($index)" class="btn btn-danger btn-xs">Delete</button>
                            </td>
                        </tr>
                    </table>
                </div>
            </div>
        </div>
Now if your run or refresh the application you will see the list will be there and if you try to add new post it will be append to the existing list.
Step 8 – Update the Post:
Open up the index.php page into your editor and add new bootstrap model to have update feature:
`index.php:`
<div class="modal fade" tabindex="-1" role="dialog" id="update_post">
<div class="modal-dialog modal-lg" role="document">
<div class="modal-content">
<div class="modal-header">
<button type="button" class="close" data-dismiss="modal" aria-label="Close"><span
aria-hidden="true">×</span></button>
<h4 class="modal-title">Update Post</h4>
</div>
<div class="modal-body">
<ul class="alert alert-danger" ng-if="errors.length > 0">
<li ng-repeat="error in errors">
{{ error }}
</li>
</ul>
<div class="form-group">
<label>Name:</label>
<input type="text" ng-model="update_post.name" class="form-control">
</div>
<div class="form-group">
<label>Post Details:</label>
<textarea ck-editor ng-model="update_post.description"></textarea>
</div>
</div>
<div class="modal-footer">
<button type="button" class="btn btn-default" data-dismiss="modal">Close</button>
<button type="button" ng-click="updatePost()" class="btn btn-primary">Publish Changes</button>
</div>
</div>
<!-- /.modal-content -->
</div>
<!-- /.modal-dialog -->
</div>
<!-- /.modal -->
Update the Post Controller from ng-script.js:
$scope.edit = function (index) {
        $scope.update_post = $scope.posts[index];
        var modal_element = angular.element('#update_post');
        modal_element.modal('show');
    };

    $scope.updatePost = function () {
        $http.post('script/update.php', {
            post: $scope.update_post
        })
            .then(function success(e) {

                $scope.errors = [];

                var modal_element = angular.element('#update_post');
                modal_element.modal('hide');

            }, function error(e) {
                $scope.errors = e.data.errors;
            });
    };
Give it a try to update your existing post from the demo it should work as showing below:

Step 9 – Delete Post
Finally let’s add delete feature into the demo, open up the ng-script.js file add following method into the postController after updatePost method:
$scope.delete = function (index) {

        var conf = confirm("Do you really want to delete the post?");

        if (conf == true) {
            $http.post('script/delete.php', {
                post: $scope.posts[index]
            })
                .then(function success(e) {

                    $scope.errors = [];

                    $scope.posts.splice(index, 1);

                }, function error(e) {
                    $scope.errors = e.data.errors;
                });
        }
    };
Now if you try to delete the post from the list it should work.
let me know if you have any question related to this tutorial using comment box below:

Hi Yogesh.. I’ve searched for this tutorial since a week ago and now found on your website.. Thank you so much for this…
Great..!
Visitor Rating: 5 Stars
Hi Yogesh, Can you please share the steps to have it included in Angular 4 with help of npm, without using the cdns
Hi Yogesh…..I had the great help of this code thank you very much this……
how can we remove html tags please make a script for this
thanks yogesh …but how can upload image from my computer ???