Table of Contents
Introduction:
In last tutorial “CRUD Operations in PHP with PDO using Bootstrap” I have given details on how to handle crud operation in PHP with jQuery, here we are going to try something new from the market and most usable in the real time application that is AngularJS.
AngularJS is frontend (client-side) development framework that is completely written in JavaScript with the help of AngularJS we can easily build single page and interactive web applications.
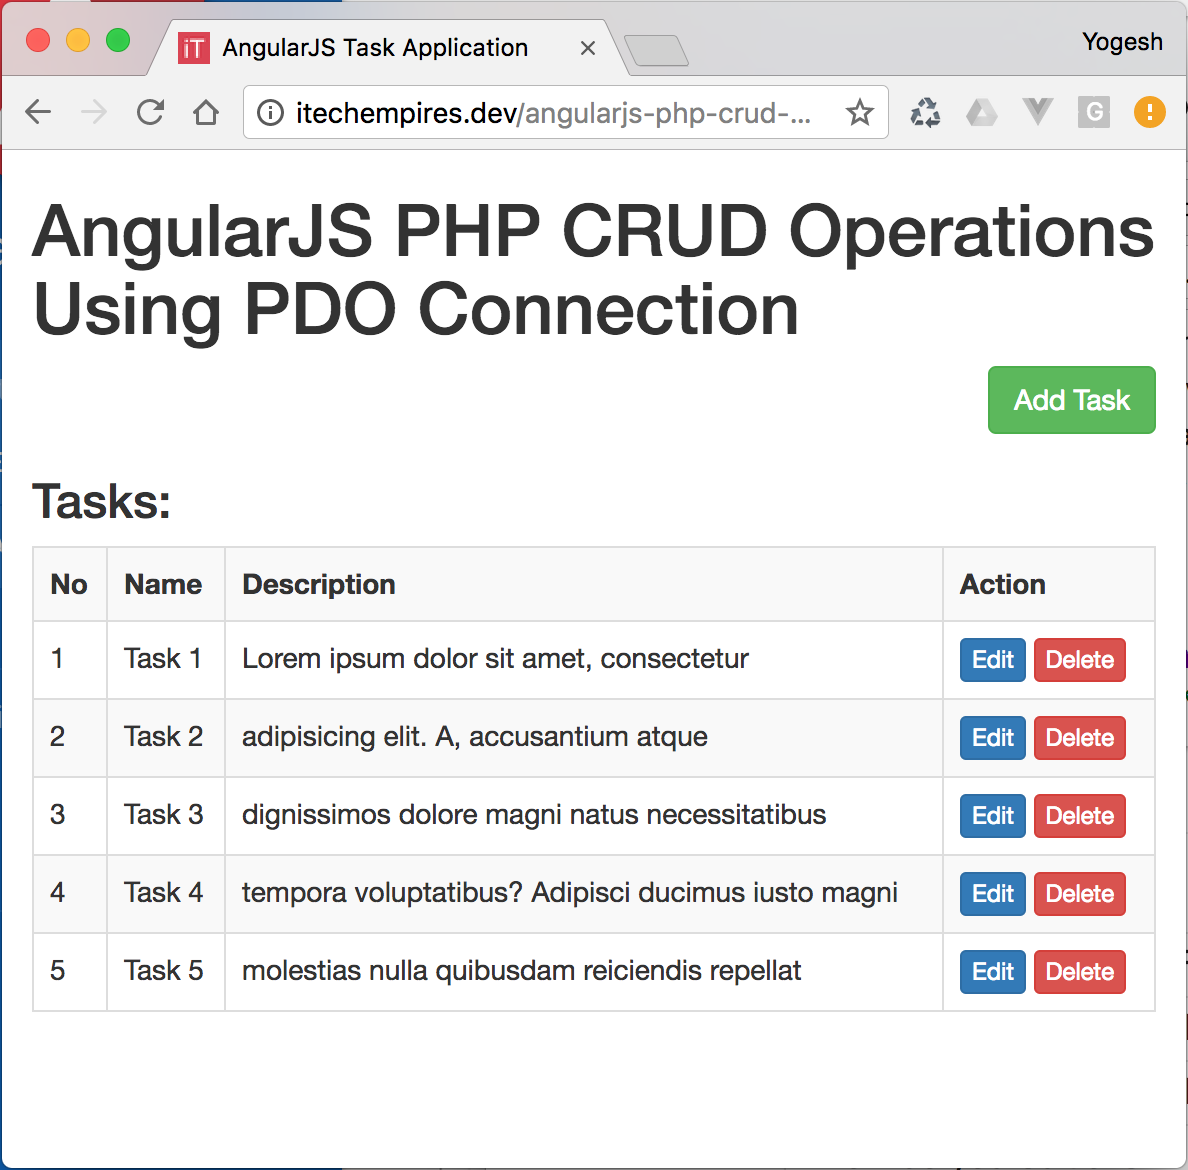
Quick Demo:
Tutorial Features:
- Add (Insert) new record to the database
- Read recodes from the database
- List all records to the webpage
- Edit and update existing record from the database
- Delete the record
Work environment:
I am assuming that you have PHP environment is ready to work with the project if not please configure PHP environment with the following needs:
- Apache/NginX
- PHP
- MySQL
Application Overview:
To demonstrate AngularJS usage I am going to use a simple example of Task application, so here we will build a very simple Task application where we can Add, Edit, List and Delete the Task.
Let’s build the application step-by-step:
Step 1 – Database Setup:
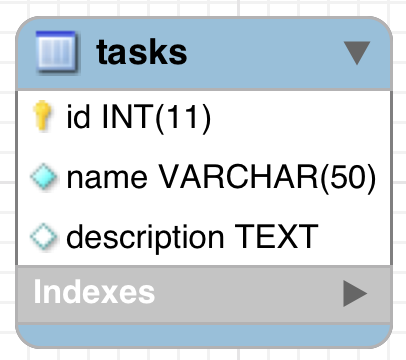
Create MySQL database and add tasks table into it, you can easily use following script:
CREATE TABLE `tasks` (
  `id` int(11) unsigned NOT NULL AUTO_INCREMENT,
  `name` varchar(50) NOT NULL DEFAULT '',
  `description` text,
  PRIMARY KEY (`id`)
) ENGINE=InnoDB DEFAULT CHARSET=latin1;

Step 2 – Setup Application File Structure:
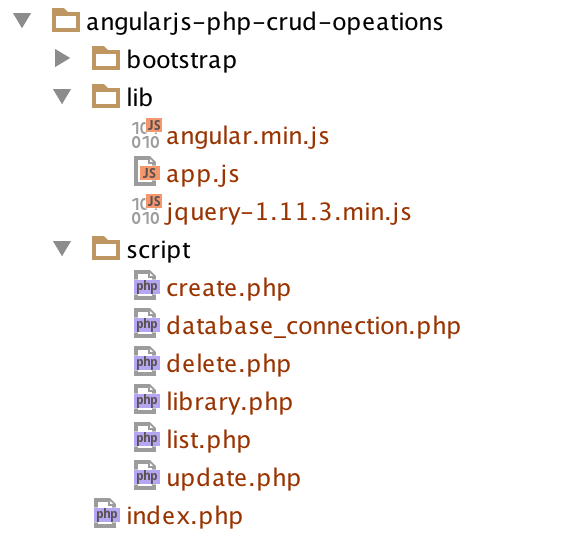
Use following screen as a reference and create required files and folders for the application:

Here is a quick review of the application directory structure to get basic understanding of its usages
angularjs-php-crud-opeations: Application Root Directory
bootstrap: as name suggest this directory will have files related to bootstrap framework, you download bootstrap file from getbootstrap.com or those files will be already available with this tutorial source code.
lib/angular.min.js: AngularJS Library file
lib/jquery-1.11.3.min.js: jQuery Library file
lib/app.js: Our custom script file to write client side logic using AngularJS
script: This directory is having all required files for crud operations including library file and Database connection file.
Index.php: application index file where we are going to have our CRUD application templated loaded.
Step 3 – Database connection Script:
When we need to interact with the database to store and read data from the script of our application we need to write a connection script to enable a connection between application and database, so go ahead open up the `database_connection.php` file from the script folder and simply add following connection script to the file.
`script/database_connection.php:`
<?php
/*
 * DATABASE connection script
 * */
define('HOST', 'localhost'); // Database Host name ex. localhost
define('USER', 'DATABASE_USER'); // Database User ex. root
define('PASSWORD', 'UPDATE_THE_PASSWORD_HERE'); // Database User Password  (if password is not set for user then keep it empty )
define('DATABASE', 'DEMO'); // Database Name

function DB()
{
    static $instance;
    if ($instance === null) {
        $opt = array(
            PDO::ATTR_ERRMODE => PDO::ERRMODE_EXCEPTION,
            PDO::ATTR_DEFAULT_FETCH_MODE => PDO::FETCH_ASSOC,
            PDO::ATTR_EMULATE_PREPARES => FALSE,
        );
        $dsn = 'mysql:host=' . HOST . ';dbname=' . DATABASE;
        $instance = new PDO($dsn, USER, PASSWORD, $opt);
    }
    return $instance;
}

?>
In the above script we are having a connection to MySQL database using PHP Database Object, I have added `DB()` global function to use thought our future script which will be there in the next steps.
Note: please make sure to update the value of Database connection variable from the above script to math with your php-working environment. Ex. HOST, USER, PASSWORD and DATABASE
Step 4 – Write CRUD Functions:
Let’s write php code to handle create, read, update and delete operations, we are going to write Object Oriented Code to just make you familiar with. If you are a php beginner it will be great step for you to understand the basics of it.
Ok go ahead and open up the `library.php` file from the script folder and add following library script, you can find the explanation after this script.
`script/library.php`:
<?php

require __DIR__ . '/database_connection.php';

/**
 * Class Task
 */
class Task
{

    /**
     * @var mysqli|PDO|string
     */
    protected $db;

    /**
     * Task constructor.
     */
    public function __construct()
    {
        $this->db = DB();
    }

    /**
     * Add new Task
     *
     * @param $name
     * @param $description
     *
     * @return string
     */
    public function Create($name, $description)
    {
        $query = $this->db->prepare("INSERT INTO tasks(name, description) VALUES (:name,:description)");
        $query->bindParam("name", $name, PDO::PARAM_STR);
        $query->bindParam("description", $description, PDO::PARAM_STR);
        $query->execute();

        return json_encode(['task' => [
            'id'          => $this->db->lastInsertId(),
            'name'        => $name,
            'description' => $description
        ]]);
    }

    /**
     * List Tasks
     *
     * @return string
     */
    public function Read()
    {
        $query = $this->db->prepare("SELECT * FROM tasks");
        $query->execute();
        $data = array();
        while ($row = $query->fetch(PDO::FETCH_ASSOC)) {
            $data[] = $row;
        }

        return json_encode(['tasks' => $data]);
    }


    /**
     * Update Task
     *
     * @param $name
     * @param $description
     * @param $task_id
     */
    public function Update($name, $description, $task_id)
    {
        $query = $this->db->prepare("UPDATE tasks SET name = :name, description = :description WHERE id = :id");
        $query->bindParam("name", $name, PDO::PARAM_STR);
        $query->bindParam("description", $description, PDO::PARAM_STR);
        $query->bindParam("id", $task_id, PDO::PARAM_STR);
        $query->execute();
    }

    /**
     * Delete Task
     *
     * @param $task_id
     */
    public function Delete($task_id)
    {
        $query = $this->db->prepare("DELETE FROM tasks WHERE id = :id");
        $query->bindParam("id", $task_id, PDO::PARAM_STR);
        $query->execute();
    }
}
Quick review on `library.php` file script:
At the very beginning of the script you will find the require section where I am adding `database_connection.php` file to the library file so that we can access the database global function to communicate with the database.
Next we have a opening of Class `Task` and then the declaration of $db variable which is having ` protected ` as a prefix which is called access specifier to control the access of the variable, in this case we are just allowing $db variable to use in the Task class or it’s Sub classes.
`__construct()`: as name suggest we have constructer defined to initialize variables.
`Create($name, $description)`: This is method is used to create Record/Task into the database, it requires two arguments to pass while calling the method.
`Read()`: Used to read the records from the database.
`Update($name, $description, $task_id)`: Used to Update the existing record from the database and It required a three arguments while calling.
`Delete($task_id)`: Used to delete existing record using Task ID.
Watch complete AngularJS PHP CRUD Video Tutorial Series:
Step 5 – Index Page Basic Setup:
Next we need to add basic html code and import few required JS file into the `index.php` file, go ahead and open up the index.php file into you editor and use following code:
<!doctype html>
<html lang="en">
<head>
    <meta charset="UTF-8">
    <title>AngularJS Task Application</title>

    <!-- Bootstrap CSS File  -->
    <link rel="stylesheet" type="text/css" href="bootstrap/css/bootstrap.css"/>
</head>
<body>

<div>

    <!-- Content Section -->

    <!-- /Content Section -->

</div>

<!-- Jquery JS file -->
<script type="text/javascript" src="lib/jquery-1.11.3.min.js"></script>

<!-- AngularJS file -->
<script type="text/javascript" src="lib/angular.min.js"></script>

<!-- Bootstrap JS file -->
<script type="text/javascript" src="bootstrap/js/bootstrap.min.js"></script>

<!-- Custom JS file -->
<script type="text/javascript" src="lib/app.js"></script>
</body>
</html>
Quick overview on the above structure:
If you notice we have added very simple html code here, at the very beginning in header section after page title we have imported bootstrap CSS file as we are going to require that for the design.
Next.. in the body section we have our JS file loaded at the bottom, jQuery, AngularJS, Bootstrap and our own custom JS file called app.js.
So we have our basic setup is ready, to revise the tutorial as of now we have our database up and ready, Database connection, Library file along with the required CRUD function are all set and now we just did the index page setup, all right let’s get to the next step to complete this demo application.
Step 6 – Register AngularJS Module and Create Controller:
Let’s start diving into the AngularJS now, so in this step I am going to take you in to the AngularJS world, so whenever you need to use AngularJS into your application after importing JS file into the page you have register your AngularJS Module, let me show you how to that:
Go ahead and open up the app.js file from lib directory and add following line of code:
`lib/app.js`
var app = angular.module('App', []);
Next step is to create Angular JS controller, here is how we create controller:
`lib/app.js`
app.controller('TaskController', ['$scope', '$http', function ($scope, $http) {

}]);
We have our module and controller ready to call into the html, open up the index.php file and add `ng-app` directory along with `ng-controller` directive as showing below:
<!doctype html>
<html lang="en">
<head>
    <meta charset="UTF-8">
    <title>AngularJS Task Application</title>

    <!-- Bootstrap CSS File  -->
    <link rel="stylesheet" type="text/css" href="bootstrap/css/bootstrap.css"/>
</head>
<body ng-app="App">

<div ng-controller="TaskController">

    <!-- Content Section -->

    <!-- /Content Section -->

</div>
Step 7 – Read and List Records:
To read the records from angular JS we need to setup a function into AngularJS controller and call our php api to access the records from the database.
Open up the app.js file and add following function into angular JS controller as showing below:
app.controller('TaskController', ['$scope', '$http', function ($scope, $http) {

    // List of task
    $scope.tasks = [];

    $scope.listTasks = function () {
        $http.get('script/list.php', {})
            .then(function success(e) {
                $scope.tasks = e.data.tasks;
            }, function error(e) {

            });
    };
    $scope.listTasks();

}]);
`script/list.php`
<?php
require __DIR__ . '/library.php';

$task = new Task();

echo $task->Read();
?>
Next we are ready with records from the database we just needs to list them in to the index.php file, to list records use following script and add to it our content section of index page:
<div ng-controller="TaskController">

    <!-- Content Section -->
    <div class="container">
        <div class="row">
            <div class="col-md-12">
                <h1>AngularJS PHP CRUD Operations Using PDO Connection</h1>
            </div>
        </div>
        <div class="row">
            <div class="col-md-12">
                <div class="pull-right">
                    <button class="btn btn-success" data-toggle="modal" data-target="#add_new_task_modal">Add Task
                    </button>
                </div>
            </div>
        </div>
        <div class="row">
            <div class="col-md-12">
                <h3>Tasks:</h3>
                <table ng-if="tasks.length > 0" class="table table-bordered table-responsive table-striped">
                    <tr>
                        <th>No</th>
                        <th>Name</th>
                        <th>Description</th>
                        <th>Action</th>
                    </tr>
                    <tr ng-repeat="task in tasks">
                        <td>{{ $index + 1 }}</td>
                        <td>{{ task.name }}</td>
                        <td>{{ task.description }}</td>
                        <td>
                            <button ng-click="edit($index)"  class="btn btn-primary btn-xs">Edit</button>
                            <button ng-click="delete($index)" class="btn btn-danger btn-xs">Delete</button>
                        </td>
                    </tr>
                </table>
            </div>
        </div>
    </div>
    <!-- /Content Section -->

</div>
If you notice we have bit extra design already added such as Add Task button and Edit and Delete button along with the ng-click events right? don’t get confuse we are going to see that next just stat with me.
Step 8 – Add New Task:
As you see in step six we have added controller function, did the setup of a php api and then updated our index.php page, so now onward for next feature we are going to do repeat same steps
i) Add Controller Function to Add the Task:
`lib/app.js`
    // Add new task
    $scope.addTask = function () {
        $http.post('script/create.php', {
            task: $scope.task
        })
            .then(function success(e) {

                $scope.errors = [];

                $scope.tasks.push(e.data.task);

                var modal_element = angular.element('#add_new_task_modal');
                modal_element.modal('hide');

            }, function error(e) {
                $scope.errors = e.data.errors;
            });
    };
ii) Update the create.php api file to be able to store the record into the database:
`script/create.php`
<?php

$data = json_decode(file_get_contents('php://input'), TRUE);

if (isset($data['task'])) {

    require __DIR__ . '/library.php';

    $name = (isset($data['task']['name']) ? $data['task']['name'] : NULL);
    $description = (isset($data['task']['description']) ? $data['task']['description'] : NULL);

    // validated the request
    if ($name == NULL) {
        http_response_code(400);
        echo json_encode(['errors' => ["Name Field is required"]]);

    } else {

        // Add the task
        $task = new Task();

        echo $task->Create($name, $description);
    }
}
?>
iii) Add Bootstrap modal popup into the index.php page inside the controller scope:
`index.php`
<!-- /Content Section -->
<!-- Bootstrap Modals -->
<!-- Modal - Add New Task -->
<div class="modal fade" id="add_new_task_modal" tabindex="-1" role="dialog" aria-labelledby="myModalLabel">
<div class="modal-dialog" role="document">
<div class="modal-content">
<div class="modal-header">
<button type="button" class="close" data-dismiss="modal" aria-label="Close"><span
aria-hidden="true">×</span></button>
<h4 class="modal-title" id="myModalLabel">Add Task</h4>
</div>
<div class="modal-body">
<ul class="alert alert-danger" ng-if="errors.length > 0">
<li ng-repeat="error in errors">
{{ error }}
</li>
</ul>
<div class="form-group">
<label for="name">Name</label>
<input ng-model="task.name" type="text" id="name" class="form-control"/>
</div>
<div class="form-group">
<label for="description">Description</label>
<textarea ng-model="task.description" class="form-control" name="description"></textarea>
</div>
</div>
<div class="modal-footer">
<button type="button" class="btn btn-default" data-dismiss="modal">Cancel</button>
<button type="button" class="btn btn-primary" ng-click="addTask()">Add Task</button>
</div>
</div>
</div>
</div>
<!-- // Modal -->
Step 9 – Edit and Update Task:
As I said our first for each action is to add controller function, in this case we are going to required to two controller functions for each action accordingly
i.i) Function to execute when user click on edit button from the task list:
`lib/app.js`
    // open edit task details popup
    $scope.edit = function (index) {
        $scope.task_details = $scope.tasks[index];
        var modal_element = angular.element('#modal_update_task');
        modal_element.modal('show');
    };
i.ii) Function to execute when user clicks on update details button from the update modal popup.
`lib/app.js`
    // update the task
    $scope.updateTask = function () {
        $http.post('script/update.php', {
            task: $scope.task_details
        })
            .then(function success(e) {

                $scope.errors = [];

                var modal_element = angular.element('#modal_update_task');
                modal_element.modal('hide');

            }, function error(e) {
                $scope.errors = e.data.errors;
            });
    };
ii) Update the `script/update.php` api:
<?php

$data = json_decode(file_get_contents('php://input'), TRUE);

if (isset($data['task'])) {

    require __DIR__ . '/library.php';

    $name = (isset($data['task']['name']) ? $data['task']['name'] : NULL);
    $description = (isset($data['task']['description']) ? $data['task']['description'] : NULL);
    $task_id = (isset($data['task']['id']) ? $data['task']['id'] : NULL);

    // validations
    if ($name == NULL) {
        http_response_code(400);
        echo json_encode(['errors' => ["Name Field is required"]]);

    } else {

        // Update the Task
        $task = new Task();

        $task->Update($name, $description, $task_id);
    }
}

?>
iii) Add Bootstrap modal into the index.php page to show task details while updating:
<!-- Modal - Update Task -->
<div class="modal fade" id="modal_update_task" tabindex="-1" role="dialog" aria-labelledby="myModalLabel">
<div class="modal-dialog" role="document">
<div class="modal-content">
<div class="modal-header">
<button type="button" class="close" data-dismiss="modal" aria-label="Close"><span
aria-hidden="true">×</span></button>
<h4 class="modal-title" id="myModalLabel">Task Details</h4>
</div>
<div class="modal-body">
<ul class="alert alert-danger" ng-if="errors.length > 0">
<li ng-repeat="error in errors">
{{ error }}
</li>
</ul>
<div class="form-group">
<label for="name">Name</label>
<input ng-model="task_details.name" type="text" id="name" class="form-control"/>
</div>
<div class="form-group">
<label for="description">Description</label>
<textarea ng-model="task_details.description" class="form-control" name="description"></textarea>
</div>
</div>
<div class="modal-footer">
<button type="button" class="btn btn-default" data-dismiss="modal">Cancel</button>
<button type="button" class="btn btn-primary" ng-click="updateTask()">Save Changes</button>
</div>
</div>
</div>
</div>
<!-- // Modal -->
Step 10 – Delete the Task:
i) Create Controller Function for the delete action:
    // delete the task
    $scope.delete = function (index) {

        var conf = confirm("Do you really want to delete the task?");

        if (conf == true) {
            $http.post('script/delete.php', {
                task: $scope.tasks[index]
            })
                .then(function success(e) {

                    $scope.errors = [];

                    $scope.tasks.splice(index, 1);

                }, function error(e) {
                    $scope.errors = e.data.errors;
                });
        }
    };
ii) Update `script/delete.php` api:
<?php

$data = json_decode(file_get_contents('php://input'), TRUE);

if (isset($data['task'])) {

    require __DIR__ . '/library.php';

    $task_id = (isset($data['task']['id']) ? $data['task']['id'] : NULL);

    // Delete the Task
    $task = new Task();

    $task->Delete($task_id);
}

?>
We are done.. go ahead run your AngularJS application from your browser let me know if you find any errors or issue running the application, simply commenting using following comment section.
Do checkout live demo of this tutorial:
Happy coding.


Sir,
When i edit a data and after editing i press cancel button the edited data showed on the table…
this is a nice site
Thank for the script, but $this->db->lastInsertId() is not working in localhost with php 7.1.11
It should work, checkout twice there might be issue with database connection or in to the query execution.
the create function causes a 500 internal server error, whereas i did exactly the same thing as you except that my mysql field names are in uppercase letters plus lastinsertid () does not work in localhost on wamp server in php 7 anymore i do not do not understand why you use this system for a request insert into, thanks for the answer
hello i m rahul in demo i face one problem when i click edit button after open page when i edit data after cancel button data is store how to solve this problem. give me solution
Sir,
When i edit a data and after editing i press cancel button the edited data showed on the table…
Very nice, thank you!
Sir can i make a advanced crud application in Angularjs which contains some kind of modern desktop interface can you guide me how to implement it