Table of Contents
Using Google Multi Factor Authentication in PHP
I have posted different tutorials on login registration feature with PDO as well mysqli, today this tutorial is bringing up the new additional step towards the user level security that is PHP Multi factor authentication.
Google has introduced two step verification process with mobile application called `Google Authenticator App` which helps to bring in multi factor authentication.
By using google two-factor authentication you will be able to provide extra security layer to user, foreach and every login step user has to enter security code and it is different for each request it has 30-60 seconds timespan.
let’s start by looking at tutorial features and the technology we are going to use to build.
Tutorial Features:
- Register (Creating New User Account)
- Login
- Google Authenticator Configuration
- Two-Step verification
- State Management
Points to Learn:
- PHP (Object Oriented)
- MySQL
- PHP Data Object
- User of `password_hash()` and `password_verify()`
- Bootstrap
At the end of this tutorial, you should be able to create a login register application with multi factor authentication process.
Step 1: Download and Install Google Authenticator Application:
We are going to need Google Authenticator Application so before proceeding you should download and install application into your mobile phone, use following links to download the applications:


Step 2: Database Configuration:
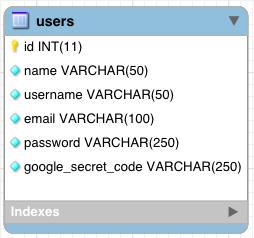
As we are building Login Registration system, we need a very basic table to store user details, along with that we need additional field to store `Google Secret Code`.
CREATE TABLE `users` (
  `id` int(11) NOT NULL AUTO_INCREMENT,
  `name` varchar(50) NOT NULL,
  `username` varchar(50) NOT NULL,
  `email` varchar(100) NOT NULL,
  `password` varchar(250) NOT NULL,
  `google_secret_code` varchar(250) NOT NULL,
  PRIMARY KEY (`id`)
);Step 3: Database Connection Script:
Create db_connection.php file and use following code, don’t forgot to update connection variables to match with your systems configuration:
I am going to store this file under `config` folder to make it more organized:
`config/db_connection.php`
/*
 * Name: DATABASE connection script
 * File name: db_connection.php
 * database Connection variables
 * */
define('HOST', 'localhost'); // Database host name ex. localhost
define('USER', 'root'); // Database user. ex. root ( if your on local server)
define('PASSWORD', 'root'); // Database user password  (if password is not set for user then keep it empty )
define('DATABASE', 'itech_auth'); // Database name
define('CHARSET', 'utf8');

function DB()
{
    static $instance;
    if ($instance === null) {
        $opt = array(
            PDO::ATTR_ERRMODE => PDO::ERRMODE_EXCEPTION,
            PDO::ATTR_DEFAULT_FETCH_MODE => PDO::FETCH_ASSOC,
            PDO::ATTR_EMULATE_PREPARES => FALSE,
        );
        $dsn = 'mysql:host=' . HOST . ';dbname=' . DATABASE . ';charset=' . CHARSET;
        $instance = new PDO($dsn, USER, PASSWORD, $opt);
    }
    return $instance;
}
`DB()` – this is global function which are going to use in the project while interacting with database.
Step 4: Registration Page:
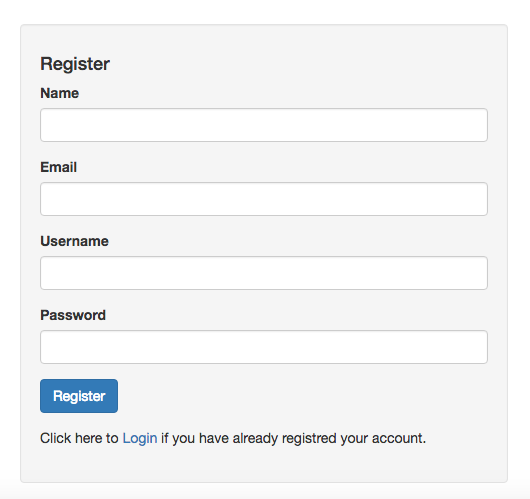
Create `registration.php` page and use following code do design our registration page.
<!doctype html>
<html lang="en">
<head>
    <meta charset="UTF-8">
    <title>Registration</title>
    <!-- Latest compiled and minified CSS -->
    <link rel="stylesheet" href="css/bootstrap.min.css">
</head>
<body>

<div class="container">
    <div class="row jumbotron">
        <div class="col-md-12">
            <h2>
                Demo: Using Google Two factor authentication in PHP
            </h2>
            <p>
                Note: This is demo version from iTech Empires tutorials. (Multi-factor Authentication)
            </p>
        </div>
    </div>
    <div class="row">
        <div class="col-md-5 col-md-offset-3 well">
            <h4>Register</h4>
            <?php
            if ($register_error_message != "") {
                echo '<div class="alert alert-danger"><strong>Error: </strong> ' . $register_error_message . '</div>';
            }
            ?>
            <form action="registration.php" method="post">
                <div class="form-group">
                    <label for="">Name</label>
                    <input type="text" name="name" class="form-control"/>
                </div>
                <div class="form-group">
                    <label for="">Email</label>
                    <input type="email" name="email" class="form-control"/>
                </div>
                <div class="form-group">
                    <label for="">Username</label>
                    <input type="text" name="username" class="form-control"/>
                </div>
                <div class="form-group">
                    <label for="">Password</label>
                    <input type="password" name="password" class="form-control"/>
                </div>
                <div class="form-group">
                    <input type="submit" name="btnRegister" class="btn btn-primary" value="Register"/>
                </div>
            </form>
            <div class="form-group">
                Click here to <a href="index.php">Login</a> if you have already registred your account.
            </div>
        </div>
    </div>
</div>

</body>
</html>
Step 5: Login Page:
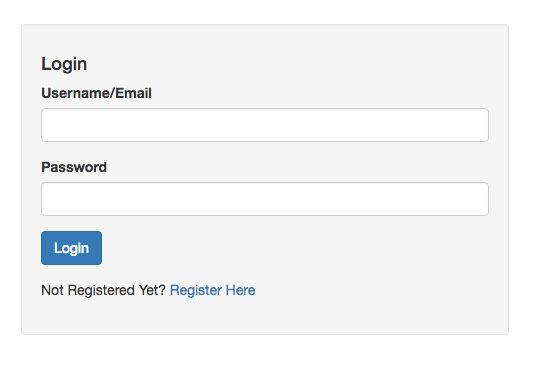
We are going to have login page on our index.php page, so let’s create new page called `index.php` and use below code to design login page.
<!doctype html>
<html lang="en">
<head>
    <meta charset="UTF-8">
    <title>Login</title>
    <!-- Latest compiled and minified CSS -->
    <link rel="stylesheet" href="css/bootstrap.min.css">
</head>
<body>

<div class="container">
    <div class="row jumbotron">
        <div class="col-md-12">
            <h2>
                Demo: Using Google Two factor authentication in PHP
            </h2>
            <p>
                Note: This is demo version from iTech Empires tutorials. (Multi-factor Authentication)
            </p>
        </div>
    </div>
    <div class="row">
        <div class="col-md-5 col-md-offset-3 well">
            <h4>Login</h4>
            <?php
            if ($login_error_message != "") {
                echo '<div class="alert alert-danger"><strong>Error: </strong> ' . $login_error_message . '</div>';
            }
            ?>
            <form action="index.php" method="post">
                <div class="form-group">
                    <label for="">Username/Email</label>
                    <input type="text" name="username" class="form-control"/>
                </div>
                <div class="form-group">
                    <label for="">Password</label>
                    <input type="password" name="password" class="form-control"/>
                </div>
                <div class="form-group">
                    <input type="submit" name="btnLogin" class="btn btn-primary" value="Login"/>
                </div>
            </form>
            <div class="form-group">
                Not Registered Yet? <a href="registration.php">Register Here</a>
            </div>
        </div>
    </div>
</div>

</body>
</html>Step 6: Create Library file:
As I said earlier, we will add Object Oriented concept to learn bit of it, so this library file is part of OOP, which is going to have a class and different functions according to our need, let’s create `library.php` file under `library` folder:
`library/library.php`
/*
 * Tutorial: Google Multi factor authentication in PHP
 *
 * Page: Application library
 * */

class DemoLib
{

    protected $db;

    function __construct($db)
    {
        $this->db = $db;
    }

    function __destruct()
    {
        $this->db = null;
    }

    /*
     * Register New User
     *
     * @param $name, $email, $username, $password, $auth_code
     * @return ID
     * */
    public function Register($name, $email, $username, $password, $google_secret_code)
    {
        $query = $this->db->prepare("INSERT INTO users(name, email, username, password, google_secret_code) VALUES (:name,:email,:username,:password,:google_secret_code)");
        $query->bindParam("name", $name, PDO::PARAM_STR);
        $query->bindParam("email", $email, PDO::PARAM_STR);
        $query->bindParam("username", $username, PDO::PARAM_STR);
        // $enc_password = password_hash($password, PASSWORD_DEFAULT, ['cost' => 11]);
        $hash = password_hash($password, PASSWORD_BCRYPT, ['cost' => 10]);
        $query->bindParam("password", $hash, PDO::PARAM_STR);
        $query->bindParam("google_secret_code", $google_secret_code, PDO::PARAM_STR);
        $query->execute();
        return $this->db->lastInsertId();
    }

    /*
     * Check Username
     *
     * @param $username
     * @return boolean
     * */
    public function isUsername($username)
    {
        $query = $this->db->prepare("SELECT id FROM users WHERE username=:username");
        $query->bindParam("username", $username, PDO::PARAM_STR);
        $query->execute();
        if ($query->rowCount() > 0) {
            return true;
        } else {
            return false;
        }
    }

    /*
     * Check Email
     *
     * @param $email
     * @return boolean
     * */
    public function isEmail($email)
    {
        $query = $this->db->prepare("SELECT id FROM users WHERE email=:email");
        $query->bindParam("email", $email, PDO::PARAM_STR);
        $query->execute();
        if ($query->rowCount() > 0) {
            return true;
        } else {
            return false;
        }
    }

    /*
     * Login
     *
     * @param $username, $password
     * @return $mixed
     * */
    public function Login($username, $password)
    {
        $query = $this->db->prepare("SELECT id, password FROM users WHERE username=:username OR email=:email");
        $query->bindParam("username", $username, PDO::PARAM_STR);
        $query->bindParam("email", $username, PDO::PARAM_STR);
        $query->execute();
        if ($query->rowCount() > 0) {
            $result = $query->fetch(PDO::FETCH_OBJ);
            $enc_password = $result->password;
            if (password_verify($password, $enc_password)) {
                return $result->id;
            } else {
                return false;
            }
        } else {
            return false;
        }
    }

    /*
     * get User Details
     *
     * @param $user_id
     * @return $mixed
     * */
    public function UserDetails($user_id)
    {
        $query = $this->db->prepare("SELECT id, name, username, email, google_secret_code FROM users WHERE id=:user_id");
        $query->bindParam("user_id", $user_id, PDO::PARAM_STR);
        $query->execute();
        if ($query->rowCount() > 0) {
            return $query->fetch(PDO::FETCH_OBJ);
        }
    }
}
Quick description: We have created DemoLib class along with few basic functions, this class accepts `$db` variable, which is the instance of PHP PDO Connection script, so whenever we need to call functions from this DemoLib Class we have to pass the PDF connection instance.
Overall, we have our core structure ready to use let’s making our registration from functional.
Step 7: User Registration:
Open up the `registration.php` file and add following code at the top of the file:
// Start Session
session_start();

// Database connection
require __DIR__ . '/config/db_connection.php';
$db = DB();

// Application library ( with DemoLib class )
require __DIR__ . '/library/library.php';
$app = new DemoLib($db);

require_once __DIR__ . '/GoogleAuthenticator/GoogleAuthenticator.php';
$pga = new PHPGangsta_GoogleAuthenticator();
$secret = $pga->createSecret();

$register_error_message = '';

// check Register request
if (!empty($_POST['btnRegister'])) {
    if ($_POST['name'] == "") {
        $register_error_message = 'Name field is required!';
    } else if ($_POST['email'] == "") {
        $register_error_message = 'Email field is required!';
    } else if ($_POST['username'] == "") {
        $register_error_message = 'Username field is required!';
    } else if ($_POST['password'] == "") {
        $register_error_message = 'Password field is required!';
    } else if (!filter_var($_POST['email'], FILTER_VALIDATE_EMAIL)) {
        $register_error_message = 'Invalid email address!';
    } else if ($app->isEmail($_POST['email'])) {
        $register_error_message = 'Email is already in use!';
    } else if ($app->isUsername($_POST['username'])) {
        $register_error_message = 'Username is already in use!';
    } else {
        $user_id = $app->Register($_POST['name'], $_POST['email'], $_POST['username'], $_POST['password'], $secret);
        // set session and redirect user to the profile page
        $_SESSION['user_id'] = $user_id;
        header("Location: confirm_google_auth.php");
    }
}
This is the script where we are creating new user in the system along with the unique Google Authenticator Code which is going to be a key while validating user request such as login.
If you see above code, you will notice we are redirecting user to the next page that is Device confirmation, please make sure you have your mobile phone ready with the `Authenticator` Application installed.
Step 8: User Device Conformation:
Let’s create new page called `confirm_google_auth.php` and use following code:
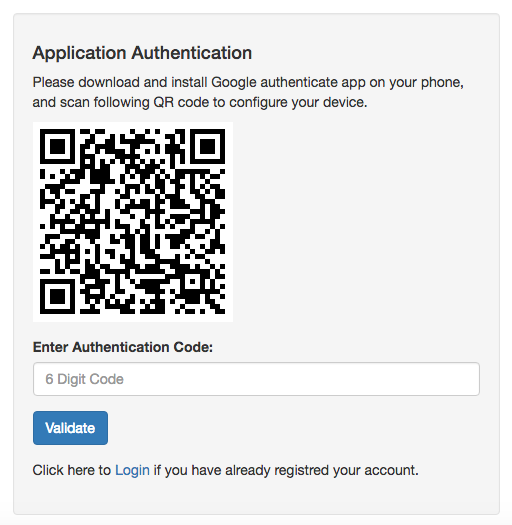
Keep in mind we are validating user here, meaning GoogleAuthenticator is going to need QR Code image of Google Secrete code which we had stored along with the user record while creating new user.
So, in this step we are going to fetch specific user google secret code and will generate QR code.
`confirm_google_auth.php`
// Start Session
session_start();

// Database connection
require __DIR__ . '/config/db_connection.php';
$db = DB();

// Application library ( with DemoLib class )
require __DIR__ . '/library/library.php';
$app = new DemoLib($db);
$user = $app->UserDetails($_SESSION['user_id']);

require_once __DIR__ . '/GoogleAuthenticator/GoogleAuthenticator.php';
$pga = new PHPGangsta_GoogleAuthenticator();
$qr_code =  $pga->getQRCodeGoogleUrl($user->email, $user->google_secret_code, 'itechempires.com');

$error_message = '';

if (isset($_POST['btnValidate'])) {

    $code = $_POST['code'];

    if ($code == "") {
        $error_message = 'Please Scan above QR code to configure your application and enter genereated authentication code to validated!';
    }
    else
    {
        if($pga->verifyCode($user->google_secret_code, $code, 2))
        {
            // success
            header("Location: profile.php");
        }
        else
        {
            // fail
            $error_message = 'Invalid Authentication Code!';
        }
    }
}
?>
<!doctype html>
<html lang="en">
<head>
    <meta charset="UTF-8">
    <title>Confirm User Device</title>
    <!-- Latest compiled and minified CSS -->
    <link rel="stylesheet" href="css/bootstrap.min.css">
</head>
<body>

<div class="container">
    <div class="row jumbotron">
        <div class="col-md-12">
            <h2>
                Demo: Using Google Two factor authentication in PHP
            </h2>
            <p>
                Note: This is demo version from iTech Empires tutorials. (Multi-factor Authentication)
            </p>
        </div>
    </div>
    <div class="row">
        <div class="col-md-5 col-md-offset-3 well">
            <h4>Application Authentication</h4>

            <p>
                Please download and install Google authenticate app on your phone, and scan following QR code to configure your device.
            </p>

            <div class="form-group">
                <img src="<?php echo $qr_code; ?>">
            </div>

            <form method="post" action="confirm_google_auth.php">
                <?php
                if ($error_message != "") {
                    echo '<div class="alert alert-danger"><strong>Error: </strong> ' . $error_message . '</div>';
                }
                ?>
                <div class="form-group">
                    <label for="code">Enter Authentication Code:</label>
                    <input type="text" name="code" placeholder="6 Digit Code" class="form-control">
                </div>
                <div class="form-group">
                    <button type="submit" name="btnValidate" class="btn btn-primary">Validate</button>
                </div>
            </form>

            <div class="form-group">
                Click here to <a href="index.php">Login</a> if you have already registered your account.
            </div>
        </div>
    </div>
</div>

</body>
</html>
Step 9: Create profile page:
We are going to need a sample profile page to redirect user when successfully login or after getting device confirmation. let’s create that.
`profile.php`
// Start Session
session_start();

// check user login
if(empty($_SESSION['user_id']))
{
    header("Location: index.php");
}

// Database connection
require __DIR__ . '/config/db_connection.php';
$db = DB();

// Application library ( with DemoLib class )
require __DIR__ . '/library/library.php';
$app = new DemoLib($db);
$user = $app->UserDetails($_SESSION['user_id']);

?>
<!doctype html>
<html lang="en">
<head>
    <meta charset="UTF-8">
    <title>User Profile</title>
    <!-- Latest compiled and minified CSS -->
    <link rel="stylesheet" href="css/bootstrap.min.css">
</head>
<body>

<div class="container">
    <div class="row jumbotron">
        <div class="col-md-12">
            <h2>
                Demo: Using Google Two factor authentication in PHP
            </h2>
            <p>
                Note: This is demo version from iTech Empires tutorials. (Multi-factor Authentication)
            </p>
        </div>
    </div>
    <div class="row">
        <div class="col-md-5 col-md-offset-3 well">
            <h2>User Profile</h2>
            <h4>Welcome <?php echo $user->name; ?></h4>
            <p>Account Details:</p>
            <p>Name: <?php echo $user->name; ?></p>
            <p>Username <?php echo $user->username; ?></p>
            <p>Email <?php echo $user->email; ?></p>
            <br>
            Click here to <a href="logout.php">Logout</a>
        </div>
    </div>
</div>

</body>
</html>
Step 10: Login Script:
We have completed our first workflow of creating and validating device of new user, now we need add login feature, we have our design ready on `index.php` go ahead and open that page and add following code:
// Start Session
session_start();

// Database connection
require __DIR__ . '/config/db_connection.php';
$db = DB();

// Application library ( with DemoLib class )
require __DIR__ . '/library/library.php';
$app = new DemoLib($db);

$login_error_message = '';

// check Login request
if (!empty($_POST['btnLogin'])) {

    $username = trim($_POST['username']);
    $password = trim($_POST['password']);

    if ($username == "") {
        $login_error_message = 'Username field is required!';
    } else if ($password == "") {
        $login_error_message = 'Password field is required!';
    } else {
        $user_id = $app->Login($username, $password); // check user login
        if($user_id > 0)
        {
            $_SESSION['user_id'] = $user_id; // Set Session
            header("Location: validate_login.php"); // Redirect user to validate auth code
        }
        else
        {
            $login_error_message = 'Invalid login details!';
        }
    }
}
?>
We are doing a simple common operation here to validated user credentials and if valid details found we are redirecting user to extra step that is validated security code.
Step 11: Validated Security Code:
`validate_login.php`
// Start Session
session_start();

// Database connection
require __DIR__ . '/config/db_connection.php';
$db = DB();

// Application library ( with DemoLib class )
require __DIR__ . '/library/library.php';
$app = new DemoLib($db);
$user = $app->UserDetails($_SESSION['user_id']);

require_once __DIR__ . '/GoogleAuthenticator/GoogleAuthenticator.php';
$pga = new PHPGangsta_GoogleAuthenticator();

$error_message = '';

if (isset($_POST['btnValidate'])) {

    $code = $_POST['code'];

    if ($code == "") {
        $error_message = 'Please enter authentication code to validated!';
    }
    else
    {
        if($pga->verifyCode($user->google_secret_code, $code, 2))
        {
            // success
            header("Location: profile.php");
        }
        else
        {
            // fail
            $error_message = 'Invalid Authentication Code!';
        }
    }
}
?>
<!doctype html>
<html lang="en">
<head>
    <meta charset="UTF-8">
    <title>Validate Login</title>
    <!-- Latest compiled and minified CSS -->
    <link rel="stylesheet" href="css/bootstrap.min.css">
</head>
<body>

<div class="container">
    <div class="row jumbotron">
        <div class="col-md-12">
            <h2>
                Demo: Using Google Two factor authentication in PHP
            </h2>
            <p>
                Note: This is demo version from iTech Empires tutorials. (Multi-factor Authentication)
            </p>
        </div>
    </div>
    <div class="row">
        <div class="col-md-5 col-md-offset-3 well">
            <h4>Multi Factor Authentication</h4>

            <form method="post" action="validate_login.php">
                <?php
                if ($error_message != "") {
                    echo '<div class="alert alert-danger"><strong>Error: </strong> ' . $error_message . '</div>';
                }
                ?>
                <div class="form-group">
                    <input type="text" name="code" placeholder="Enter Authentication Code" class="form-control">
                </div>
                <div class="form-group">
                    <button type="submit" name="btnValidate" class="btn btn-primary">Validate</button>
                </div>
            </form>

            <div class="form-group">
                Click here to <a href="index.php">Login</a> if you have already registered your account.
            </div>
        </div>
    </div>
</div>

</body>
</html>
Step 12: User Logout:
Finally, we need user logout page, use following to create `logout.php` page:
// start session
session_start();

// Destroy user session
unset($_SESSION['user_id']);

// Redirect to index.php page
header("Location: index.php");
?>
You can download or check live demo using below links:
Get Complete Source Code


not working the codes. please gave back my paypal credits
You must be having an issues with the implementation, kindly checkout the live demo it’s working. and the code delivered to you is completely same as from the live demo. do checkout step by step and let me know if it’s still doesn’t work.
Hi there, the code is working in implementation but some bugs occurs. When I try to login then I can access the home page without putting the auth code. I tried as much decoding and searching to not access the home page but still user can access the home page. Your work is not complete.
This is not right @markjerard:disqus .. I am telling you again do checkout demo first -http://demos.itechempires.com/php-google-two-factor-authentication/ also https://www.youtube.com/watch?v=tkcopVlSmRA
and then fell free to comment.
file /GoogleAuthenticator/GoogleAuthenticator.php ???????
Ok, this line in is incorrect in confirm_google_auth.php
$user = $app->UserDetails($_SESSION[‘user_id’]);
Should be
$user = $app->UserDetails($_SESSION[‘username’]);
From where I can get /GoogleAuthenticator/GoogleAuthenticator.php ?
Al implementarlo localmente no funciona escaneo el codigo e ingreso los digitosque me pide y siempre me dice que el codigo es incorrecto, estoy usando la version descargada de aqui.
@victor Make sure to check code multiple time the code you have downloaded is tested and it works, if you want you can checkout I Tech empires live demo on Google Multi factor authentication it is available at – Google Multi factor authentication Live Demo
thank a lot for explaining straight forward.
One question, Google Code is change in 30 seconds in app. but old code also working.
is it? or I make mistake some where?
where is the /GoogleAuthenticator/GoogleAuthenticator.php file??
Worked well, thanks for the turorial .. one thing to note, i just used
`$qrCodeUrl = $ga->getQRCodeGoogleUrl(‘My App’, $secret);`
how to hide QRcode once configured in google authenticater app
How secure is the confirm_google_auth.php page, since anyone can access it without being required to sign in. Also, you are exposing the database connections to user without being signed in.