
In this tutorial I am going to provide step by step guide to implement CREAT, READ, UPDATE and DELETE Operations using Laravel 5.2 PHP Framework.
Table of Contents
Development Platform:
Laravel Provides Homestead development environment, it’s my preferred option while working with Laravel project.
It has all required configuration ready to use for the framework, if you haven’t heard about homestead just visit Laravel official website for download and installation. however, you can also continue with your existing environment it can be LAMP, MAPM or WAMP just make sure with the following software’s and extensions.
- PHP >= 5.5.9
- OpenSSL PHP Extension
- PDO PHP Extension
- Mbstring PHP Extension
- Tokenizer PHP Extension
- Composer
If you have your server configuration ready to use, then let’s get started with the first step to install Laravel framework.
Step 1: Install Laravel:
Open up the terminal and navigate `cd` to your server root directory and type in following command to install Laravel, application directory is dependent on where your server root is located, for example LAMP is having it set to `/var/www/`.
let’s see what happen next!
sudo composer create-project --prefer-dist laravel/laravel crud-demo

After Installing Laravel successfully you should see `crud-demo` folder with Laravel application, change the file permissions to be able read, write and execute to do that use following command, make sure you have provided correct path.
sudo chmod -R 775 crud-demo/
You can try to run newly installed Laravel project on browser, in my case the URL is: http://crud-demo.dev:8888. it should show up Laravel welcome screen.

Step 2: Database Connection Settings:
Create a database and change settings from `. env` file showing below, make sure to mention password if database user is having password set.
DB_CONNECTION=mysql
DB_HOST=127.0.0.1
DB_PORT=3306
DB_DATABASE=crud_demo
DB_USERNAME=homestead
DB_PASSWORD=secret
Step 3: Database migration:
Basically, we are going to setup database table with Laravel migration, use following command to create migration file from terminal and open it up in the editor. (All migration files are located in `database/migrations` folder)
php artisan make:migration create_tasks_table --create=tasks
Update the Schema to specify table fields as showing below:
use IlluminateDatabaseSchemaBlueprint;
use IlluminateDatabaseMigrationsMigration;

class CreateTasksTable extends Migration
{
    /**
     * Run the migrations.
     *
     * @return void
     */
    public function up()
    {
        Schema::create('tasks', function (Blueprint $table) {
            $table->increments('id');
            $table->string('name');
            $table->text('description');
            $table->timestamps();
        });
    }

    /**
     * Reverse the migrations.
     *
     * @return void
     */
    public function down()
    {
        Schema::drop('tasks');
    }
}
If you ready with the migration file use following to migrate the table.
php artisan migrate
You will get `Migration table created successfully. ` message in your terminal.
Let’s go the next step to create `Laravel Model` for task table.
Step 4: Create Eloquent Model:
php artisan make:model Task
Open the `Task.php` file, it should be located in `app/Task.php` directory and add `$fillable` variable.
namespace App;

use IlluminateDatabaseEloquentModel;

class Task extends Model
{
    public $fillable = ['name', 'description'];
}
Step 5: Define Routes:
In Laravel we have to define routes to handle request and response, route can be defined in `app/Http/routes.php` file. open up the routes file and add following code to define routes for our CRUD operations.
Route::get('/', 'TaskController@index');

Route::resource('tasks', 'TaskController');
`Route::get(‘/’, ‘TaskController@index’);` – To list task by default on home page.
`Route::resource(‘tasks’, ‘TaskController’);` – Resource route it will generate CRUD URI.
ex. http://crud-demo.dev:8888/ or we can use resource route that is http://crud-demo.dev:8888/tasks both will work same.
We need to add our resource controller for `tasks` routes, go ahead and create controller using following command:
php artisan make:controller TaskController --resource
Controller are located in `app/Http/Controllers` directory, you open up the TaskController to view file it should match with below controller file:
`TaskController.php`:
namespace AppHttpControllers;

use IlluminateHttpRequest;

use AppHttpRequests;

class TaskController extends Controller
{
    /**
     * Display a listing of the resource.
     *
     * @return IlluminateHttpResponse
     */
    public function index()
    {
        //
    }

    /**
     * Show the form for creating a new resource.
     *
     * @return IlluminateHttpResponse
     */
    public function create()
    {
        //
    }

    /**
     * Store a newly created resource in storage.
     *
     * @param  IlluminateHttpRequest  $request
     * @return IlluminateHttpResponse
     */
    public function store(Request $request)
    {
        //
    }

    /**
     * Display the specified resource.
     *
     * @param  int  $id
     * @return IlluminateHttpResponse
     */
    public function show($id)
    {
        //
    }

    /**
     * Show the form for editing the specified resource.
     *
     * @param  int  $id
     * @return IlluminateHttpResponse
     */
    public function edit($id)
    {
        //
    }

    /**
     * Update the specified resource in storage.
     *
     * @param  IlluminateHttpRequest  $request
     * @param  int  $id
     * @return IlluminateHttpResponse
     */
    public function update(Request $request, $id)
    {
        //
    }

    /**
     * Remove the specified resource from storage.
     *
     * @param  int  $id
     * @return IlluminateHttpResponse
     */
    public function destroy($id)
    {
        //
    }
}
Use following command to list and make sure you have all required routes ready to use.
php artisan route:list
In this case if you run the above command, it will list out following routes:

Step 6: Install required HTML Package:
I am going to use `FORM` class in our blade templates, Laravel has removed HTML package from the default configuration, follow next steps to pull html package in using composer
Edit your `composer.json` file:
"require": {
    "laravelcollective/html": "5.2.*"
}
Next, use terminal to update composer:
composer update
You will see composer is going to pull the package from the repository to our project.
Add new provides in `config/app.php` file:
'providers' => [
    CollectiveHtmlHtmlServiceProvider::class,
  ],
Add following classes the aliases array of `config/app.php` file:
  'aliases' => [
      'Form' => CollectiveHtmlFormFacade::class,
      'Html' => CollectiveHtmlHtmlFacade::class,
  ],
We are good to go the next step to do some designing and coding.
Step 7: Design Layout using Blade Template:
We are going to use layout for all crud pages, Layout is basically a master page for all child pages from the project, Laravel layouts help us to re-use same code within multiple pages.
Create layout page under `resources/views/layouts/master.blade.php` and add following code:
<!doctype html>
<html lang="en">
<head>
    <meta charset="UTF-8">
    <title>Task List</title>

    <!-- Bootstrap CSS File  -->
    <link rel="stylesheet" type="text/css" href="{{ URL::asset('bootstrap/css/bootstrap.min.css') }}"/>
</head>
<body>

<div class="container">

    <nav class="navbar navbar-default">
        <div class="container-fluid">
            <div class="navbar-header">
                <a class="navbar-brand" href="#">Laravel CRUD Operations Demo</a>
            </div>
            <ul class="nav navbar-nav">

            </ul>
        </div>
    </nav>

    <head>
        <h1></h1>
    </head>

    @yield('content')

</div>
</body>
</html>
We have our master page ready to use along with the basic bootstrap design now we will have to pull in bootstrap files from getbootstrap.com and add those files to public directory of the project.
Next you will see `@yield(‘content’)` – this is section we are going implement in the child pages.
let’s create folder named `task` under `resources/views/`, here we are going to store our views so it will good to organise our project folder structure. I would prefer you to use this kind of file structure for every project it’s good to have organised.
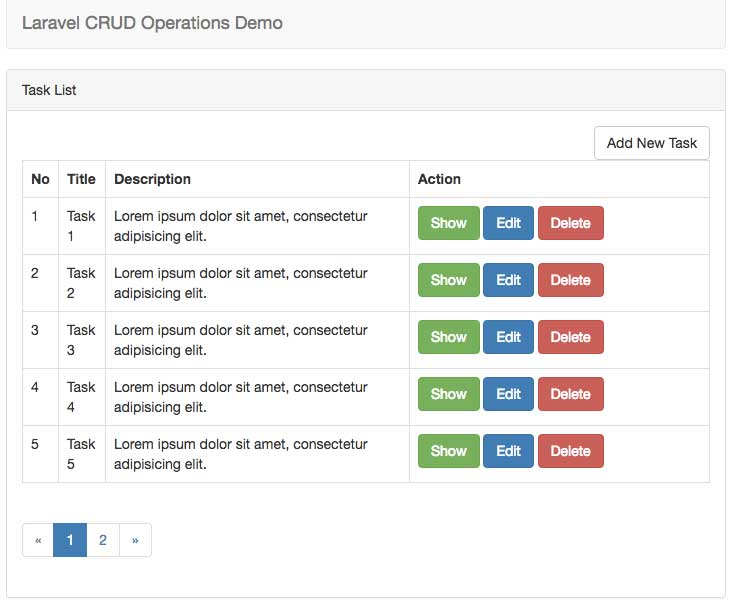
List view:
Create `resources/views/task/list.blade.php` file and following code:
@extends('layouts.master')

@section('content')

    @if ($message = Session::get('success'))
        <div class="alert alert-success">
            <p>{{ $message }}</p>
        </div>
    @endif

    <div class="panel panel-default">
        <div class="panel-heading">
            Task List
        </div>
        <div class="panel-body">
            <div class="form-group">
                <div class="pull-right">
                    <a href="/tasks/create" class="btn btn-default">Add New Task</a>
                </div>
            </div>

            <table class="table table-bordered table-stripped">
                <tr>
                    <th width="20">No</th>
                    <th>Title</th>
                    <th>Description</th>
                    <th width="300">Action</th>
                </tr>
                @if (count($tasks) > 0)
                    @foreach ($tasks as $key => $task)
                        <tr>
                            <td>{{ ++$i }}</td>
                            <td>{{ $task->name }}</td>
                            <td>{{ $task->description }}</td>
                            <td>
                                <a class="btn btn-success" href="{{ route('tasks.show',$task->id) }}">Show</a>
                                <a class="btn btn-primary" href="{{ route('tasks.edit',$task->id) }}">Edit</a>
                                {{ Form::open(['method' => 'DELETE','route' => ['tasks.destroy', $task->id],'style'=>'display:inline']) }}
                                {{ Form::submit('Delete', ['class' => 'btn btn-danger']) }}
                                {{ Form::close() }}
                            </td>
                        </tr>
                    @endforeach
                @else
                    <tr>
                        <td colspan="4">Tasks not found!</td>
                    </tr>
                @endif
            </table>

            {{ $tasks->render() }}

        </div>
    </div>

@endsection
If you have a look on above code, you will see what I was talking about calling our layout page, so at the very top we are extending the layout page and implementing the content section which is going to render in the content variable of layout.
In content section first, we have bootstrap design I am using bootstrap panel here to get more better look, you can look the bootstrap CSS classes for panel for example `panel-heading` and `panel-body`.
Next there is html table to loop throughout the `$tasks` variable which are going to see step by step, for now just keep in mind that whenever you need to call, you should pass `$tasks` variable.
:
Don’t forgot we are going to have pagination at the of the task list, `rendor()` is going to help to generate pagination.
Let’s have a look on our listing view:
Create View:
Create new file under `resources/views/task/create.blade.php`, we are going to use this view to have us create new task form, use following code and add to the create.blade.php page.
@extends('layouts.master')

@section('content')

    <div class="panel panel-default">
        <div class="panel-heading">Add New Task</div>
        <div class="panel-body">

            @if (count($errors) > 0)
                <div class="alert alert-danger">
                    <strong>Errors:</strong>
                    <ul>
                        @foreach ($errors->all() as $error)
                            <li>{{ $error }}</li>
                        @endforeach
                    </ul>
                </div>
            @endif

            {{ Form::open(array('route' => 'tasks.store','method'=>'POST')) }}
            <div class="form-group">
                <label for="name">Name</label>
                <input type="text" name="name" class="form-control" value="{{  old('name') }}">
            </div>
            <div class="form-group">
                <label for="description">Description</label>
                <textarea name="description" class="form-control" rows="3">{{  old('description') }}</textarea>
            </div>
            <div class="form-group">
                <input type="submit" value="Add Task" class="btn btn-info">
                <a href="{{ route('tasks.index') }}" class="btn btn-default">Cancel</a>
            </div>
            {{ Form::close() }}
        </div>
    </div>

@endsection
Here again we are using same master page, so that’s the reusability Okay next we have our create task form here along with the Error section.

Edit View:
Add `resources/views/task/edit.blade.php` and add following code:
@extends('layouts.master')

@section('content')

    <div class="panel panel-default">
        <div class="panel-heading">Edit Task</div>
        <div class="panel-body">

            @if (count($errors) > 0)
                <div class="alert alert-danger">
                    <strong>Errors:</strong>
                    <ul>
                        @foreach ($errors->all() as $error)
                            <li>{{ $error }}</li>
                        @endforeach
                    </ul>
                </div>
            @endif

            {!! Form::model($task, ['method' => 'PATCH','route' => ['tasks.update', $task->id]]) !!}
            <div class="form-group">
                <label for="name">Name</label>
                <input type="text" name="name" class="form-control" value="{{  $task->name }}">
            </div>
            <div class="form-group">
                <label for="description">Description</label>
                <textarea name="description" class="form-control" rows="3">{{  $task->description }}</textarea>
            </div>
            <div class="form-group">
                <input type="submit" value="Save Changes" class="btn btn-info">
                <a href="{{ route('tasks.index')  }}" class="btn btn-default">Cancel</a>
            </div>
            {!! Form::close() !!}
        </div>
    </div>

@endsection

Show View:
Add `resources/views/task/show.blade.php` to have task details page, go ahead and use following code:
@extends('layouts.master')

@section('content')

    <div class="panel panel-default">
        <div class="panel-heading">
            View Task
        </div>
        <div class="panel-body">
            <div class="pull-right">
                <a class="btn btn-default" href="{{ route('tasks.index')  }}">Go Back</a>
            </div>
            <div class="form-group">
                <strong>Name: </strong> {{ $task->name  }}
            </div>
            <div class="form-group">
                <strong>Description: </strong> {{ $task->description  }}
            </div>
        </div>
    </div>

@endsection

Step 8: Update TaskController file:
Finally, we have to do focus on the import part of the tutorial, which our `TaskController`, go ahead and edit `TaskController.php` file, and try to match with the following functions. we need to update each function.
namespace AppHttpControllers;

use AppTask;
use IlluminateHttpRequest;

use AppHttpRequests;

class TaskController extends Controller
{
    /**
     * Display a listing of the resource.
     *
     * @return IlluminateHttpResponse
     */
    public function index(Request $request)
    {
        $tasks = Task::orderBy('name','ASC')->paginate(5);
        return view('task.list',compact('tasks'))->with('i', ($request->input('page', 1) - 1) * 5);
    }

    /**
     * Show the form for creating a new resource.
     *
     * @return IlluminateHttpResponse
     */
    public function create()
    {
        return view('task.create');
    }

    /**
     * Store a newly created resource in storage.
     *
     * @param  IlluminateHttpRequest $request
     * @return IlluminateHttpResponse
     */
    public function store(Request $request)
    {
        // validated input request
        $this->validate($request, [
            'name' => 'required',
            'description' => 'required'
        ]);

        // create new task
        Task::create($request->all());
        return redirect()->route('tasks.index')->with('success', 'Your task added successfully!');
    }

    /**
     * Display the specified resource.
     *
     * @param  int $id
     * @return IlluminateHttpResponse
     */
    public function show($id)
    {
        $task = Task::find($id);
        return view('task.show',compact('task'));
    }

    /**
     * Show the form for editing the specified resource.
     *
     * @param  int $id
     * @return IlluminateHttpResponse
     */
    public function edit($id)
    {
        $task = Task::find($id);
        return view('task.edit', compact('task'));
    }

    /**
     * Update the specified resource in storage.
     *
     * @param  IlluminateHttpRequest $request
     * @param  int $id
     * @return IlluminateHttpResponse
     */
    public function update(Request $request, $id)
    {
        $this->validate($request, [
            'name' => 'required',
            'description' => 'required'
        ]);
        Task::find($id)->update($request->all());
        return redirect()->route('tasks.index')->with('success','Task updated successfully');
    }

    /**
     * Remove the specified resource from storage.
     *
     * @param  int $id
     * @return IlluminateHttpResponse
     */
    public function destroy($id)
    {
        Task::find($id)->delete();
        return redirect()->route('tasks.index')->with('success','Task removed successfully');
    }
}
If you checkout the controller I have added all the operations that we going to needs to handle our resource route along with the blade templates:
Quick description RESTful functions:
`index()` – use to get task from the table and return with `task.list` view.
`create()` – returns `task.create` view.
`store()` – handle post request getting from create view, validated the request, create new task and redirect to `tasks.index` route along with the success message.
`show()` – find the task details according to the ID and returns `task.show` view.
`edit()` – find the task details with the specified ID and returns `task.edit` view.
`update()` – handle request coming from edit view, validate the request, update the record and redirect to the `tasks.index` route.
`destroy()` – handle Delete method, deletes the record from the table using eloquent modal and redirects back to the `tasks.index` route.
We are done, I think having read this tutorial you should be able to use Laravel now with the it’s important features like eloquent, middleware, routes and controller.
Go start building great Laravel applications.
Feel free to comments if you get any issues using this tutorial or you have any question, I always do my best to respond.
To download complete source for this tutorial you can simply visit GitHub repository to clone/download source code – https://github.com/itechempires/Laravel-5.2-CRUD-Application
Don’t forgot to share on social media, sharing is caring.
Thanks, keep learning…!
What does “public $fillable = [ ];” mean?
It is used to set the fillable attributes for the model to serves as a “white list” of attributes that should be mass assignable.
FatalErrorException in ProviderRepository.php line 146:
Class ‘Illuminate\Notifications\NotificationServiceProvider’ not found
How to solve it i have done all process.plz help me
Thanks a lot for this intersting tutorial. But, I am facing an issue : when I click on “Add New Task” , I got this error : The requested URL /tasks/create was not found on this server.
HTML package is missing from the project, follow the Step 6: Install required HTML Package and you will be good to go.
i do the step but it’s still the same
thanks for this tuitorials, it works find in 5.4, got some error regarding html but i fixed it and run it fine. cool. thanks.
Great, Keep Going!